If you want to sell to the local audience, you should create a multilingual website.
Because why not use the language your customers speak?
You could also get a competitive advantage with a multilingual website. You could win the hearts of your audience by creating a website version on the language they are comfortable with.
If you are a local business or someone selling to non-English speaking communities, implementing another language would boost your sales.
Plus, creating a multilingual website in WordPress is a piece of cake once you get the hang of it.
You just need to install a plugin, and your website is ready for another language.
There are many plugins out there, but in this guide, we will use Polylang. We recommend Polylang because it’s free and easy-to-use.
You can create posts, pages, categories, and even post tags and then define the language for each of them with this plugin. With Polylang, you can use as many languages as you want on your website. It supports RTL language scripts as well.
All the WordPress languages are automatically downloaded and updated in the Polylang plugin. You can also use the automatic translation if you are in a hurry.
We prefer using manual translation because auto-translation isn’t accurate, at least for the language, Espanol, we will be translating into in this guide.
So, let’s get started.
Features of Polylang Plugin
- Supports unlimited languages
- Fully compatible with RTL scripts
- Can translate posts, pages, media, categories, menu, widgets, and other theme options.
- Can add a language switcher widget or navigation menu
Create Multilingual WordPress Website With Polylang
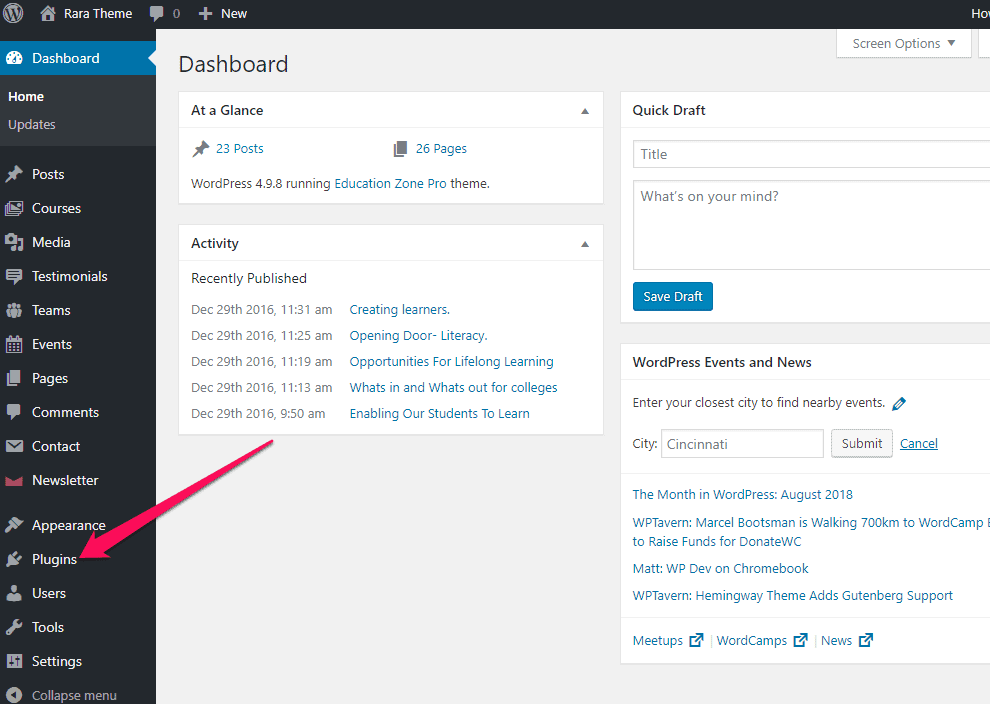
Step 1: Installing Polylang
First, we need to install the Polylang plugin on the WordPress website.
- Login to your WordPress Dashboard
- Go to Plugins
- Click on Add New
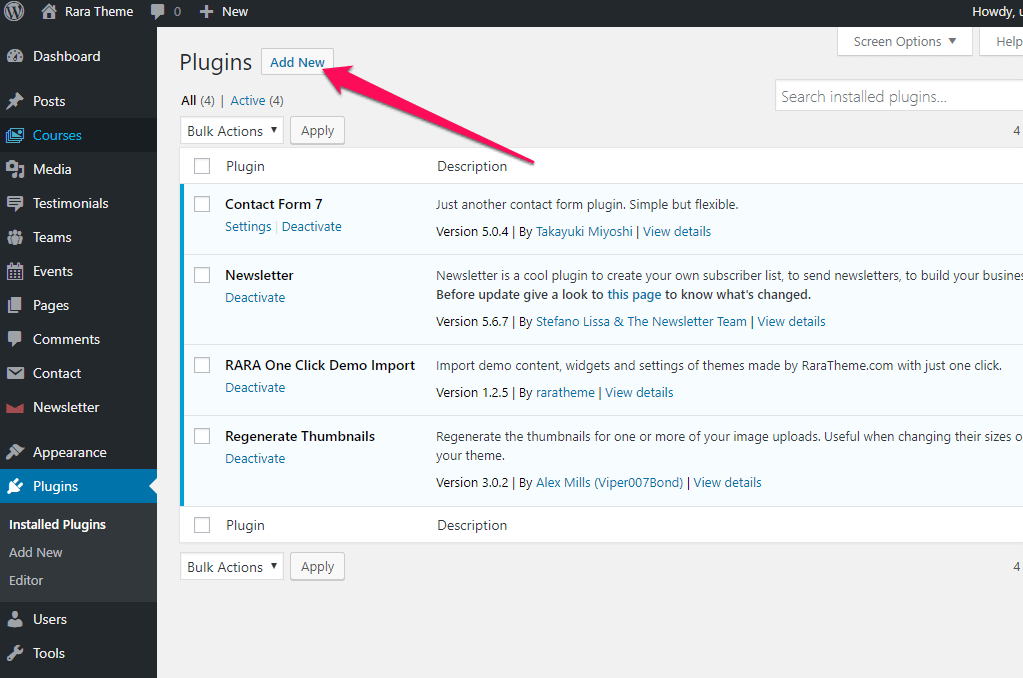
- Search for Polylang plugin and click on Install Now
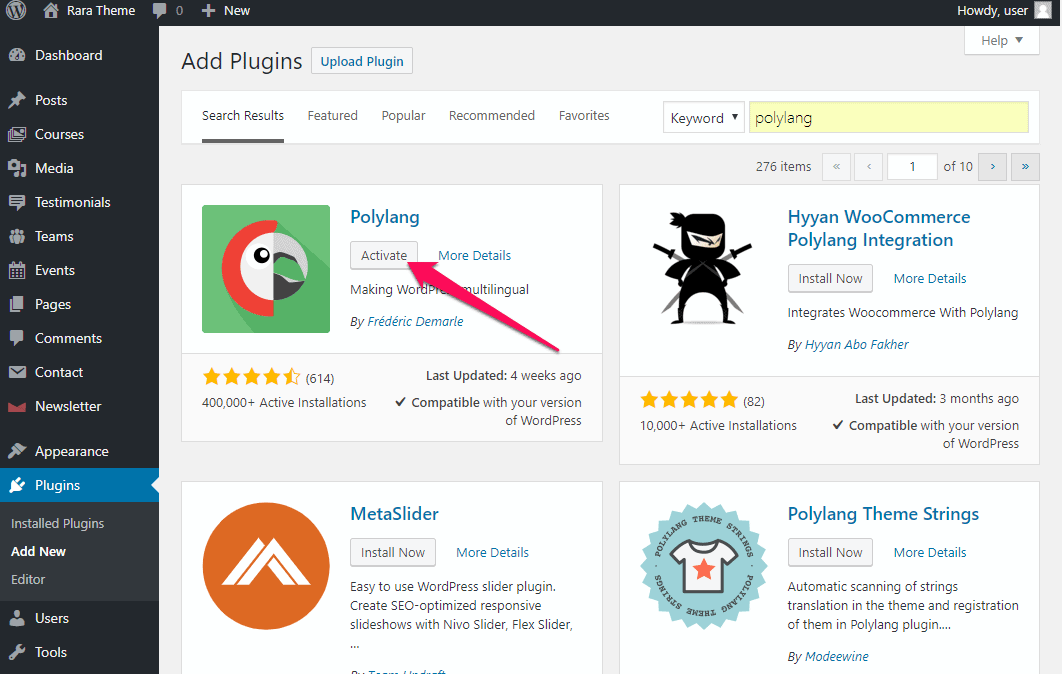
- Click on Activate, once the plugin is installed. Once activated, you will see Languages option on the dashboard.
After the plugin is installed, you need to go ahead and configure the Polylang plugin. Polylang comes with 90+ languages predefined into it. The first step is to add the languages you want on your website.
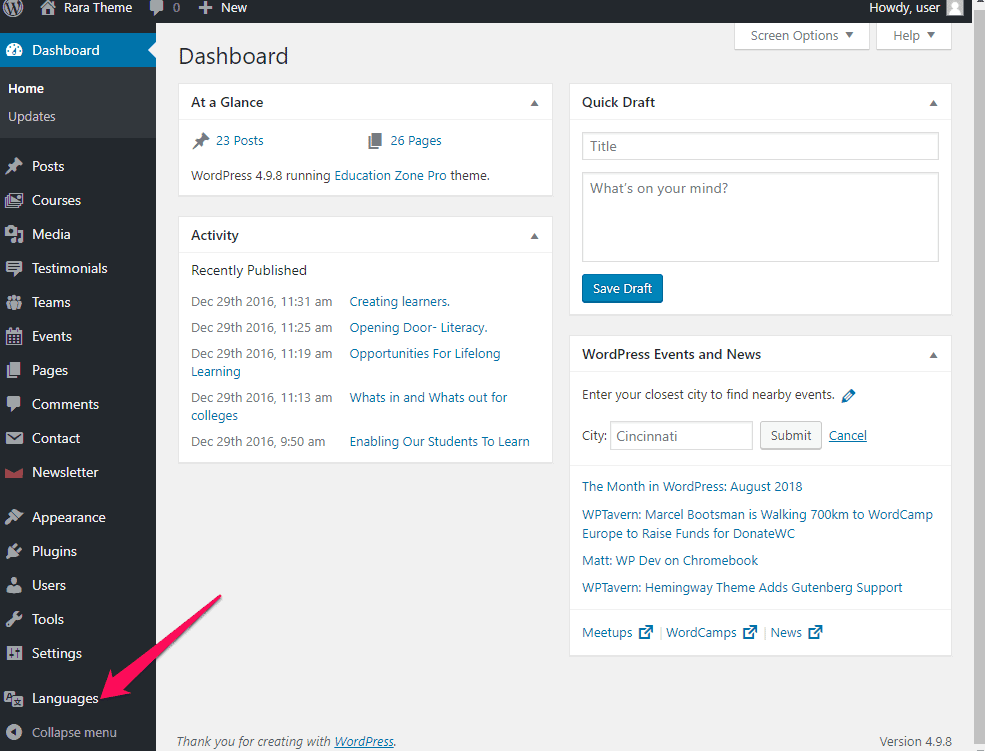
Step 2: Adding Languages
To add languages to your WordPress website, navigate to Languages.
- From the drop-down menu, select the first language. It will be English for us. If you don’t want the English version of your website, choose another language from the drop-down. Then, click on Add new Language.

- Similarly, select another language. You can add as many languages as you like. In our case, we will be adding Espanol as the second language.
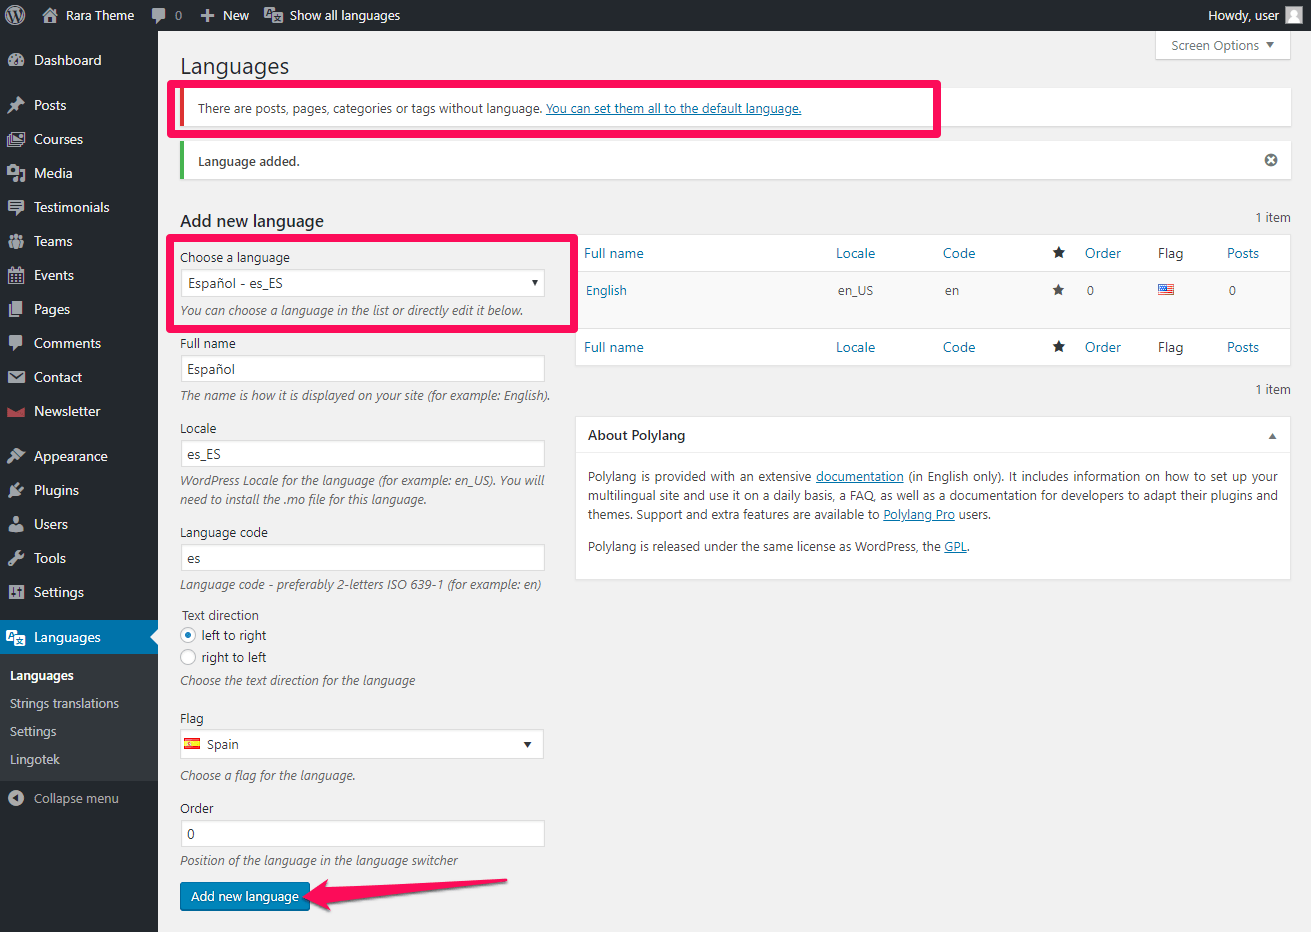
After you have added the preferred languages, select the order for the language. When you add multiple languages, the plugin will show a notification to set the default language for the existing posts, pages, categories, or tags.
Step 3: Setting the Default Language
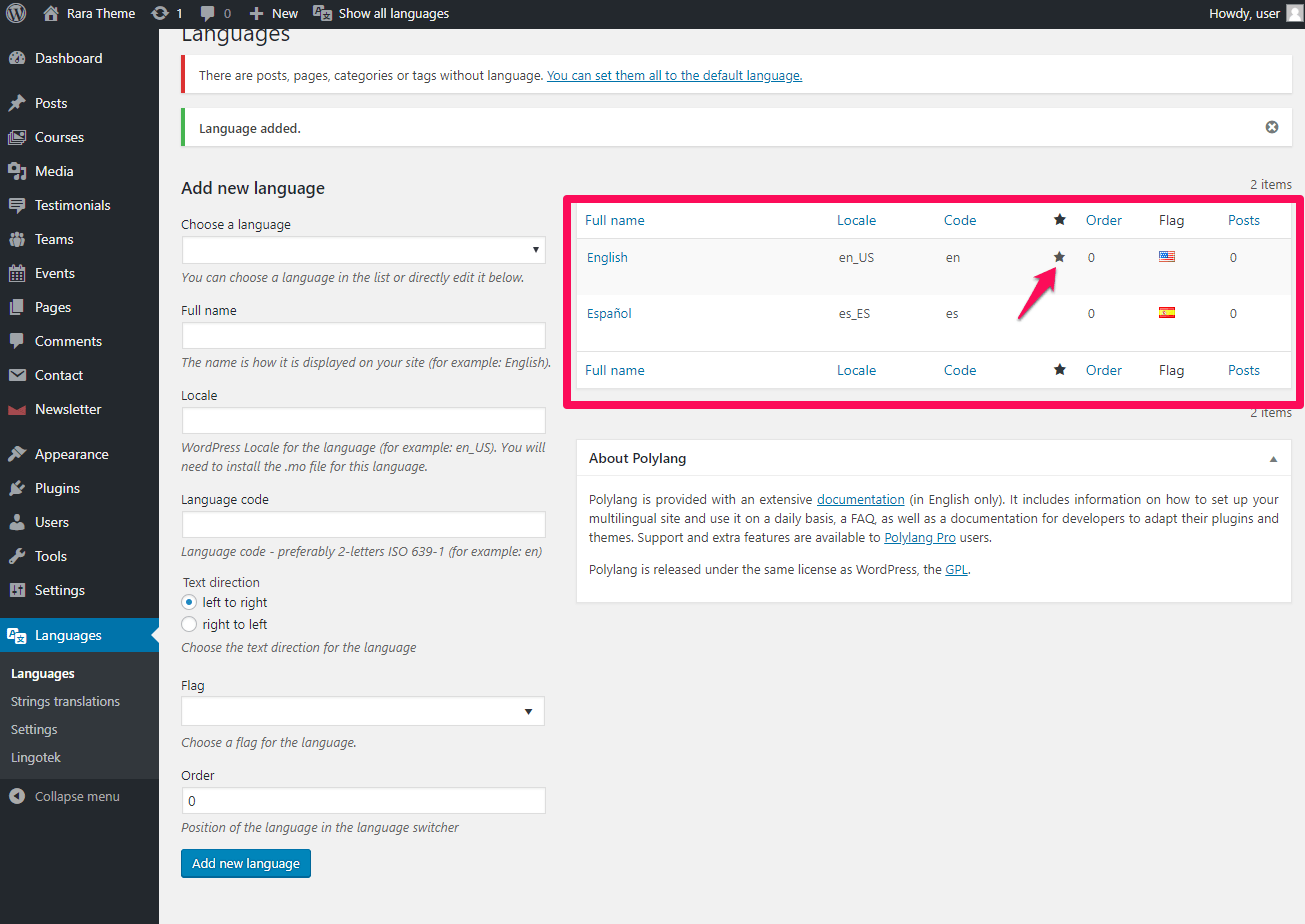
You need to set up a default language for your site. The language of the existing content should be the default language.
To set up a default language, hover over the star symbol of the language and click it. The blue star in a language means it’s the default language. English is the default language in our case.
Step 4: Setting Up Language Switcher
Most of the multilingual websites display a language switcher option to help their visitor easily switch to their preferred language. You can keep the language switcher option in the navigation menu or the sidebar using the widget.
Note: Your theme must be compatible with Polylang plugin to use the language switcher successfully. Try the option that works best with your theme.
Language Switcher in Navigation Menu
You can add the language switcher option in the menu bar to allow your visitor easily navigate to other versions of the website. To add the language switcher option in the menu bar, please follow the below steps:
Note: You need to create a separate menu for each language of the website.
- Log in to the WordPress dashboard
- Go to Appearance >Menu
- Select the Primary Menu
- Click on Language Switcher Checkbox and then Add to Menu option
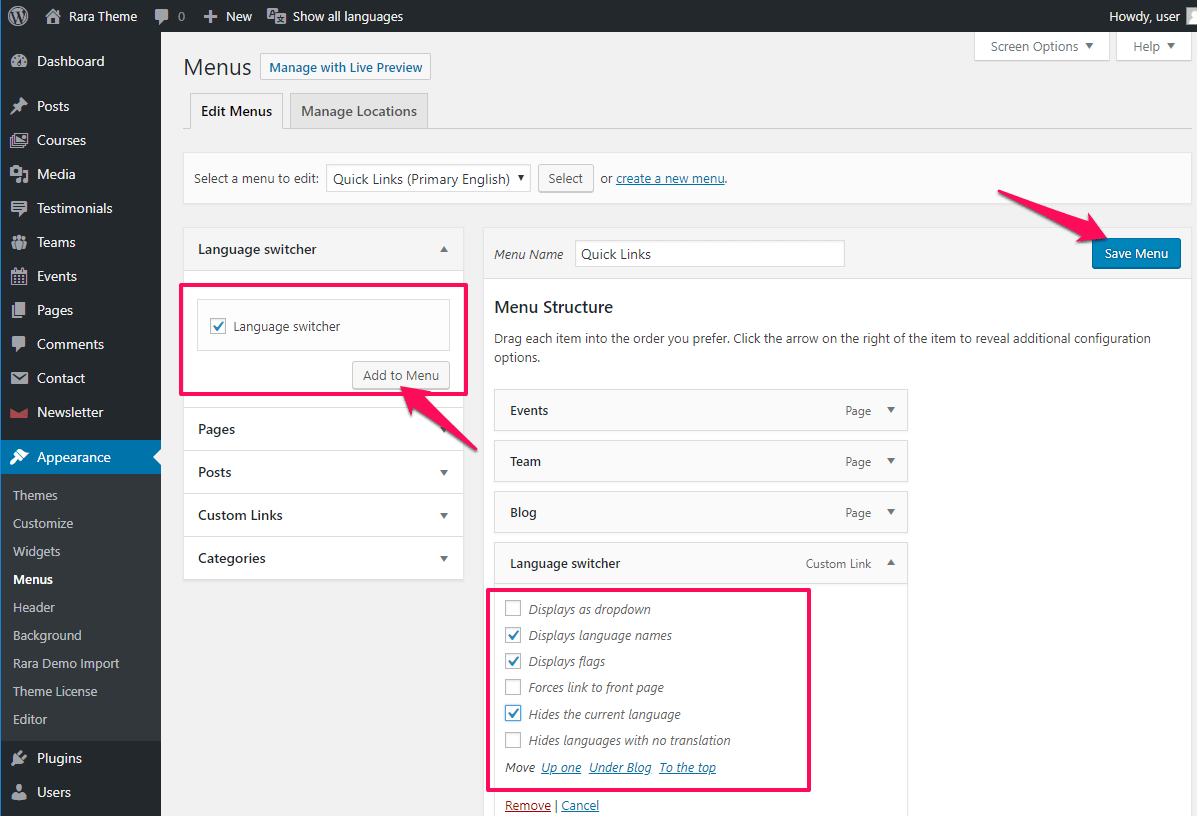
- Click on the Language Switcher drop-down as given above and check mark on Display language names, Display flags and Hide current language.
- Click on Save Menu.
Note: If the language switcher option is not displayed in the Menu Settings, Click on Screen Options on the top right of the screen and checkbox the Language Switcher option.

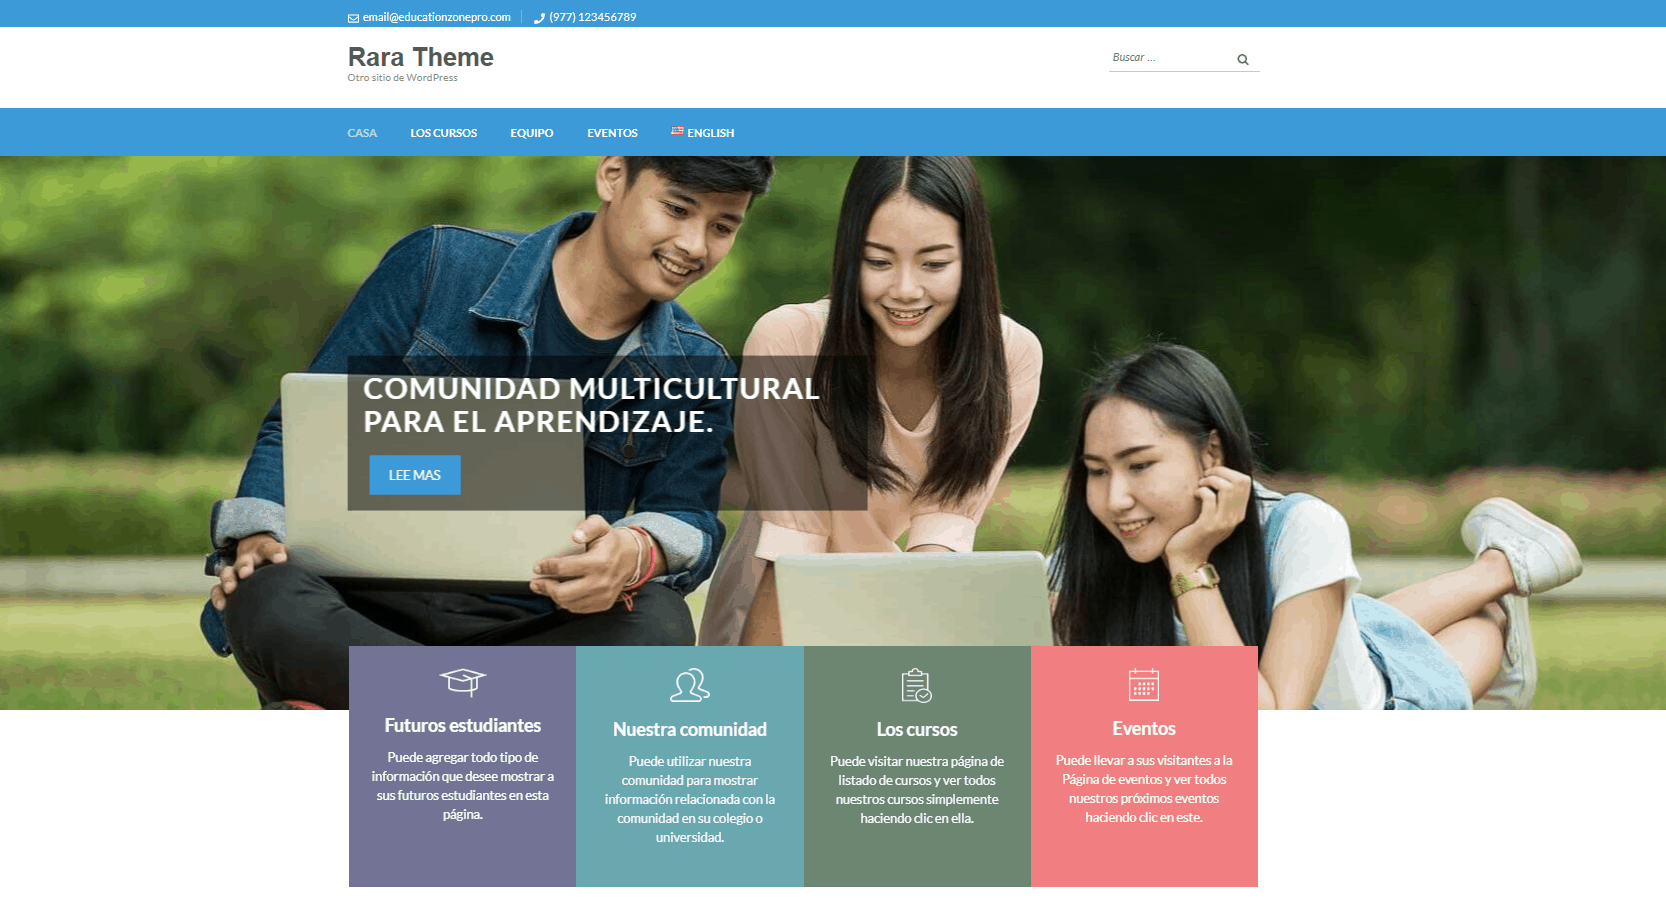
Once you have added the Language switcher in the menu, please visit your site. Your site should have a language switcher like the given below if you have done everything correctly.
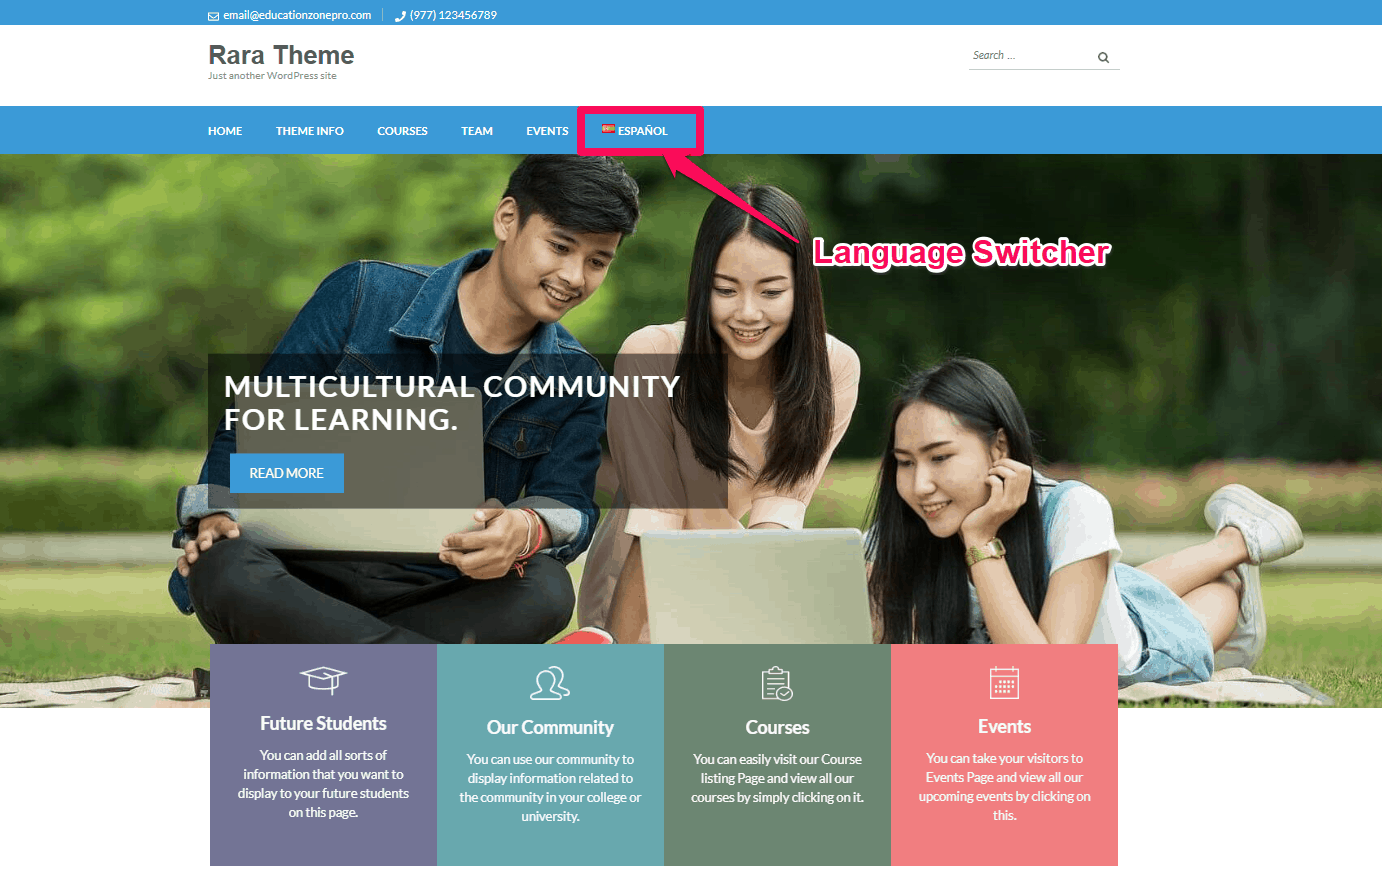
You can switch to other versions of the website by clicking on the language switcher option. In our case, the second language of the website is Espanol.
Language Switcher using Widget
You can also add language switcher option in the widget area to help the user easily switch the language of their choice. You can add the language switcher on the sidebar widget or footer widget.
To add a language switcher in the widget area, please follow the below steps:
- Login to WordPress dashboard
- Go to Appearance >Widgets
- Drag the Language Switcher widget and place it in the desired sidebar or footer if the theme supports it.
- You can add multiples languages on the sidebar.
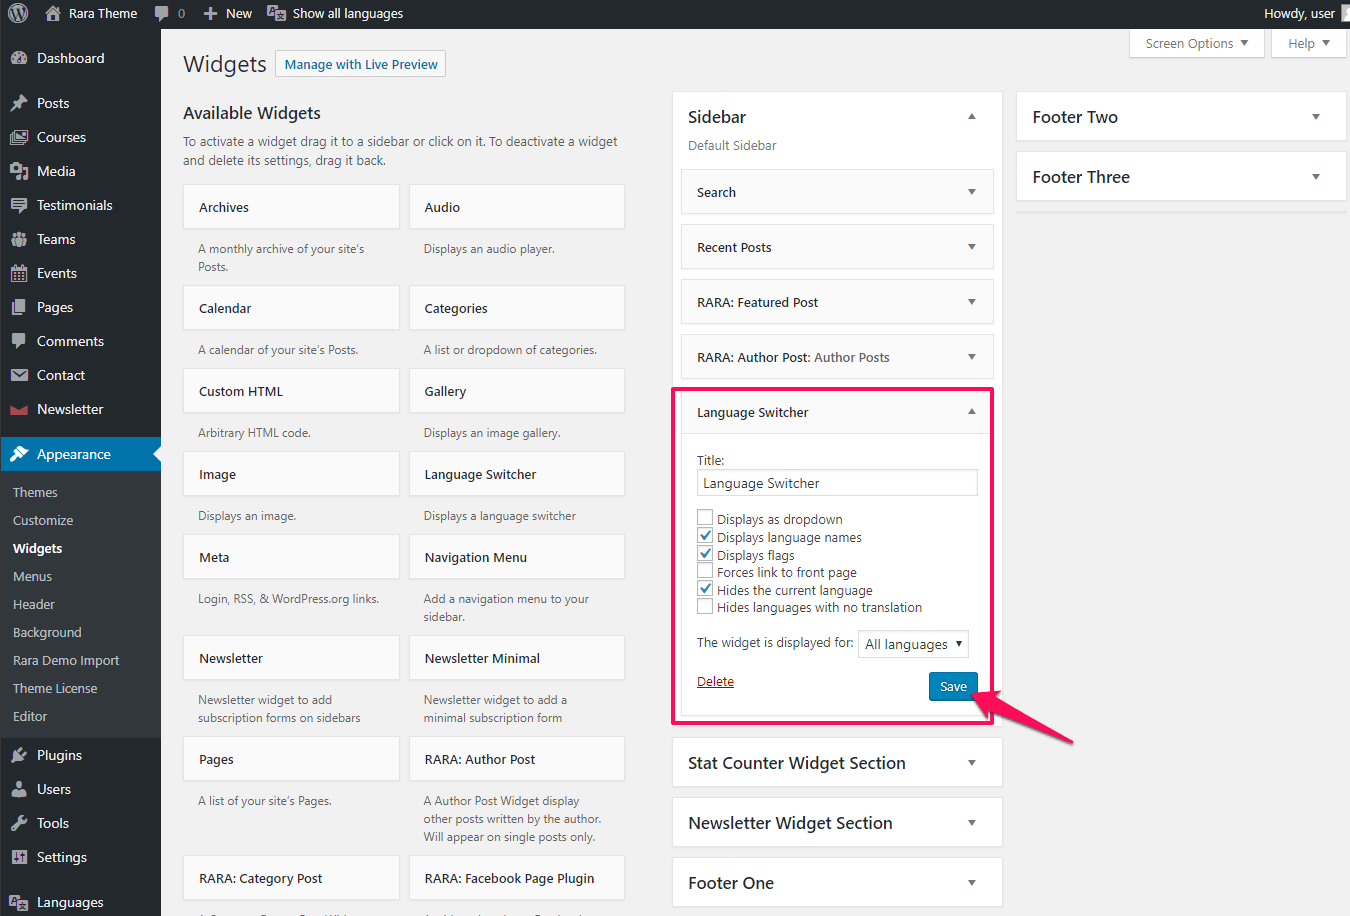
Once you have selected the options, click on Save to add the language switcher in the widget area.
Step 5: Theme Panel Translations
After you have added a new language into the Languages menu, you need to translate the component of the theme.
To translate the components of the themes and plugins, follow the below steps:
- Go to Languages > String Translations
You can translate various user-defined components of the website such as site title, site tagline, widget title, and others. Polylang also allows you to translate theme and plugin options. Remember, your theme must be compatible with Polylang to see the options. Check our multilingual themes.
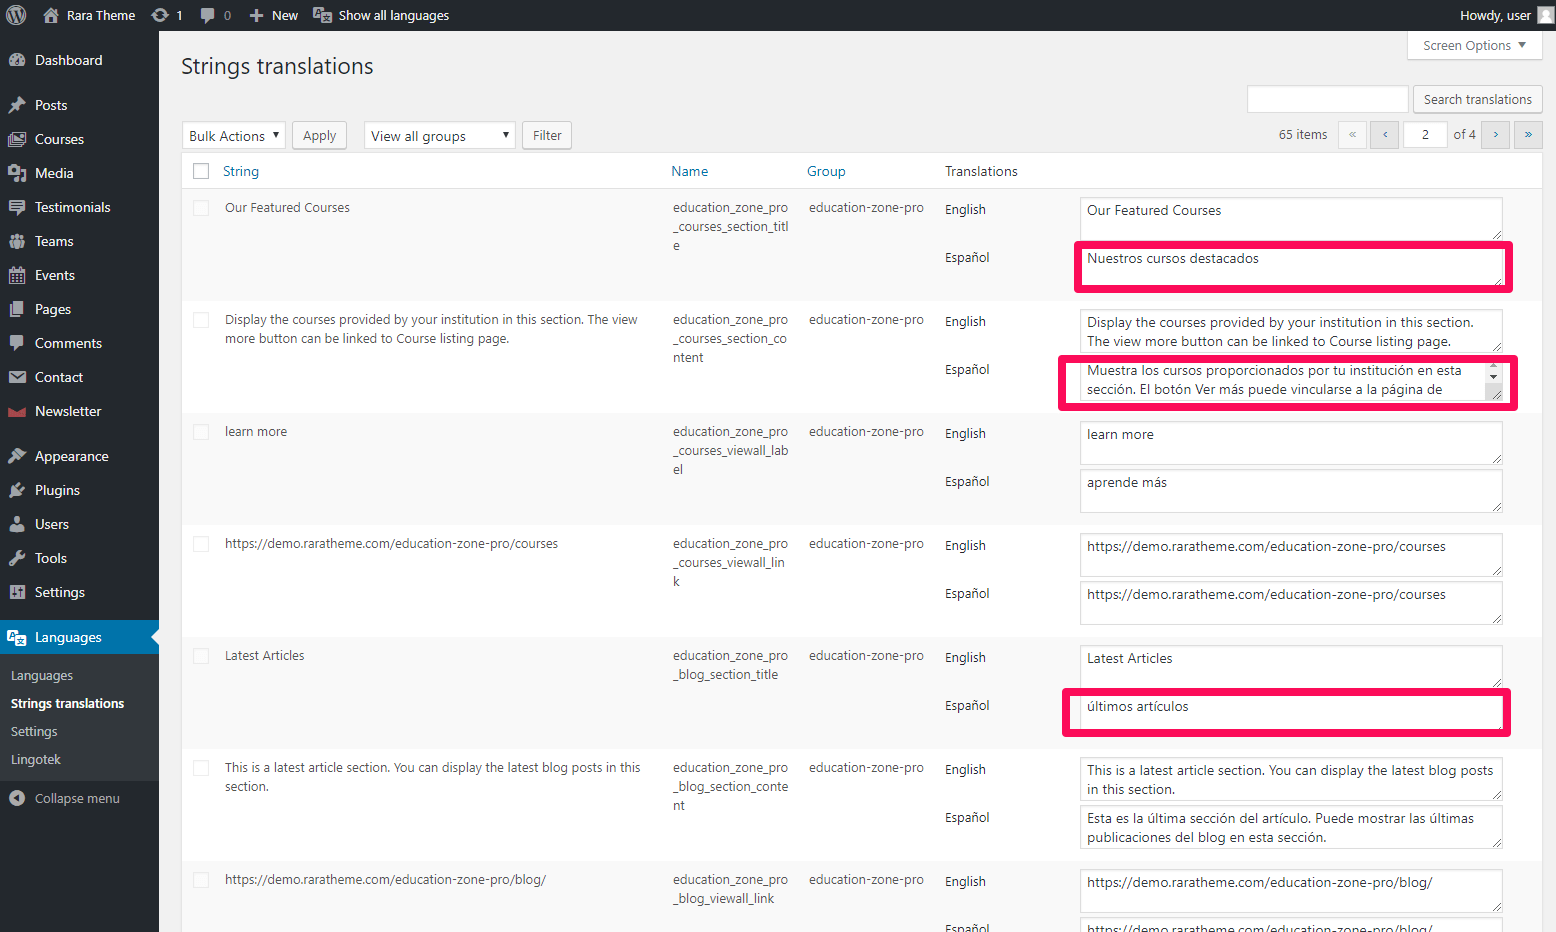
The string column contains the strings of the default language. You can translate them into the additional language you have installed on your website. Enter the translated strings into the input fields of the translation column. Once you have entered all the translated strings, click on Save Changes.
Step 6: Polylang Settings
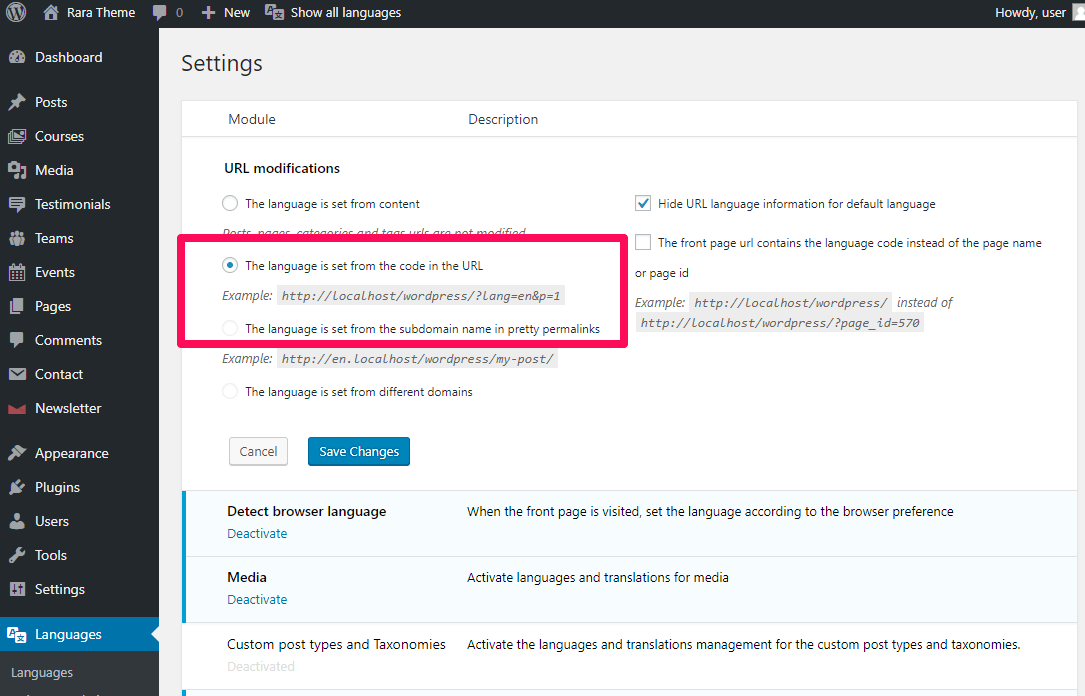
URL Modifications
You can perform the URL modifications for different languages of the posts, pages, and categories from here to take the full advantage of multilingual SEO. However, if you are a beginner, then we recommend you not to touch the URL settings.
Detect Browser Language
When this option is Activated, a visitor will first see the website in the language which is set as preferred language in his browser.

If you have not activated this option, a visitor will see your site in the default language.
Media
The Media option is activated by default and translates the texts associated with the media items like title, alt text, and description.

Translating media item in a different language is an optimal way to optimize the media items for Local SEO.
Step 7: Translation of Posts, Pages, Categories, and Tags
Please follow the given steps to create a multilingual post of the already existing posts:
- Login to your WordPress dashboard
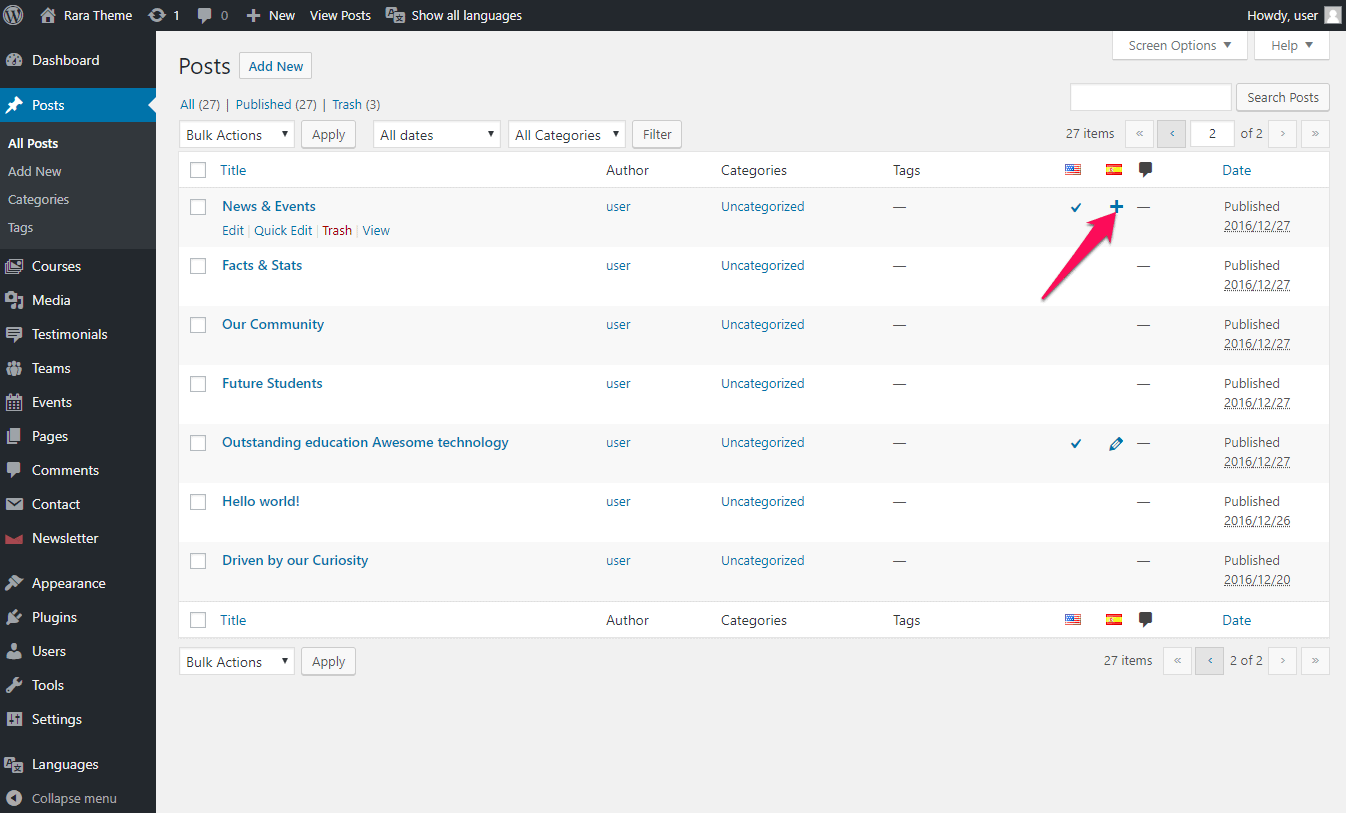
- Navigate to Posts and click on All Posts
You will see the list of existing posts here. A check mark would indicate the current language of the post.
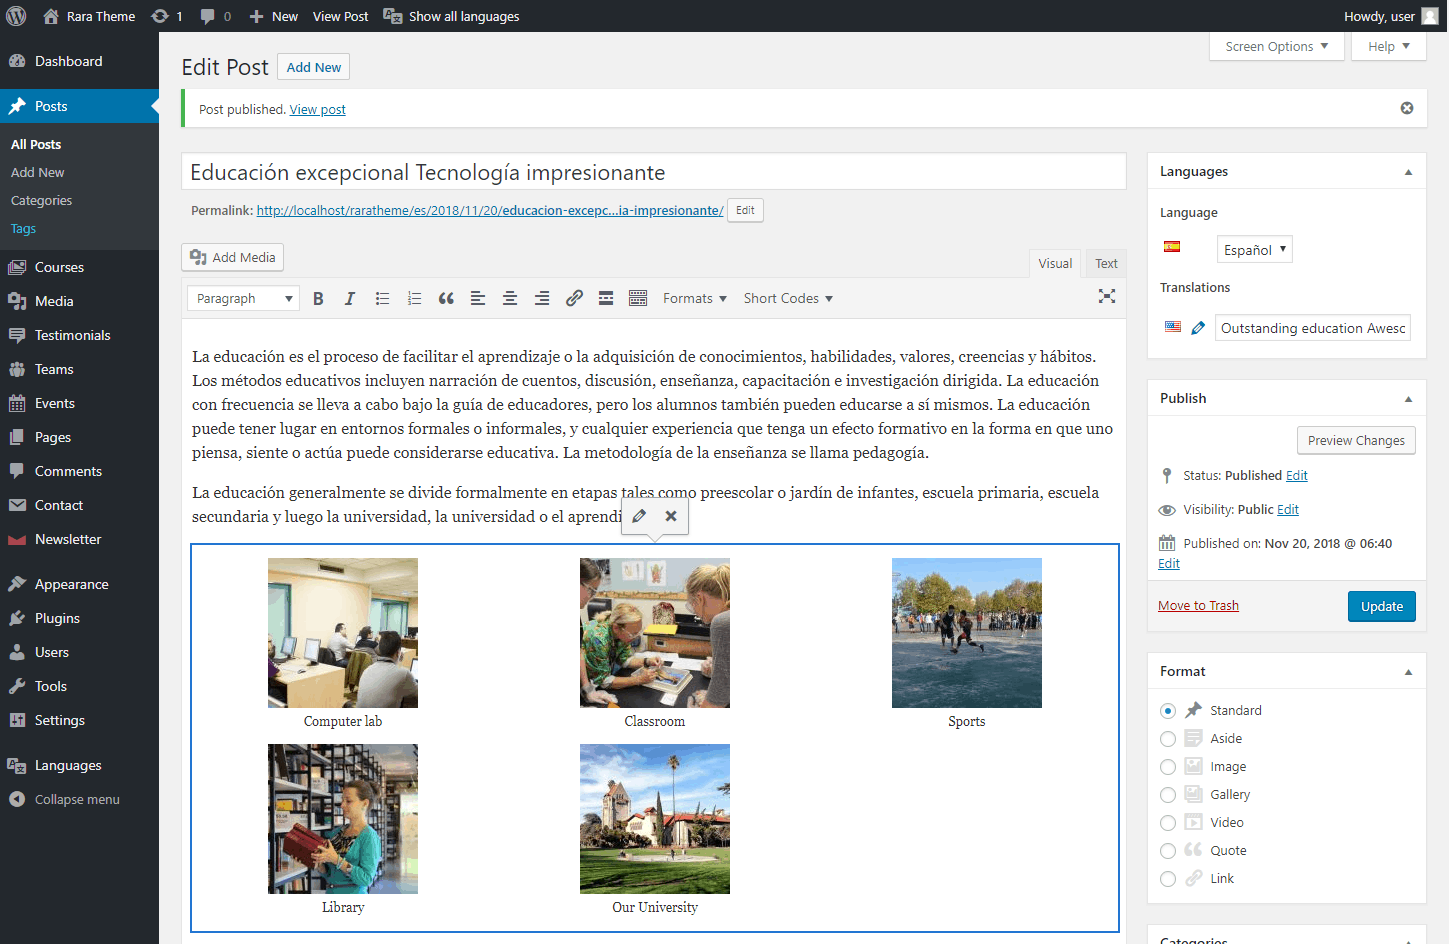
Clicking on the “+” sign next to the flag of a language will send you to a page for creating new posts, which is where we need to enter the manual translation for the existing post.
- Enter the translated text for the language you selected. An example of the multilingual post is shown below.
You can create different versions of your existing pages, categories, and tags of the website in different languages in a similar fashion.
Conclusion
If you have followed us through the guide, you now have a multilingual website. If you have any questions, please contact us through a Support Ticket.
Do you also want to create a business website? Then, please go through How to create Business Website in 2024.