If you’re a regular internet user, you most likely have already encountered an internal server error. It is by far one of the most common errors in WordPress. When a site suddenly throws an internal server error, it can leave a bad impression on your viewers.
If you’re a website owner, this can be a serious problem. If you keep your visitors unattended with an internal server error, you’ll have to bear the risk of losing out on potential customers.
So, it’s important to know everything about an internal server error and how to fix it. First, let’s try to understand what an internal server error is.
What is an Internal Server Error?
The internal server error is, without a doubt, the most annoying and the most common kind of error. Annoying, because this error is nonspecific — meaning they do not provide any information whatsoever to users or even developers.
Since you do not have any information about the source of the error, it is quite frustrating and confusing.
In simple terms, an internal server error occurs when a server fails to figure out the actual issue. It is often caused by certain functions of WordPress plugins/themes, PHP memory limit, and corrupted .htaccess files.
When you encounter such an error, there are a few steps that you need to carry out. It’s more like a hit-and-trial process where you try out different ways of working out the solutions.
Since such errors are quite frequent in WordPress, it is always smart to backup your website. Here’s how you can do it:
Backing Up Your WordPress Website
As a website owner, it is always good to back up your website to prevent your data — both the database and your website files. In today’s competitive market, most hosting providers tend to offer backup and restore facilities.
So, whenever you choose a hosting provider for your WordPress website, make sure the plan includes back and restore facilities.
Even so, things do not always work in your favor. So, we highly recommend you to backup your website manually. There are a handful of ways you can do so.
Let’s check them out:
Backing Up Your Website Using cPanel
This method gives you complete control of your WordPress website, allowing you to create backups easily. You can store your website files in several locations, including Google Drive, Dropbox, hard drive, and so forth to ensure full backup.
Backing Up Your Website Using SFTP
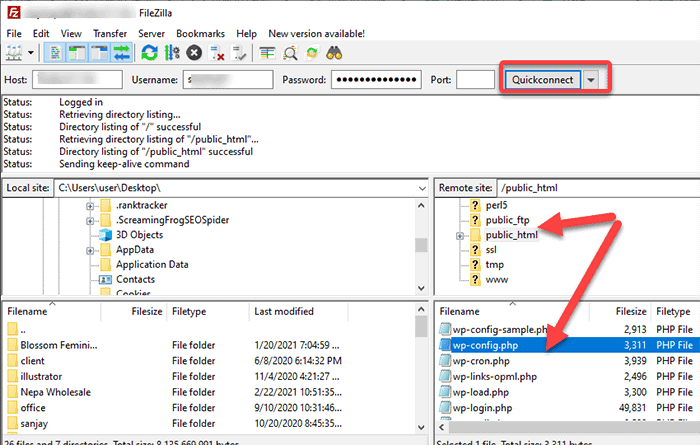
One of the most straightforward ways to back up your website files in this method is by using a popular file manager — FileZilla. You can simply download and install the file manager and log in to the application.
Once you’re logged in, select all the files you want to back up, right-click on the mouse, and choose “Download Selected Items.” Once all the files are downloaded, make sure to save them in a secure location.
Backing Up Your Website Via phpMyAdmin
This method is mostly used to backup your database rather than your website files. First, log in to your phpMyAdmin and click on the “Databases” tab.
Once you’re in the “Databases” tab, select all the files you want to back up and click on the “Export” button. After that, choose your preferred export method and set “Format” to SQL.
Finally, press the “Go” button and store the downloaded files in a proper location.
If you want to learn in detail how to back up your website step by step with demonstration. We have a guide on this. Please check it out if you like.
Now that you’ve learned to backup your website files and databases, it is time to know how to fix the WordPress internal server error.
Let’s get into it!
Ways to Fix WordPress Internal Server Error
Here are a few steps you can carry out to fix the internal server error on your website.
Method 1: Enable Debugging
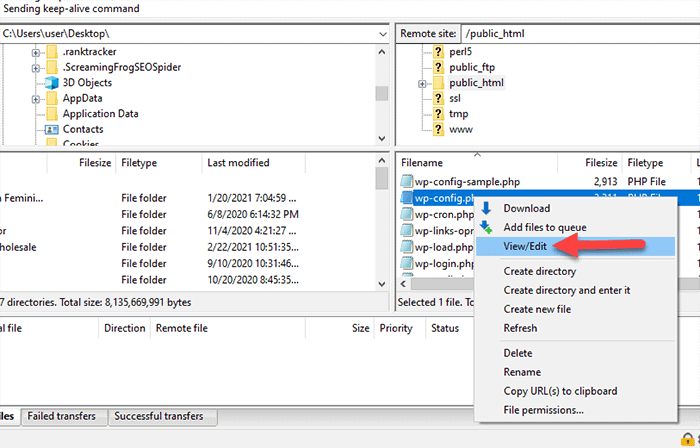
Once you’ve encountered an internal server error, the first thing to do is try to make sense of the error. The error can simply be a fault in your site’s code. To find where the error is coming from, you should firstly look for wp-config.php.
Download the wp-config.php file from your website’s root directory. Then, open the downloaded file using a text editor and look for WP_DEBUG. If you find this line of code, change ‘false’ to ‘true’ and re-upload the file to the server.
In case you do not find it, add the following code at the end of the text right above the line that says “/* That’s all, stop editing! Happy blogging. */” :
define( "WP_DEBUG", true );Now, try reloading your website. You might see a “fatal error” message pointing to a specific line of code in a particular file. This narrows down your problem by telling you exactly where the error is.
Note: Do not forget to change the WP_DEBUG value to false once you’ve finished everything. Otherwise, by default, WordPress displays debug messages on your entire site that might be risky and confusing for your visitors.
Method 2: Check if Your WordPress Dashboard Works
Whenever you encounter an internal server error, check if your WordPress Dashboard is still loading. For that, you need to access your backend.
Visit http://yoursite.com/wp-admin/ to access your admin dashboard. If the page loads easily and you can access your backend WordPress dashboard, you can be sure that the problem is either with the theme or the plugin.
Method 3: Deactivate All Your Plugins
Another reason your website can encounter an internal server error is due to the fault in your WordPress plugins. To test if the error is coming from plugins, the first and foremost thing to do is deactivate all your plugins.
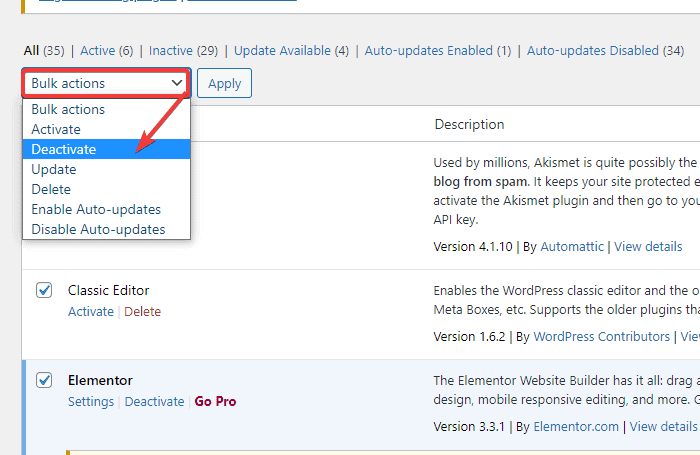
Deactivating your plugins will not result in any loss of data or the plugin. If your WordPress dashboard is loading perfectly fine, you can deactivate all your plugins at once by doing as follows:
- Go to Plugins in the WordPress Dashboard.
- Select the checkbox to select all plugins.
- Select Deactivate from the dropdown menu.
- Click apply.
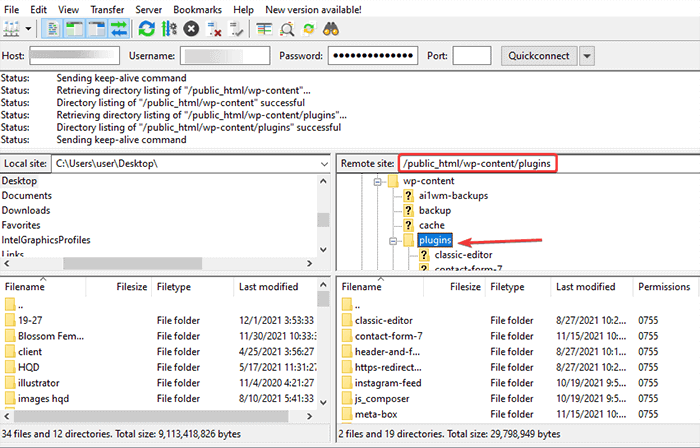
In case your dashboard isn’t working, you can also deactivate them via FTP. Here’s how you can do it:
- Connect to the WordPress site’s server via FTP.
- Navigate to the wp-content folder.
- Change plugins folder to plugins-deactivated.
If you’re certain that the error is coming from plugins, you should start looking for the particular plugin responsible for the error.
For that, start re-activating plugins one by one. Also, keep checking for the internal server error, and you will find the culprit.
Once you’ve found it, disable the plugin and call for support immediately. Or, you can opt for an alternative plugin as there are hundreds of them.
If you’re using FTP, do not forget to rename the folder back to plugins before reactivating plugins.
Method 3: Switch to the Default Theme
If you finished checking your plugins and still couldn’t figure out where the error is coming from, it is now time to check your WordPress theme. You can start by switching to the default WordPress theme.
We recommend the Twenty Twenty-One default theme. There are earlier versions available too.
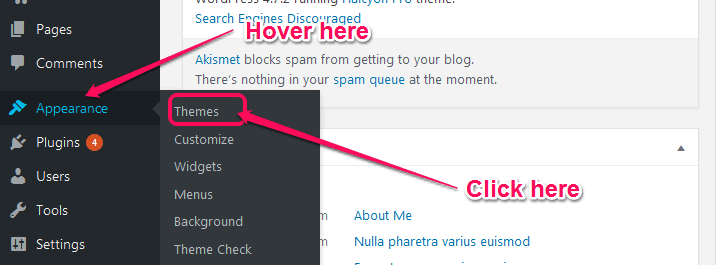
If your dashboard is still accessible, go to Appearance -> Themes, that’s where you’ll find the default option. In case you can not find the default theme, you can download it from WordPress.org.
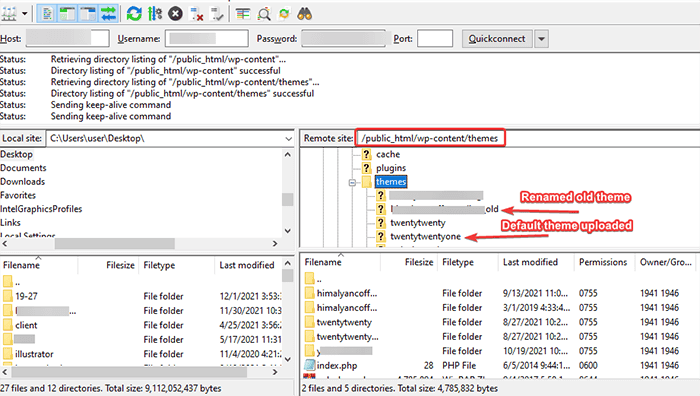
You can even switch to the default theme using FTP if your dashboard isn’t accessible. Follow the steps below:
- Connect to the WordPress site’s server via FTP.
- Go to wp-content/themes folder.
- Download the default theme (Twenty Twenty-One preferred) from WordPress.org and upload the theme folder after extracting the theme file.
- Also, rename the current theme folder to [theme-name]- deactivated.
- Once you deactivate your current theme, WordPress automatically falls back to the default theme.
If switching to the default theme works for you, it is quite obvious that the error is coming from the theme. If you’re using a theme from a WordPress developer, you should immediately let them know regarding the issue and ask for support.
Note: Before opting for other options, make sure you check all the possibilities for the error.
Method 4: Increase Your Site’s PHP Memory Limit
Sometimes your WordPress site might throw an internal server error when your website exceeds the memory limit. This usually occurs when you have a badly coded theme or plugin.
Generally, your website server has a set amount of memory located to it, and you cannot increase your memory limit above that. Besides choosing another hosting service, there are a few more ways you can increase your website’s memory limit. Here’s how:
- wp-config.php file
Connect to your server via FTP. Open and edit the wp-config.php file and add the following code snippet below the line that says, /* That’s all, stop editing! Happy blogging. */ :
define('WP_MEMORY_LIMIT', '256M');- PHP.ini file
To increase your website’s memory limit using this method, find the PHP.ini file in the wp-admin folder. You then need to open and edit the file. Look for the line that says, memory_limit = [number]M, now change the number to 256. Your code should now look like memory_limit = 256M.
- .htaccess file
Connect to your server via FTP and locate and edit the .htaccess file. Now, add the following line:
php_value memory_limit 256MBesides the methods listed above, you need to contact your hosting service provider to increase your website’s memory limit.
Method 5: Debug .htaccess issues
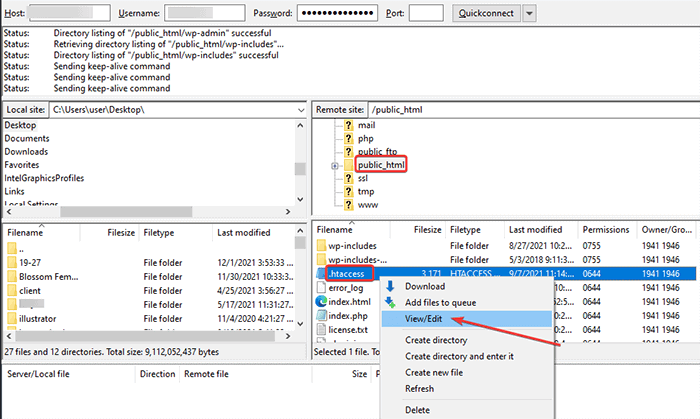
If your hosting provider uses the Apache server, you’ll find the .htaccess file in your website’s root directory. It is the configuration file that lets you enable advanced functionalities.
WordPress uses this file to manage your website’s permalinks, set up redirects, change upload size, and much more.
Even a minor error such as a missing space or a typo can cause an internal error and crash your website. To check if the .htaccess file has errors, locate the .htaccess file in the root directory of your website. Download the file and back it up by saving it on your computer.
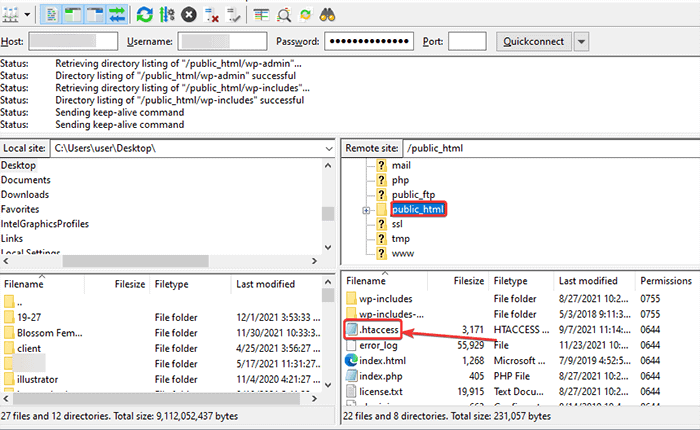
Once you have your backup, delete the copy of the .htaccess file on your server. Now, try loading your website. If your website starts working, you can be sure that the error is coming from the .htaccess file.
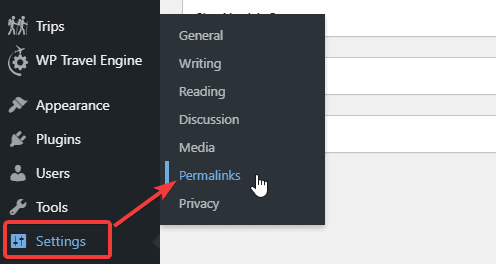
To fix the error, go to Settings > Permalinks and click Save. This forces WordPress to generate a new .htaccess file if you don’t have any custom .htaccess rules. If you have custom rules, go through the .htaccess file line by line and see when your site goes down.
When you get to the line that’s causing the error, carefully look for typos or syntax errors. If you do not find such typos, you can delete the entire line causing the error. You can also ask for help in support forums.
Method 6: Reinstall WordPress
Sometimes your WordPress core files might be corrupted due to some unpredictable circumstances. Something might have gone wrong while your server was copying the required files. In such cases, re-uploading the WordPress core files can save you from the hassle of finding the bug.
To reinstall the WordPress core files, follow the steps below:
- Download a new copy for WordPress from WordPress.org.
- Extract the ZIP file.
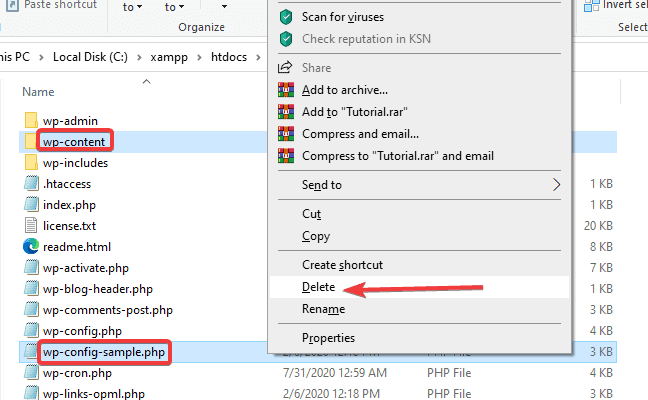
- Make sure you delete the wp-content folder and wp-config-sample.php file. Also, delete the wp-config.php file.
- Now, connect your host via FTP.
- Upload the rest of the folders and files to the root folder of your website.
- Select the option to overwrite all files when you see a prompt option.
Method 7: Check on Your PHP Version Issues
Though old PHP versions do not usually cause the internal server error, it is always a good idea to check what version of PHP you’re running on. You can check your version of PHP with your hosting service provider.
Many popular older versions of PHP do not receive updates any longer and are often outdated. Make sure the version you’re using is at least PHP 7.3 or above.
You can check the PHP version running on your site by executing the PHP code.
- Start by opening a text or code editor — Notepad or TextEdit.
- Enter the following code on the editor.
<?php
echo 'Current PHP version: ' . phpversion();
?>- Once you enter the code, save the file by clicking on “File” > “Save As.” Make sure to save the add the .PHP extension while saving the file.
- Now, you will now get your current PHP version.
Method 8: Upload Fresh Versions of Core Files
Another popular option to fix an internal server error is to re-upload fresh versions of WordPress core files. This includes folders like wp-admin and wp-include.
Do not worry about missing or losing anything while re-uploading core files. Instead, it will help you recover from a corrupted file and solve your problem.
To upload fresh versions of core files, first, you need to download WordPress from WordPress.org. Then,
- Extract the zip folder you just downloaded.
- Now, connect to your website via your FTP client.
- Navigate to the root directory.
- In another window, open the WordPress file you downloaded earlier.
- Copy wp-includes and wp-admin folders and upload them to your server.
- You’ll see a prompt option to overwrite the existing folders. Select Overwrite.
- Your core files are now updated with fresh new versions.
Check and see if your internal server error still exists. If the error is from the core files, you’ll now see your website loading fine.
Method 9: Check File Permissions
It is a rare case when an internal server error occurs due to file permissions. However, it’s still worth checking. Check your files and folders within the WordPress directory of your website via an FTP client. It needs to be set to 755 or 644.
Setting the permissions to anything else results in errors, including 500 internal server errors.
Method 10: Contact Your Hosting Service Provider
If nothing works and the issue seems to be an uncommon one, the best option is to contact your hosting service provider. Not only do they help you fix server issues, but they can also help you check your file permissions and other sources.
If you’re a WordPress site owner, there are plenty of options recommended by WordPress. Here are some of the best hosting providers in the market:
If you want to get into specific details to choose the best hosting provider for your website, check out this guide – 10 Best WordPress Hosting Provider of 2024.
FAQs (Frequently Asked Questions)
Why does an internal server error occur?
In simple terms, an internal error occurs when your server encounters something unusual and cannot complete the request.
Can you fix an internal server error?
If you follow the instructions and steps mentioned in this article, you can easily fix an internal server error on your website. It is not necessary to hire an expert to fix the internal server error. However, you can always get help from forums and your hosting providers if you need to.
Conclusion
If your website is constantly troubling you and your visitors with an internal server error, try these above-listed methods to fix the error. One of these will surely fix your website’s internal server error. Try these methods one at a time to find the right approach for you.
Also, do not forget to share your experience with us in the comment section below.