Are you having problems using WordPress?
Well, it is quite common. With unlimited flexibility comes a catch. Make sure to be comfortable with working on technical issues you may come across when using WordPress. Some problems may be easy to solve, while others may be a headache.
One problem is the WordPress memory limit error. You can get confused when you first see it. But after reading this article, you will be able to solve this error in a few minutes despite your WordPress experience.
Here we have explained what a WordPress memory limit error is and how you can resolve it with two methods. Let’s begin.
What is WordPress Memory Limit Error?
WordPress needs a certain memory on your server to function. By default, the memory allocation for WordPress is 64M. But sometimes, that memory allocation is not enough. Is such a case, you will see the WordPress memory limit error as:
fatal error: the allowed memory size of 67108864 bytes exhausted
Instead of the message, you may also see a white screen of death or a maintenance mode. Either way, you are running out of memory and need to fix it. Luckily, you will learn that in the upcoming sections.
What Causes the WordPress Memory Limit Error?
Every website needs a certain memory to store the data, such as plugins, themes, databases, and content. Sometimes, the resources demand more memory. However, the web servers mark a limit on the memory that can be used by any script. By default, WordPress has 64M memory allocation.
In such a case where the demand exceeds the limitation, you get the memory limit error. Mostly, this error occurs when you upload media files to your site or install a new theme and plugin.
You may wonder why the servers limit the memory allocation. Well, it is an important feature to protect the servers. Servers need enough memory to run multiple applications for different sites at the same time. Without the limitation, a poorly written script may consume the entire memory of the server. In this case, the server crashes and takes down your site along with all the other sites it hosts.
WordPress is based on the scripts written in PHP, and it needs to abide by the allocated limitations.
How Can You Check Your PHP Memory Limit?
If you are using WordPress 5.2 or above, you can easily check your PHP memory limit using the Site Health tool. Here is how you proceed:
- Log in to your dashboard.
- Navigate to ‘Tools’ on the left side panel.
- Click on the ‘Site Health’
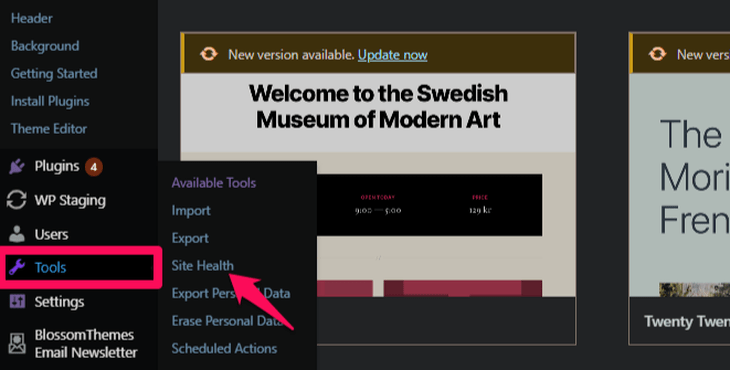
- Click on the ‘Info’ option at the top.
- Scroll down to the ‘Server’ section.
- Here you can see the ‘PHP memory limit’ option. It shows the memory limit for your PHP scripts.

How to Resolve the WordPress Memory Limit Error?
Now that you know what a WordPress memory limit error is and what causes it let us learn how to resolve it. There are two methods to solve this error. They are:
Method 1: Increasing the PHP Memory for your website
Method 2: Upgrading your hosting plan
We will be explaining these two methods below:
Method 1: Increasing the PHP Memory for Your Website
As the error name suggests, the simple thing you can do to solve it is by increasing the memory allocation for your PHP file. The amount you can increase the memory depends on your hosting plan and hosting provider. We have covered that part in the second method. For now, let’s focus on increasing PHP memory.
The memory you can use is set in your site’s wp-config.php file. The value set in this file may or may not coincide with the value set by your hosting provider. You can try to increase the value in the following ways:
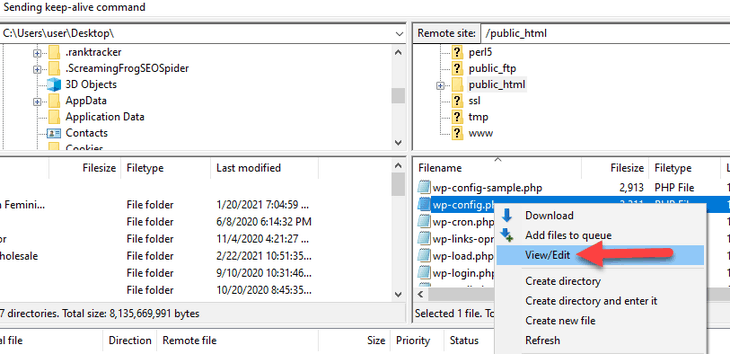
- Log in to your site using an FTP client or a file manager.
Here is an example of accessing the site using FileZilla.
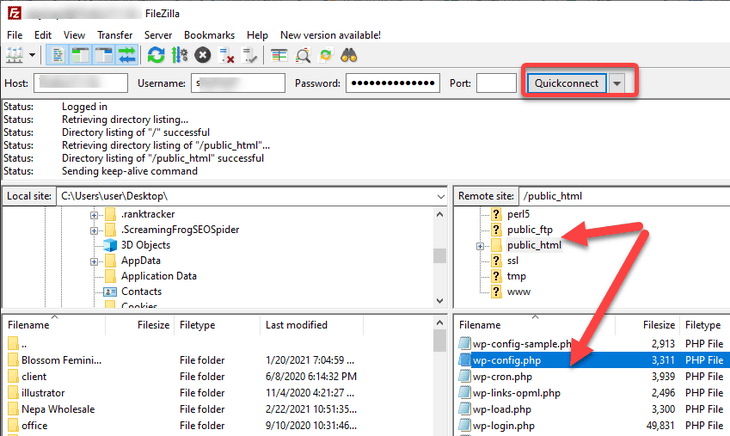
The right quadrants show the list of folders that contain your website’s file.
- Navigate down to your website’s root folder. Mostly, the root folder is named after your domain name or public_html. Double click to open it.
- Right-click the wp-config.php file and click on the ‘Edit’ option.
Do not touch any other file or line of code except the ones we are about to discuss below. Backing up your files is a good idea. You can restore the changes if you delete or make any mistake in the files.
- Paste it above the line that reads, “That’s all, stop editing! Happy blogging.”
define( 'WP_MEMORY_LIMIT', '256M' );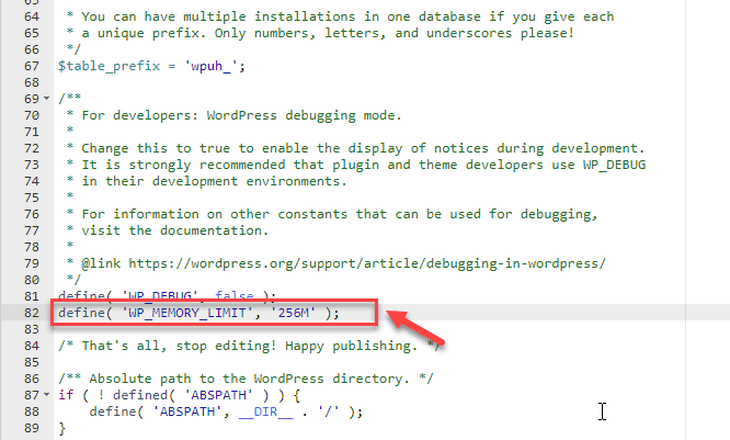
256 MB memory allocation is sufficient for most of the websites.
- Save the changes and exit the editor.
- Visit your website and do what you were trying to do prior to getting the limit error message.
If you don’t see the error, you have successfully resolved it. In case the error persists, increase the memory further. If it does not solve the issue even after a few tries, chances are, you may have reached your hosting provider’s limit.
In such a case, try the second method, as explained below:
Method 2: Upgrading your Hosting Plan
If you keep seeing the memory limit error even after increasing the memory in the wp-config.php file, there is a good chance you have reached your hosting plan limit.
Every hosting provider allocates a certain amount of resources for the hosting plan you choose. You can check your hosting provider’s dashboard to see the memory limitation. You can directly contact your hosting provider as well.
If you confirm that you have reached your hosting plan’s limit, it is time for you to upgrade to a higher tier. For a shared hosting plan user, switching to cloud hosting or a VPS (Virtual Private Server) may fix the error. Both these plans allocated higher resources than the shared hosting plan.
These reviews will help you figure out the best hosting provider and a suitable hosting plan for your website.
FAQs (Frequently Asked Questions)
Q. How to check your WordPress memory limit?
You can check your WordPress memory limit as follow:
• Log in to your admin dashboard.
• Go to ‘Tools’ and click on the ‘Site Health’ option.
• Scroll down to the server section.
• Here you can find the PHP memory limit of your server.
Q. How to change/increase the memory limit in WordPress?
You can change the memory limit in WordPress by editing your wp-config.php file from your root folder. You need to add “define( ‘WP_MEMORY_LIMIT’, ‘256M’ );” or increase the limit value. We have explained how to do that in the above section. Check it out.
Conclusion
We understand how frustrating it can be to receive an error message on WordPress, particularly when you don’t know the cause. Fortunately, the memory limit error tells you exactly what the problem is, and so, finding the solution becomes straightforward.
We have mentioned two ways you can fix the PHP memory limit error. Also, you can check How to update PHP Version for detailed information. For any further queries regarding this error, reach out to us in the comment section below.