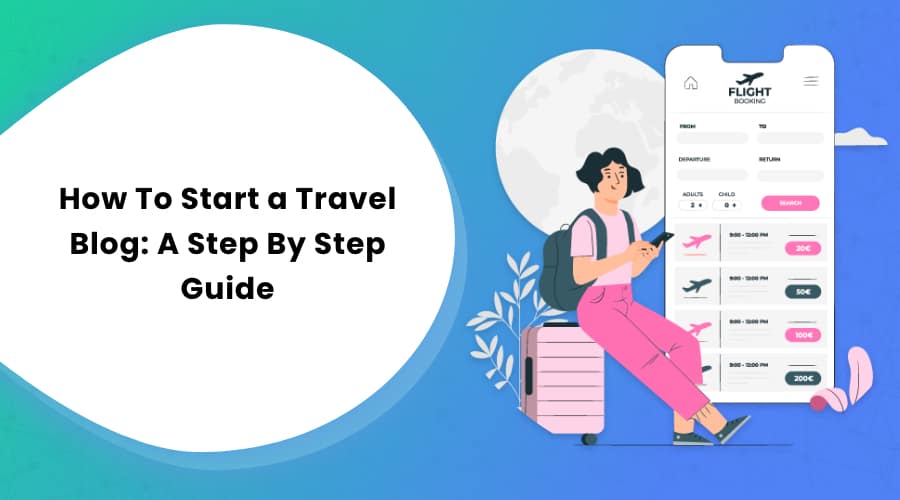
This post will teach you how to start a travel blog and get paid to travel the world.
Who doesn’t want to travel and earn six figures like some famous travel bloggers do, right? It’s a dream job for most of us– traveling for free, eating for free, and sometimes living for free. And, on the top of it, also getting paid for it.
But.
Before you start fantasizing yourself on a free trip to a beach in Bermuda, let me bring you back to the reality. The reality is, life is good only if you are ready to work hard. The rule applies to travel blogging as well.
Now, hard work isn’t the only difficult thing that might stop you from being a successful travel blogger. There are few other things to consider as well. Like making changes to your lifestyle and habits.
Let’s talk about them first, before I give you step by step instructions on how to create a travel blog and make money.
Mentally Preparing Yourself to be a Travel Blogger
1. Travel Blogging is not a vacation
There are two types of travelers.
One who travels to briefly get away from the normal-boring-routine of work and chores. These type of travelers usually hit the road for few months. And then get back to their regular routine.
The second type of traveler, on the other hand, is someone looking for a way to escape from their dull 8-hours work life. Or, is a young blood who wants to explore the world and also make money. These type of travelers want to make traveling their career. In other words, wants to earn money while on “vacation”.
If you are reading this, I will assume that you are the second type of traveler. And want to be a travel blogger.
Now, let me put you straight on this.
“Success is the result of perfection, hard work, learning from failure, loyalty, and persistence.” – Colin Powell
Travel Blogging is not a never-ending vacation, in the sense that you will get money just for relaxing. Travel Blogging requires hard work and dedication like normal work or sometimes even more. Of course, the perks of traveling is worth all the hard work.
Therefore, if you are serious about starting a travel blog and making money, be prepared to work very hard for the success!
2. Travel Blogging is like a Business
Yes, if you have decided to make a career out of travel blogging, you better start taking it like a business.
And, in business, you have to be dedicated. You may even have to work 16 hours a day, 7 days a week to make your business successful. You have to invest your time and money in it. You have to be sly. You need to build network and trust.
Similar to a business, in travel blogging, starters should mentally prepare themselves for the extra hours of work. You will struggle for a couple of years — you will have to spend money from your pocket as well (investment!).
But, once you have a fan following and you become an authority (network and trust!) of the travel blogging business, you will see the result of the hard work.
As a starter, your first investment for travel blogging business will be the cost of setting up a new blog. Creating and maintaining a blog requires some money. But, don’t worry, it won’t empty your pocket.
3. You must be ready to sacrifice your privacy
Building an audience is key in travel blogging business.
If you become a successful travel blogger, you will become a public figure. Or you could say, you need to be a public figure to be a successful blogger in the first place.
Thus, you must be ready to display all of your travel life in photographs and videos.
Why?
Because you are not the first one to start a travel blog (the competition in travel blogging is very high). There are already many famous people in the business who write about their experiences on their blog. So, people may not even notice you if you just write plain old blogs.
You need to show people proof, in photos and videos, that you really love what you do. For that, you need to constantly update your Facebook, Instagram (and other social media platforms) with photos and videos of all the activities you do. You need to share everything you do with your audiences.
So, being a travel blogger, you may not have much of a private life.
4. You should learn to adapt to different lifestyles
You should be ready for compromises.
Since you will travel a lot, you will encounter different cultures and lifestyle. You should be ready to adapt to them to enjoy them.
Also, you may not always find a five-star hotel– when you are traveling outside cities. And, sometimes you may not even have money for a good hotel because you will not earn much as a beginner. So, be ready to sleep at a cheap motel or a tea-house.
Additionally, you may even have to sleep in your sleeping bag. Maybe you are hiking or you just want to enjoy the nature. People love to read about struggles and new experiences.
Thus, as a serious travel blogger, you must always be ready for adjustments.
5. You should be ready to work extra hours even when you are tired
Imagine, you are climbing the Mount Everest. After walking for a whole day, you reach the base camp. Do you want to just go to your camp and rest because you have more walking to do tomorrow? Or you want to open your laptop and spend hours writing about your experience?
Well, if you want to show your followers that you are doing something fun, you need to forget that you are tired. You should be ready to work extra hours even after a long day.
Regularly updating your blog and social media is a necessity.
6. You should create and stick to an editorial calendar
You will basically become an editor of your own blog. A blog that will be famous if the content is posted on regular basis.
So, you should make a plan. More precisely, you must make an editorial calendar and stick to it.
An editorial calendar will help you create strategies for your blog. It will help you better organize your blog posts. You can schedule posts, manage posts categories, brainstorm ideas and manage events.
That being said, the main problem why many bloggers fail is, they can’t stick to their editorial calendar. If you are serious about your travel blog, you should be serious about your editorial calendar.
If you are still with me, congratulations! You are now ready to be a travel blogger.
So, let’s create a travel blog together!
Some of the following steps may sound technical but they aren’t. Creating a website is, believe me, very easy.
How to Create a Travel Blog: Step by Step Guide
Step 1 ⇒ Brainstorm a cool name for your travel blog
Time: Depends on you!
Cost: Free
Step 2 ⇒ Choose a reliable web host and register the domain name
Time: 10 minutes
Cost: $60 (yearly)
Step 3 ⇒ Install WordPress on your travel website
Time: 2 minutes
Cost: Free
Step 4 ⇒ Learn basic things about WordPress
Time: 1 hour
Cost: Free
Step 5 ⇒ Select an awesome design for your travel blog
Time: 5 minutes
Cost: Free to $50 (one time pay)
Step 6 ⇒ Install necessary plugins on your WordPress
Time: 5 minutes
Cost: Free
Step 7 ⇒ Install Google Tools
Time: 10 minutes
Cost: Free
Step 8 ⇒ Start your Journey!
Time: Infinity
Cost: Hard Work
Note: Some of the links in this guide are affiliate links. We earn a certain amount of commission if you buy services/products through the links, without any extra cost to you. That being said, we don’t recommend products that are not worth.
Step 1 ⇒ Brainstorm a Cool Name for Your Blog
The first step for starting a blog (or anything) is deciding its name. This is the part where many bloggers struggle.
Remember, the name is important. The name is the identity of your brand. So, take your time, brainstorm, ask your friends and come up with some great potential names.
If you are stuck, here’s how to choose a cool name for your travel blog:
- First, look at other Travel Blog names to get ideas about what sells.
- Then, write down your blog’s topic. Decide what you will be writing about. If you have a niche (city travel or hiking or something like that), write it down.
- Next, grab a Thesaurus and start looking at words related to your topic. If you didn’t find many interesting words, you can even consider a different language.
- Then, start writing all the possible words related to your topic.
- After you have a list of words, BRAINSTORM! Play with words. Make phrases. Use abbreviations. You could even try to mix them with your name or your pet’s name.
- If you are still stuck, use your full name.
Now that you have a list of possible names, it’s time to cross some of them out!
Requirements of a good blog name:
- The name should be related to your topic unless you are using your name.
- The name should be descriptive (again doesn’t apply if you use your name).
- The name should be short (three words max) and catchy.
- The name should be easy to remember. No hyphens and numbers.
- The name should be easy to spell.
- The name should be timeless. It should be good even after 10 years. Don’t put a time barrier to your blog’s name. For example, if you use a name “travelinginmytwenties”, what will you do after you turn Thirty?
Once your list of potential names for your travel blog meets the criteria of a good blog name, it is time to check for their availability.
Go to namecheap.com, enter the shortlisted names in the search box. To make your search easier, enter the names with “.com” suffix. You should try to find a .com domain because they are common and trustworthy (to your audiences’ eyes at least).
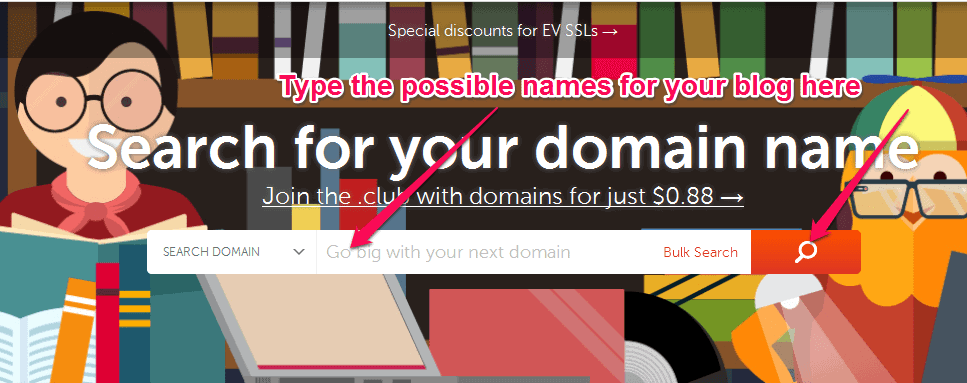
If few names you entered are not available, don’t panic. Keep trying. Be creative. I know, you can do it!
If you found a domain name, WAIT. Don’t register it yet because I will tell you a way to register the domain name for FREE in the next step!
Step 2 ⇒ Choose a Reliable Web Host and Register the Domain Name
What is a web host? In simple terms, it is a space that you rent out to keep the contents of your blog. Web hosting service allows your blog to be displayed on the Internet. Web hosting companies give you a certain amount of storage and bandwidth for a price.
You can buy different types of hosting services, but for a starter shared hosting is the best. It is cheap and gets the job done.
Which web hosting company to choose for your travel blog? There are lots of websites, blog, forums dedicated to helping you find a suitable web host. But the problem is, most of them are biased and are probably paid reviews. So, finding a reliable and affordable web host takes hours of research.
However, you are in luck!
I have done the long hours of research on web hosts, and have tried many web hosts.
I migrated through tons of web hosting services until I finally settled with SiteGround. And, after I started using SiteGround, I always recommend SiteGround to everyone, as it is cheap, reliable and WordPress ready.
Benefits of SiteGround for travel blogs:
- You get a free domain. Not many web hosts offer a free domain name. You can register the domain name you searched earlier at namecheap.com here.
- SiteGround is WordPress ready. And, WordPress.com officially recommends SiteGround. We will use WordPress to create the website.
- SiteGround has uptime of 99.99%. This means your blog will always be accessible.
- SiteGround has a superb 24/7 customer support service.
- SiteGround uses SSDs on their servers. This makes SiteGround one of the fastest web hosts. For the price you pay, no other web hosting service provides the speed like SiteGround does.
- You get free SSL certificate (HTTPS) on SiteGround. SiteGround offers built in Let’s Encrypt SSL certificate. Having an SSL certificate makes your blog trustworthy. Also, the chance of your food blog coming earlier in the Google search results is high if your blog’s URL has HTTPS.
How to get SiteGround web host and free domain
Step 1: Click here to go to SiteGround.
Step 2: Choose “StartUp” plan. It is the best plan for starters.
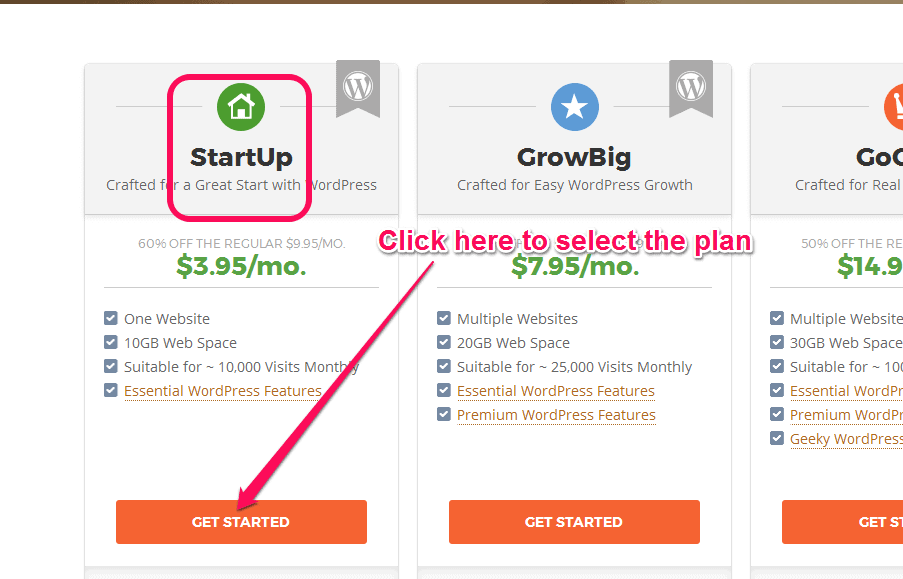
Step 3: Select register a new domain. Enter the domain name you searched at namecheap.com here. And then click “PROCEED”.
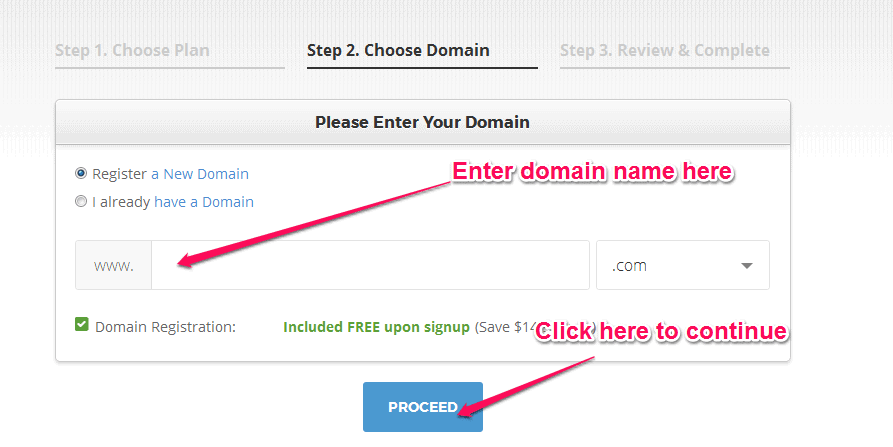
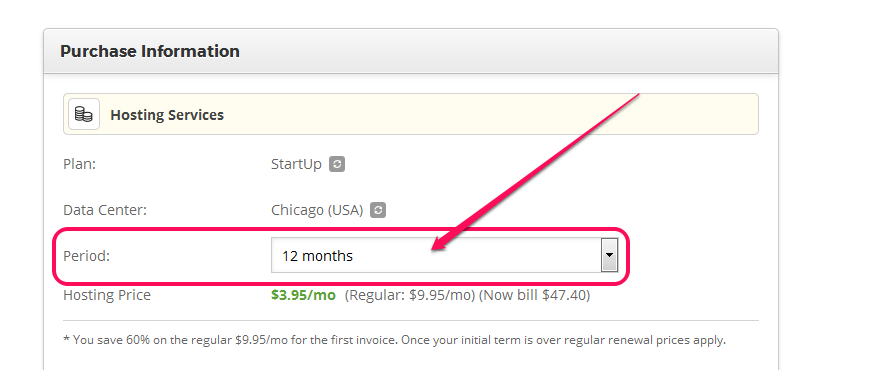
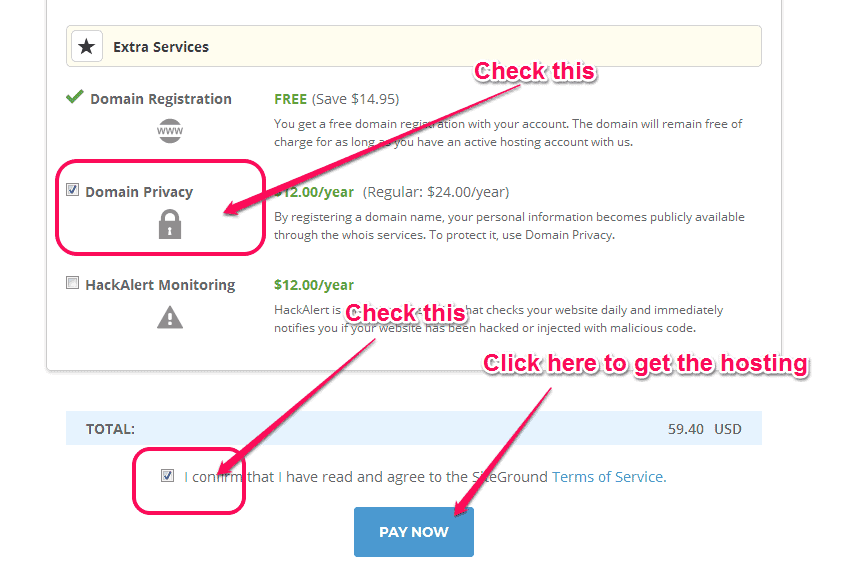
Domain Privacy prevents your information like name, address and phone number from being displayed in Domain WHOIS search. This means your personal information will be protected.
Cheers! You have a domain name and a web host now. And, you are just one step away from having your own blog.
Step 3 ⇒ Install WordPress
We will use WordPress to build the website.
WordPress is a platform to create and manage your blog. WordPress eases the task of creating a blog for people like you and me. We can create a fully functional website without ever understanding a single line of code. And, that’s good because we are not here to learn how to code. We are here to start a travel blog!
How to install WordPress:
Installing Wordpress is a piece of cake. Once you register with SiteGround, you can install WordPress with few clicks.
First, login to your SiteGround account. Check your email for the login info. You get an email with login instructions after you successfully register at SiteGround.
Then, follow these easy step by step instructions by SiteGround. Your WordPress blog will be ready in four steps.
CONGRATULATIONS! You are a travel blogger now!
You can now start writing.
But before that, your travel blog needs a little makeover. And, we will talk about how to make your blog beautiful shortly.
For now, you need access your WordPress admin panel and change some settings.
Type http://yourblogname.com/wp-admin on your web browser to access the admin panel of your WordPress. Login with your credentials (check your email for them). You must have received an email containing your login information after you installed WordPress.
The WordPress admin panel is where you will personalize your blog and post your experience.
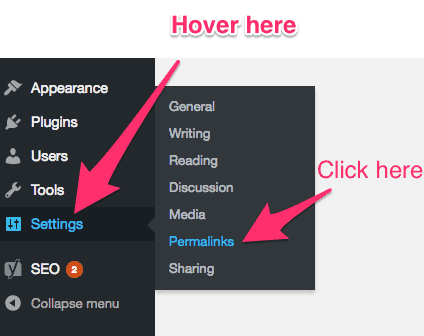
After you are logged in, go to Settings and click on Permalinks in the admin panel.
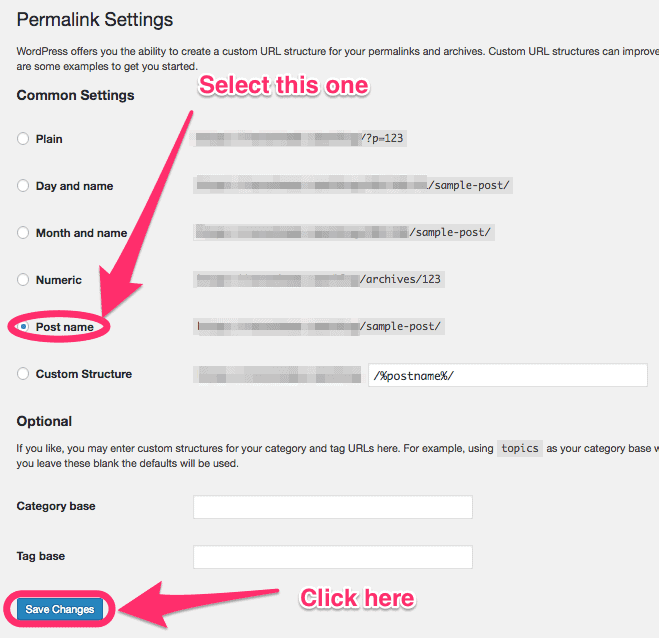
Then, in the Custom Settings select “Post Name” and click Save Changes.
Step 4 ⇒ Learn Basic Things About WordPress
WordPress is very easy to learn. And, I guarantee you, you will get the hang of it in no time.
Go to http://yourblogname.com/wp-admin. This is how your WordPress login screen will look like.
After you are logged in, you will see a list of menus (Dashboard, Posts, Media, Pages and so on) on your left-hand side. You can tweak your blog with these menus. You will also write and post your blog here.
Once you start exploring the admin panel for an hour, you will get the basic idea.
If you are stuck somewhere, you may check these article: Getting Started with WordPress Admin Dashboard and 15 Handy WordPress Features You Probably Didn’t Know..
Nevertheless, by the end of this tutorial, you will learn all the things you will need for getting started. So don’t panic yet!
Step 5 ⇒ Select an Awesome Design for Your Travel Blog
In this step, we will be making your travel blog pretty!
In WordPress, you can easily change the appearance, layout and design of your blog with WordPress themes. You just have to find a good looking theme and install it on your blog. And, in no time, your blog will look beautiful.
Now, let’s learn how to install WordPress themes. Don’t be intimidated, it’s super easy!
First, login to your WordPress admin panel. Then, click on Appearance => Themes.
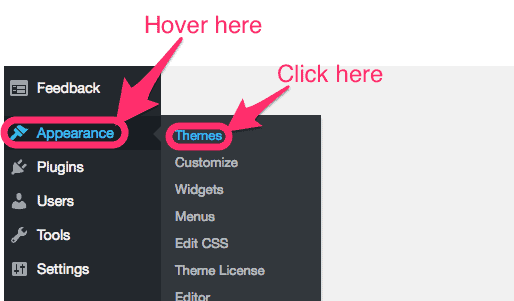
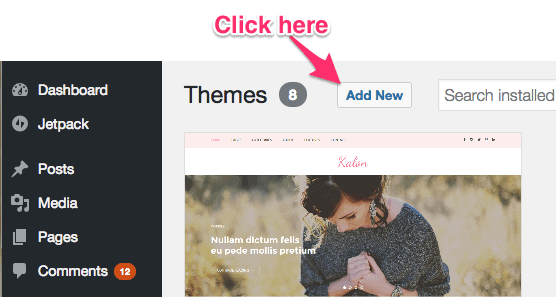
After that, click on Add New button at the top.
Now, you have two options. Search and Install free theme available in WordPress repository or upload from your computer.
How to Install and Change Free Themes from WordPress repository:
After you have clicked “Add New”, you will see a list of free WordPress themes. You can either select a theme from the list or search for other free themes using filters.
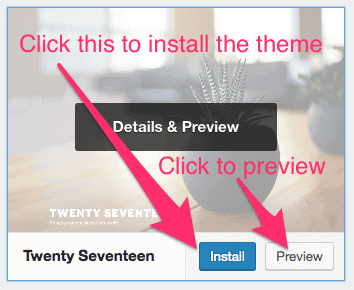
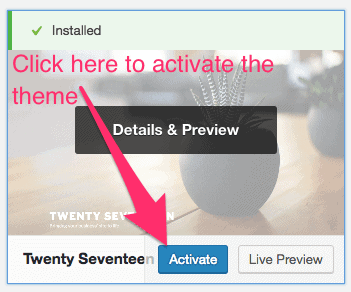
Pick a theme you like, click Preview to get an idea of the layout of the theme. If you like it, click Install. WordPress will then install the theme on your travel blog.
Now, click Activate to make it the default theme of your travel blog. Once you click Activate, you will see the theme on your new travel blog. How awesome and easy is that?
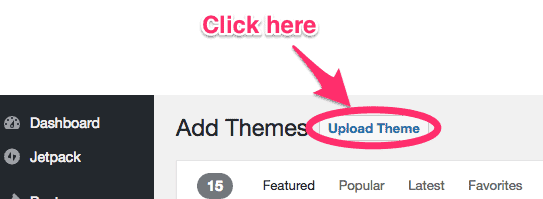
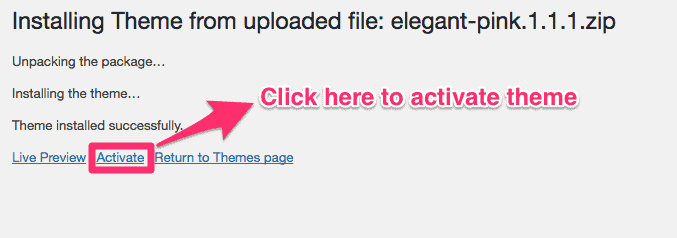
How to Install and Change the Theme by Download Method:
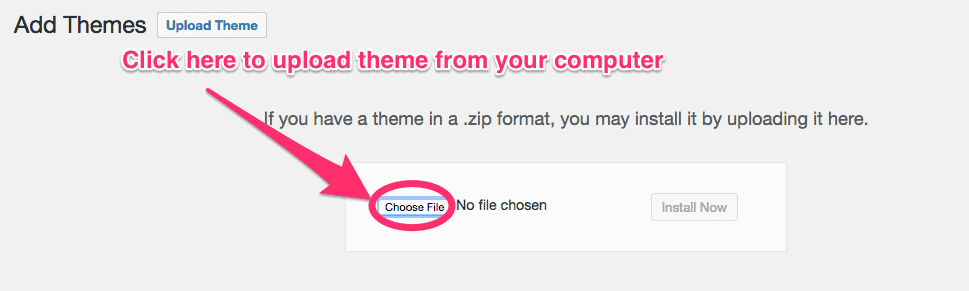
After you have clicked “Add New”, click “Upload Theme” button.
Then, click “Browse…” and select a theme from your computer. The theme should be in “.zip” format.
After the theme is successfully uploaded, the “Install Now” button will be enabled. Then, click Install Now. The theme will be installed in few seconds.
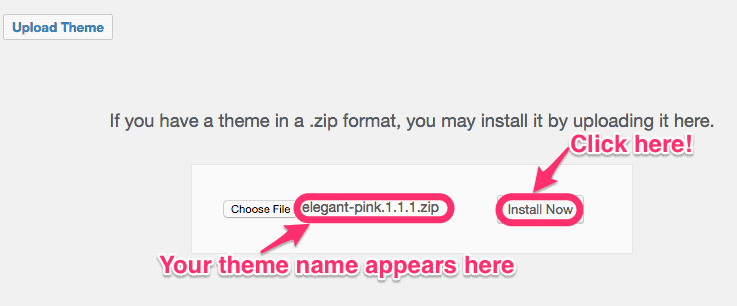
Finally, click on Activate to activate the theme on your food blog.
Good Job! You have now perfected the art of making your blog stunning.
But there’s a bigger problem!
The problem is, there are many WordPress themes (free and paid) available on the Internet. And, you and I don’t have time and money to try every single one of them.
Thus, here are few things to look for while choosing a WordPress theme. Go through them before trying out a theme.
- DESIGN: You should look for a theme that looks like a travel blog. The color and the design of the theme should look neat, attractive and should highlight your topic.
- DESIGNER: The designer of the theme should be experienced. Trust me, you don’t want to run into technical errors. Poorly coded themes, besides giving you headaches with syntax errors, is bad for SEO. It will lower your blog’s ranking on search engines like Google, Bing, Yahoo.
- RESPONSIVENESS: The theme should be optimized for every type of electronic devices– Computer, Mobile, Tablet. You don’t want to miss audience on any platforms.
- SEO Ready: A Search Engine Optimization (SEO) ready theme will rank higher in Google Search results. Thus, more people will read your blog, which is good for your popularity. To check if a theme is SEO ready, go here and paste the URL of the theme. If a theme has many errors, avoid the theme. A theme with few errors is better for SEO.
- SUPPORT FROM DEVELOPER: This applies only to the Premium themes. When you buy a Premium theme, check how responsive the support team is.
Sorry for not warning you ahead. But it looks like selecting a theme would be a picky business, doesn’t it?
But, don’t get upset.
I have picked some great themes for you. These themes will make your travel blog attractive so that you can excel at travel blogging. All the listed themes have free versions too. So, you can try the free versions first before you go Premium.
However, if you are thinking to do travel blogging for a long time (I know you are, why would you read such a long post otherwise?), invest few bucks on a quality Premium theme. With a Premium theme, you get the support from the developers themselves in case you run into technical problems.
Note: All the themes listed here are made by our team. We have lots of beautiful themes for various purposes. However, the list contains only the themes that are appropriate for a travel blog. All our themes are designed and coded by experienced designers. All the themes are responsive and SEO ready. And, you get a first-rate support from our designers.
Best Themes for a travel blog:
- The Minimal Pro
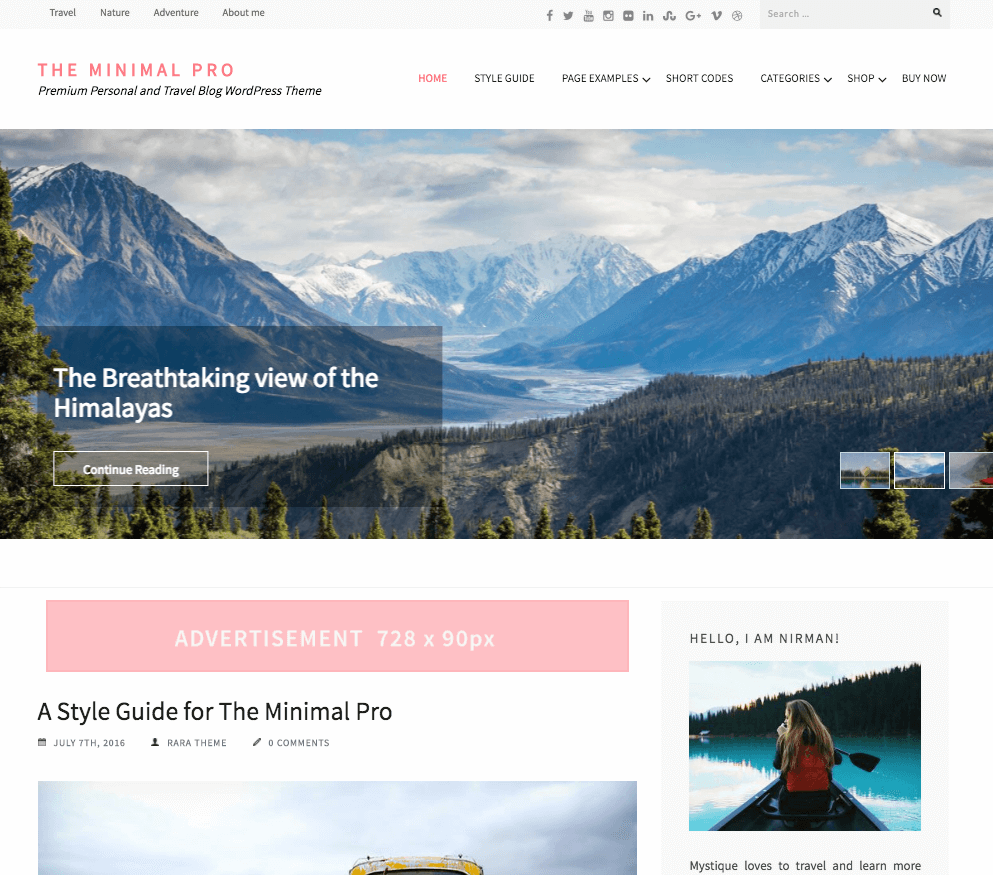
The Minimal Pro is an exquisite theme with minimal design. The theme is ideal for travel blogger who wants to focus on their content. The easy navigation and simple user interface on this theme will definitely get you some loyal followers.
The theme is also easily customizable so that you can make your blog unique and outmatch other travel bloggers. You can choose from 6 home page layouts and 5 header layouts. Also, the theme is responsive, well coded, speed-optimized and SEO ready.
View Live Demo Here | Download Here | Try Free Version Here
- Kalon Pro
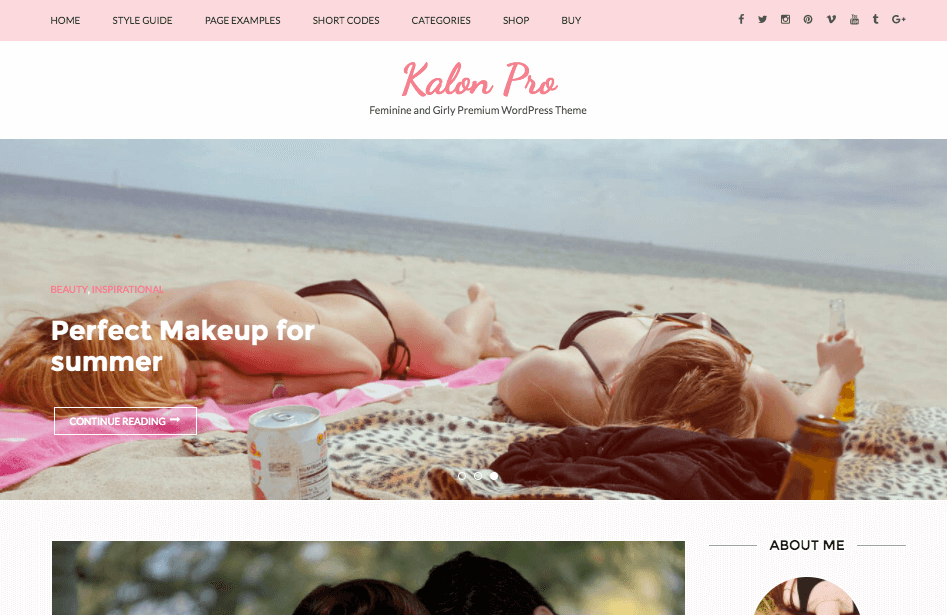
Kalon Pro is another easy to use theme. If you are looking for a more feminine look for your travel blog, you should unquestionably get this theme. Design wise this theme is a top notch.
The option to choose from 6 home page layouts and 10 header layouts will help you make your travel blog unique. And, being unique is good for competition. Kalon Pro also offers you easy full customization options. In addition, the theme is responsive, well coded, speed optimized (loads faster) and SEO ready too.
View Live Demo Here | Download Here | Try Free Version Here
- Numinous Pro
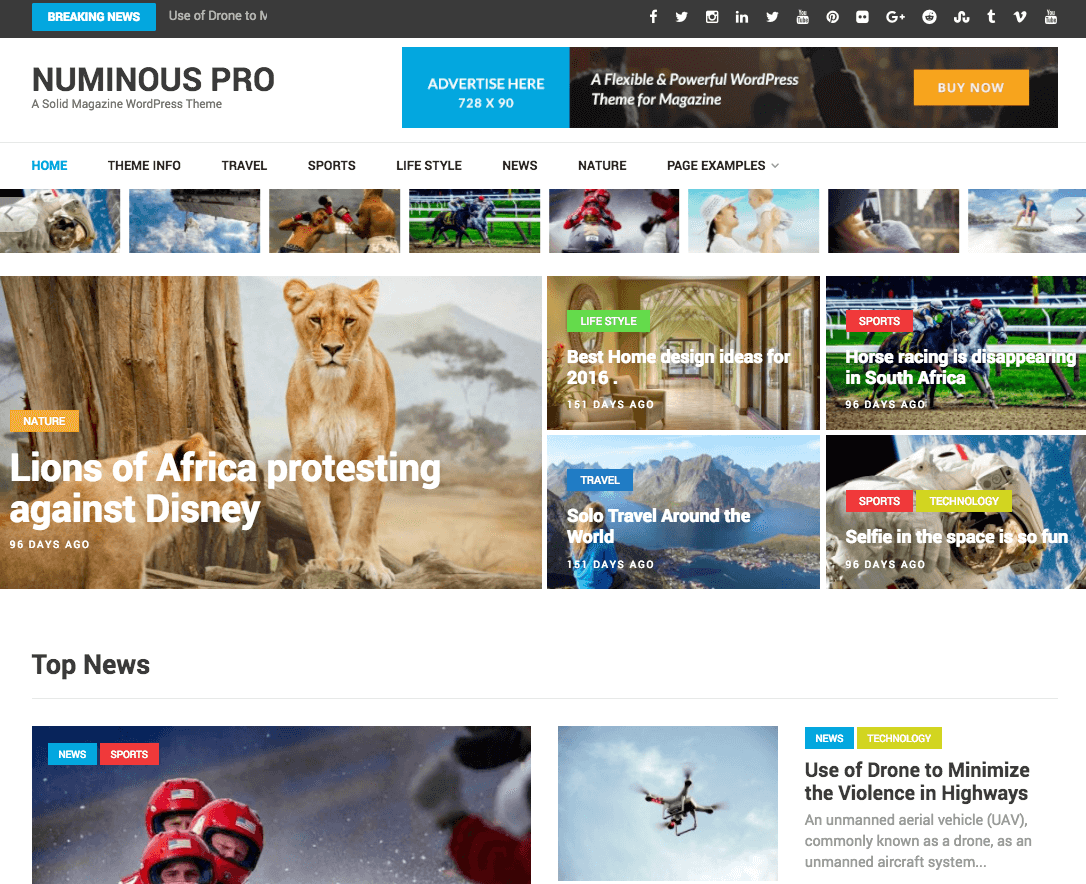
Numinous Pro is a beautiful looking theme. It is packed with a lot of features. Numinous Pro, although might look too heavy for starters, is the best theme for long term travel bloggers. This theme allows you to create unlimited categories. Categories will help you manage your content better because once you become an experienced travel blogger, you will have a LOT of content.
Numinous Pro also comes with inbuilt ad management system and Ad-blocker detector. This will help you make the most out of ads on your travel blog. Ads are one of the major sources of income for starters. Similarly, like other themes, the theme is responsive, well coded, speed optimized and SEO ready.
View Live Demo Here | Download Here | Try Free Version Here
Okay. In case you didn’t like any of these beautiful themes (I would be surprised why anyone wouldn’t like them), you can also have a look at other alternatives Elegant Pink Pro, Metro Magazine Pro and Travel Diaries Pro. All of these themes will impress your visitors and your clients, and make them visit your blog more often.
Furthermore, once you buy these themes, you can use it on any number of domains for free for lifetime. Besides all these features, you will also get great support from experienced developers if you run into any issues.
Step 6 ⇒ Install Necessary Plugins on Your WordPress
You are now almost ready to begin posting on your travel blog. Or you could just start posting right away.
However, it is best if you install some Plugins to your travel blog first.
Plugins are tools that increase the functionality of your travel blog. They will also help you organize and optimize your content. Similar to the apps you have on your smartphone, the plugins will make things easier for you.
There are lots of plugins available in WordPress (free and paid). Among them, these are the plugins that you must have on your travel blog. Install them asap!
The WordPress Plugins every travel blogger should have:
1. Akismet
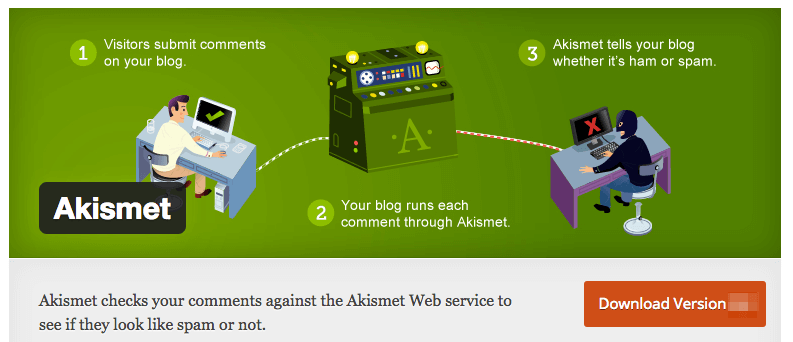
You will receive many spam comments once you start posting on your blogs. Akismet Plugin filters the spam comments and lets you review the spam comments before they are posted on your blog. Thus, you will have a spam free travel blog.
2. Yoast SEO
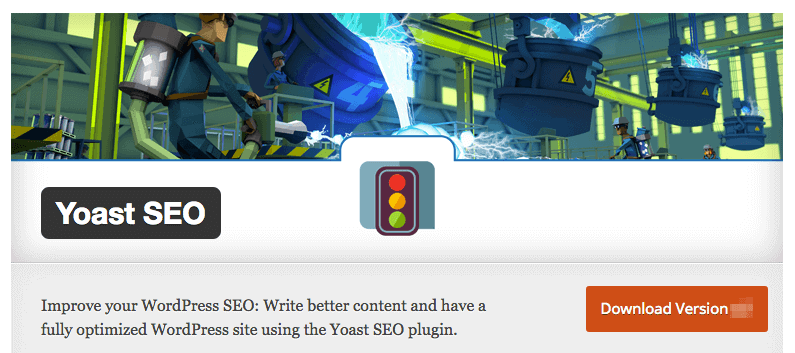
Yoast SEO is the best SEO plugin there is! Yoast SEO Plugin not only helps your blog rank higher in search engines like Google, Bing and Yahoo but also helps you write better content. It gives you real-time writing and SEO feedback.
3. Google XML Sitemaps

Google XML Sitemaps plugin tells search engines what type of content your blog has, which will eventually help your blog rank higher in search results. This plugin provides search engines a complete XML sitemap of your blog.
4. Jetpack
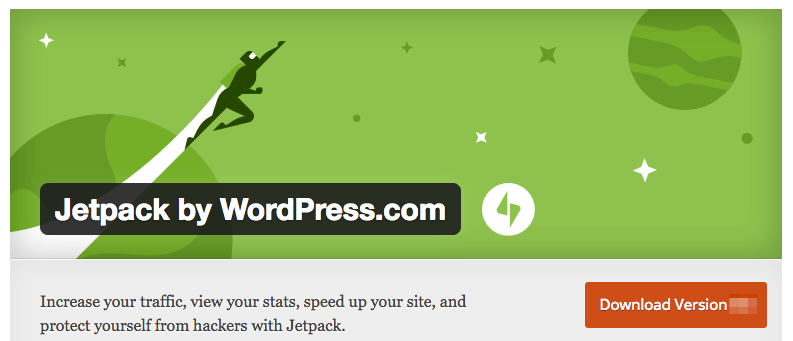
Jetpack is an official Plugin by WordPress themselves. This plugin helps you manage your WordPress blog. This plugin will also protect your travel blog against brute force attacks and unauthorized login. Similarly, this plugin provides you stats about your visitors.
5. BackUpWordPress
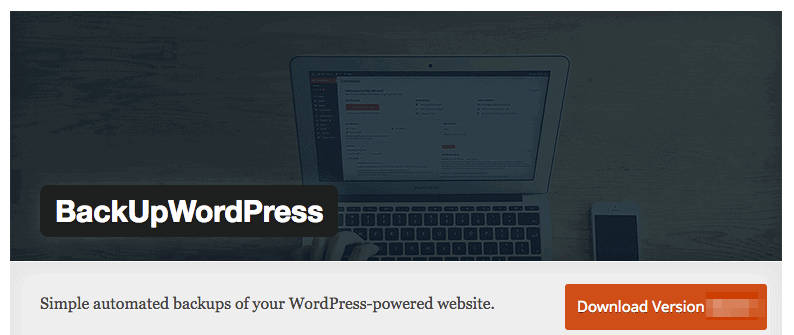
BackUpWordPress, as the name suggests, will backup your entire blog. It will backup all the content of your blog regularly. You can choose a date that suits you and schedule the backup.
6. W3 Total Cache
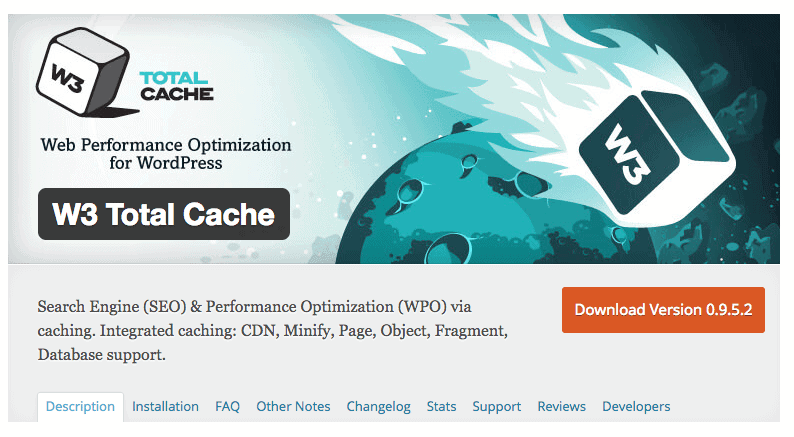
W3 Total Cache will increase the performance of your travel blog via caching. The plugin stores necessary files on your visitor’s browser so that your regular visitors will experience a faster page load time. This is a must have plugin for increasing traffic to your travel blog.
7. Smush Image Compression and Optimization
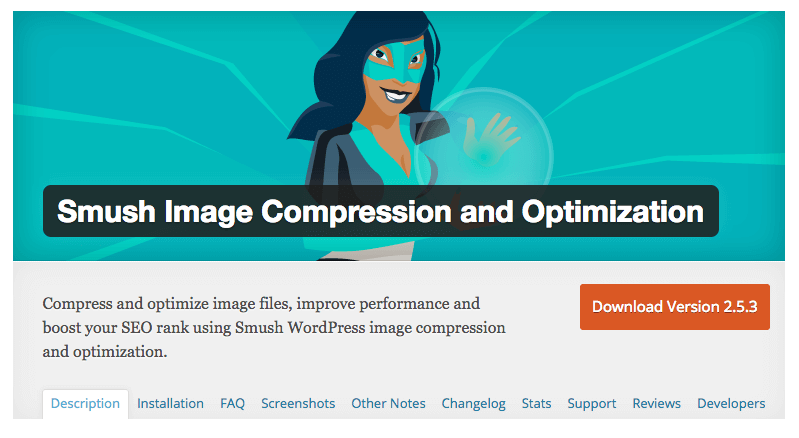
As a travel blogger, you will have a lot of images. And, having many images on your blog can slow down your travel blog. Therefore, you need to optimize and compress your high-quality images before posting.
Smush Image Compression and Optimization plugin will help you optimize, resize and compress your images with ease.
8. Geo Mashup

Geo Mashup lets you add maps (Google Maps v3, OpenStreetMap or Leaflet) easily to your travel blog. Since you will be traveling a lot, your followers would love to see the details of your destinations. Thus, you need Geo Mashup to help you easily point out locations on your travel blog.
9. Social Media and Share Icons (Ultimate Social Media)
Being active on Social Media is mandatory for a successful travel blogger. You, as a travel blogger, need to promote your blog posts in social media.
Social Media and Share Icons plugin shows attractive social media icons on your travel blog so that people can easily share your posts on their social media. This plugin will help you make your posts viral!
So you now know what plugins to add to your travel blog, but do you know how to install them on your blog? Here’s the guide:
How to install a WordPress Plugin
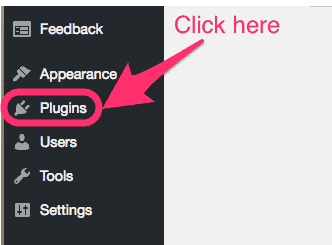
Step 1: Login to your WordPress Admin (http:yourblogname.com/wp-admin).
Step 2: Clik Plugins
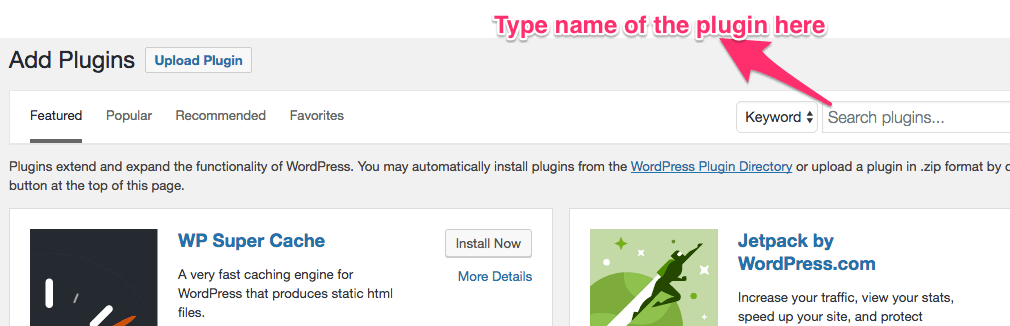
Step 3: Click “Add New” button

Step 4: Search the Plugin on the search bar.
Step 5: Click “Install Now” button. I am installing Akismet plugin.

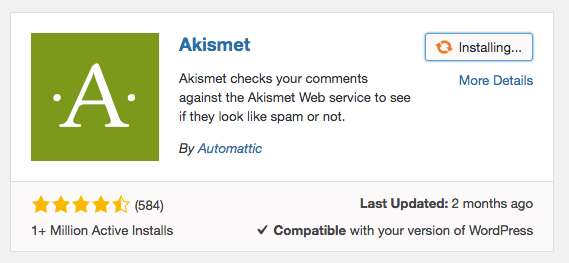
Step 6: Click “Activate”
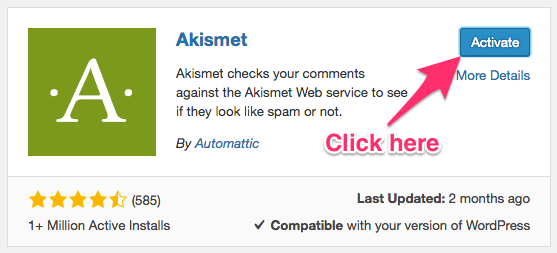
Once activated, the plugin will be shown in your plugin list.

That’s is all. Installing Plugin is a child’s play.
Step 7 ⇒ Install Google Tools
Google tools are required to analyze how Google sees your website and also to get detail information about the visitors.
If you don’t already have an account with Google (or Gmail), go create one here. If you already have a Gmail account, set up the following tools on your travel blog.
Google Search Console is a free tool that helps you detect errors on your website, map your website on Google search and give you information about the people who visit your website.
Setting up Google Search Console is easy. You can setup the tool through Yoast SEO plugin. Click here for the guide.
This free help you track your travel blog’s traffic. Once you install Google Search Console on your blog, you can simply create Google Analytics with the same google account and follow these instructions by Google! Here is the article on How to Add Google Analytics to WordPress.
Step 8 ⇒ Start Your Journey!
Drum roll please…
Congratulations!
You have a fully functioning travel blog with all the necessary tools.
NOW, you are ready to start your awesome journey of traveling and blogging! And making money of course!
Keep reading if you want few tricks and tips about how you can start making money with your travel blog.
Basic Steps to Start Earning Money with a Travel blog:
1. Become a Popular Traveler
Build your audience. Yes, that is the only way you can start making real money with your travel blog. You have to have loyal readers. There are few techniques for increasing traffic on your blog, let’s discuss them here.
Good Content: This is the utmost requirement for the success of your travel blog. You have to write quality content. You shouldn’t have any major spelling or grammatical errors on your blog (use tools like Grammarly). You should write in simple language (use Hemingway app to get the idea). You don’t have to be the language expert of course. Proof-read your post, if you think it’s comprehensible, post it.
Post Useful and Interesting Stuff: Besides having a quality content, you should also write stuff that people will find useful and interesting. Nobody wants to read the travel diaries of a stranger. Remember, you are not famous yet so people don’t care if you like coffee or tea (yet).
Write about how to travel for cheap, where to stay for best and affordable experience. Write about the problems you faced. And, add a little bit of humor to your writing. Also, try something adventurous, new and challenging stuff so that people keep coming back to your website.
Social Media: Create an account on every social media platform. Start following other famous travel bloggers on social media like Facebook, Twitter, Instagram. Post your photos, tag people and share interesting things on your social media. Also, be active on social media. Respond to messages and comments. Make your social media page engaging. If you have extra cash to spare, promote your Facebook page (it’s cheap).
Keep Posting: Like I said before, make an editorial calendar and keep posting regularly on your travel blog.
Write Guest Posts: Once you start to post regularly and have a good number of posts, you can search for famous blogs to write a guest post.
If you write a guest post about traveling in a famous blog, it will help you bring in some visitors to your blog. Also, having a guest post on a popular website will help you with your branding and credibility. You will be seen as an expert on traveling.
Plus, writing guest posts will help you build backlinks. And, backlinks are good for SEO.
To find places to write guest posts, you need to follow famous blogs and contact them. You can also use Twitter to find guest posts. Here’s how.
2. Join Travel Bloggers Association
Join communities of travel bloggers and build your network.
For starters, you can join Travel Bloggers Association, who knows you could land yourself a guest post through these communities. Also, if you are a member of famous travel blogger club, companies related to traveling may even contact you for sponsorship and advertisements.
3. Add Adsense
If you have a reasonable number of posts on your travel blog, you can apply for Google Adsense. With Google Adsense, you can place ads on your blog and you will receive money for it. Google Adsense is a good way of earning regular passive income from your travel blog.
4. Learn SEO Techniques
Search Engine Optimization (SEO) is a method of making your website rank higher on search engines like Google. There is no secret magic behind it. It is a simple technique. You need to find some time from your busy schedule and read about mastering SEO. Anyways, we already installed few plugins to help you with it.
For now, you can follow these 7 On-Page SEO techniques for instantly boosting your blog’s ranking.
You can also read more about SEO on Moz.com. It is a great place to learn about SEO and making your travel blog rank higher.
Well, if you are a beginner, that’s all the information you need to start a travel blog.
If you would like to learn in detail about how travel bloggers make money with their travel blog, you may look at this article “How to Make Money with a Travel Blog“.


This is such an awesome content! Loved it. Deserves a lot of appreciation. Keep Up the good work.
One Question: Which plugin did you use for the content index creation ?
How to optimize images for uploading in Wordpress blog ?
Can you make a blog post on all essential plugins ?
Currently i am using 20 odd plugins in my website http://www.avikbal.com These plugins made the website too heavy to load. How can i improve the site speed ?
Thanks Avik.
We use Table Of Contents Plus plugin by Michael Tran for creating table of content. We usually optimize the images using Photoshop or tinypng.net. Hope that helped. 🙂
We stumbled over here from a different web address and thought I might as well
check things out. I like what I see so i am just following you.
Look forward to going over your web page for a second time.