I think you will agree with me when I say WordPress is amazing!
Ever since I came across WordPress five years ago, I became a big fan of it. WordPress is easy to use and has lots of useful features (some secret features too).
Over the years, I learned a few tricks that helped me to utilize WordPress better!
If you use WordPress regularly, you might have a good handle on how everything works.
But, did you know that when you dig deeper, you can find some cool “hidden” WordPress features?
In this posts, I’m going to share with you 15 of these hidden features so that you can get maximum of WordPress.
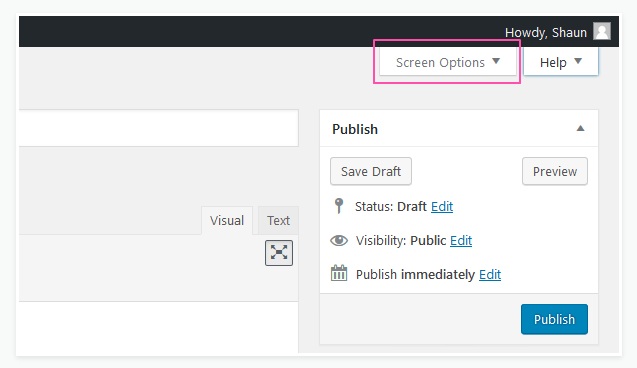
1. Screen Options
To start our list, this is an option only a few people may know of.
Chances are that you might have noticed “Screen Options” button at the top of some pages on your WordPress admin area.

This button is the key to unlocking other interesting features of WordPress that we will be talking about in this article.
The Screen Options button allows you to show and hide items on the WordPress admin screen that you are currently viewing.
Click on Screen Options to open a drop-down menu that unlocks all the hidden features that the screen has to offer.
2. Change the Author of a Post
You might have seen guest posts articles where the owner of the blog have published an article under their name, even though they have stated it was written by someone else.
This might have been their intention.
Or, it could also be that they didn’t know how to switch the attribution to the another author/user without logging into their account.
Changing author name is very easy in WordPress.
To switch the attribution to another author, click on “Screen Options” on the post editor page. Then, check the option called Author.
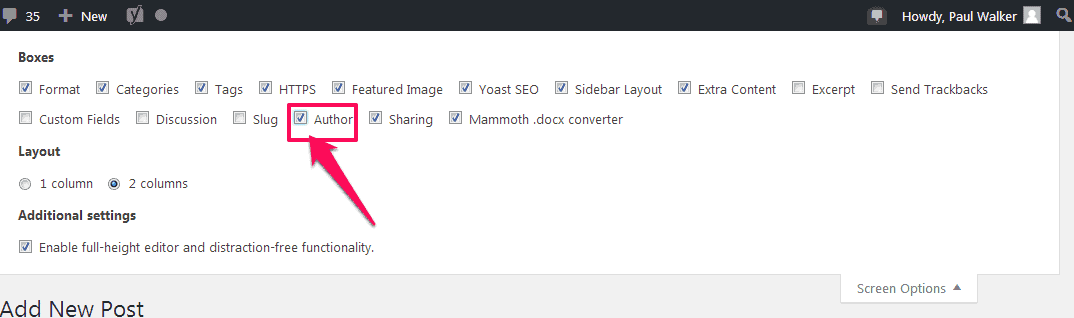
Now, scroll down to the bottom of your screen. You will find an Author tab.

Click the drop-down menu and select the author to whom you want to give the attribution. The user needs to have an account on your website. If the author doesn’t have an account, you can go ahead and create an account for the author.
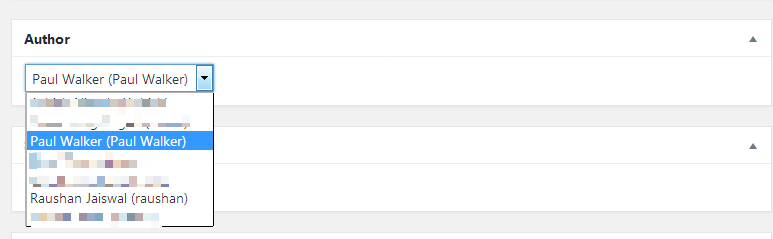
The post will be then published under the correct author attribution.
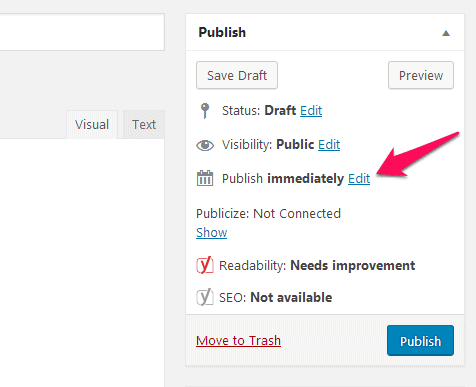
3. Schedule a Post
Sometimes you might not want to publish a post right away. Instead, you may want to get the post finished today and publish on another day.
Can you do this without a plugin? Absolutely!
WordPress supports post scheduling.
On the right-hand side of the Post Editor, you can find the Publish Box. Click on Edit, next to the Publish button.
This opens up a date entry option. Enter date and time to schedule the post, and click OK.
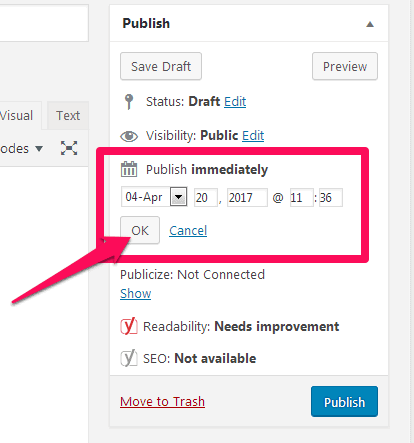
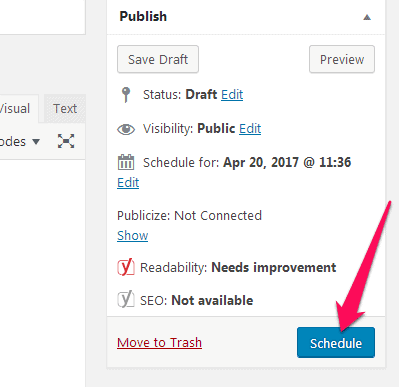
You will notice that, after you schedule a post, the Publish button will switch with a Schedule button.
Your post is now scheduled. As easy as that!
4. Make a Post Sticky
When you publish a post in WordPress, WordPress displays the latest post on the top and pushes the older posts down the page.
This means only your recent posts will be displayed on the front page.
But, what if you want to display an old post above the fresh posts on the front page? Is there a way to do that?
With WordPress, absolutely!
This feature is called “Sticky Post”, and it is easy to make a post sticky in WordPress.
Open the post that you want to make sticky, and navigate over to the Publish box. Click on “Edit” button next to the Visibility.
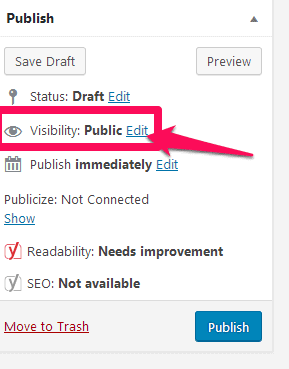
You will get a drop down list with an option called “Stick this post to the front page” when you select visibility to Public. Check the option, and click OK
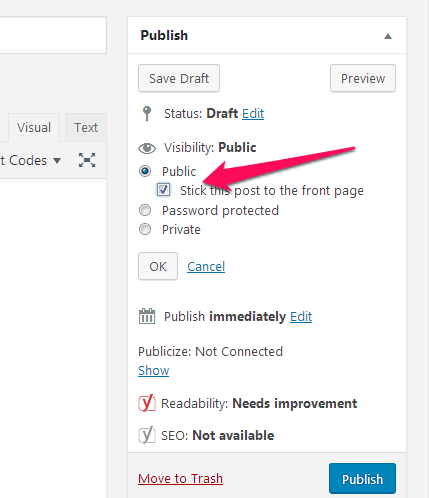
Now the post will be displayed on top of the fresh content on the front page.
5. Distraction Free Writing
WordPress post editor has so many options that, at times, it can be distracting.
If you want to stay focused and productive, you can enable distraction free writing mode in WordPress.
When you enable distraction free writing mode, it will hide all the options except the content editor.
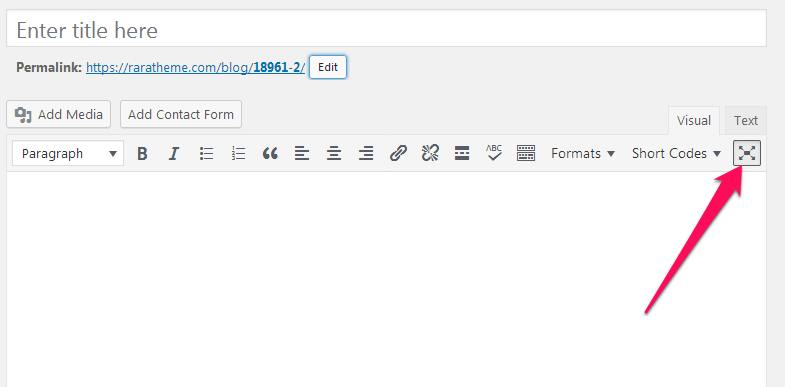
To enable distraction free writing, go to any post or page editor. At the top right-hand corner of the content editor, you will find a button (just below Visual and Text tab). Click on it.
Or, simply enter “Shift+Alt+W” on Windows OS and “Shift+Option+W” on macOS while on the content editor.
If you want the menu options back, just move your mouse over to the far right or far left, and all the options will reappear.
Please note Distraction-Free Writing Mode is available from 4.1 version of WordPress. So if you haven’t updated your WordPress, please update. Updating your WordPress is important for security issues too.
6. WordPress Image Editor
Did you know WordPress has built-in image editor?
It is nowhere as powerful as image editing tools like Photoshop. But, it provides you with an easy way to edit, resize, crop, and rotate your images.
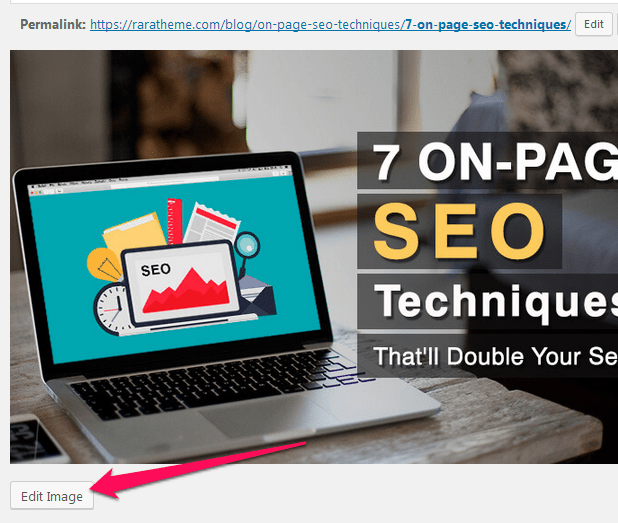
To edit an image, navigate to Media > Library.
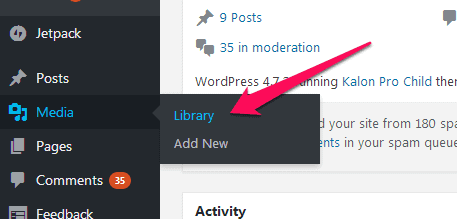
Click on the image you want to edit. And then, click on “Edit Image” button below the image.
Click “Save” after you complete editing.
7. Default Image Sizes
When you add an image to your WordPress site, WordPress offers four sizing options – full size, large, medium, and thumbnail.
Full-size is self-explanatory. But, how about the other three size options?
Though WordPress comes with preset image sizes, you can customize the default image dimensions via Settings > Media.
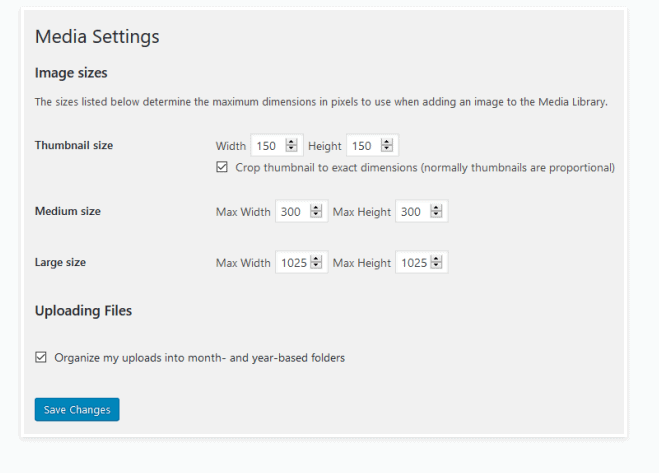
You can set the maximum dimensions for each image size options.
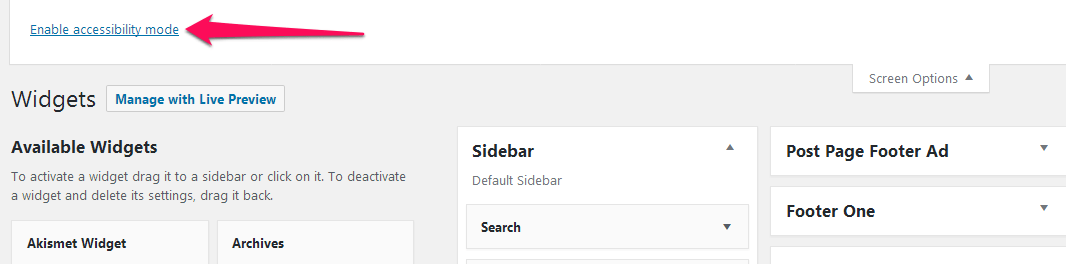
8. Accessibility Mode for Widgets
Widget is a helpful feature of WordPress. It lets you add cool things on the sidebar using the WordPress’ drag-and-drop functionality.
But, not everyone wants to use drag-and-drop feature.
So for those who like doing things manually, WordPress provides “accessibility mode” to add widgets. Instead of drag-and-drop, you will have to click on “Add” button to add widgets.
To use Accessibility Mode, navigate to Appearance > Widgets. Click on “Screen Options” and then click on “Enable accessibility mode”.
After you have enabled accessibility mode, the widgets page will reload. You will now see “Add” button next to every widget.
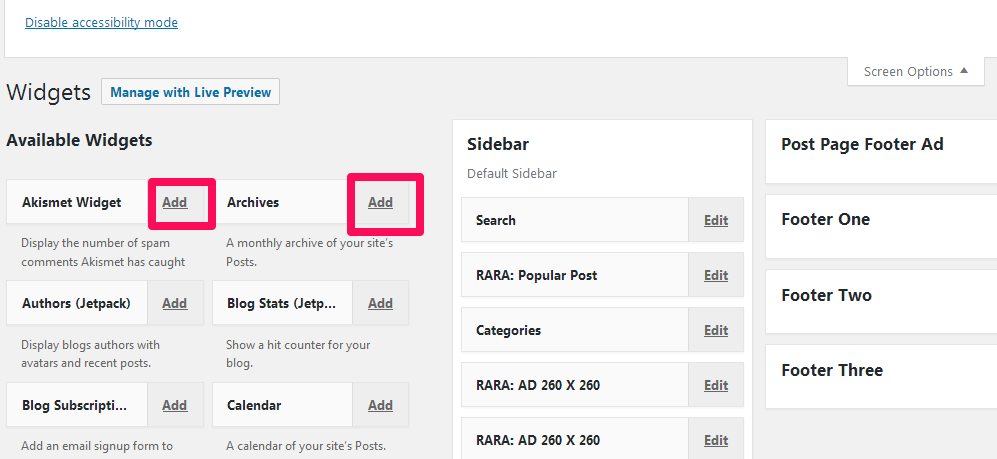
Click on “Add” to add widgets to a sidebar. You will then be taken to a page where you can manually assign the widget to sidebars.

This is not a smooth process. But, if you struggle with drag and drop, you will find it helpful.
To get back drag-and-drop feature back, click on Screen Options and disable accessibility mode.
9. Keyboard Shortcuts
Editing an article in WordPress can be tedious and time consuming with lots of mouse clicks.
However, good news is that WordPress offers shortcut keys, which are extremely helpful to stay productive and edit articles quickly.
For example, if you want to make a section of your content Title (h2), the normal way to do that is by highlighting the text, and then, going through the heading options, and choosing the heading 2 option.
That is a long process.
Instead, you could just go to the desired section of the content and enter “Control + Option + 2” on macOS (Alt + Shift + 2 on Windows) to make the section h2.
This is just one of many editing hacks.
To see the entire list of keyboard shortcuts, click on Toolbar Toggle to open the editor’s kitchen sink. Then click on the “Question Mark”.
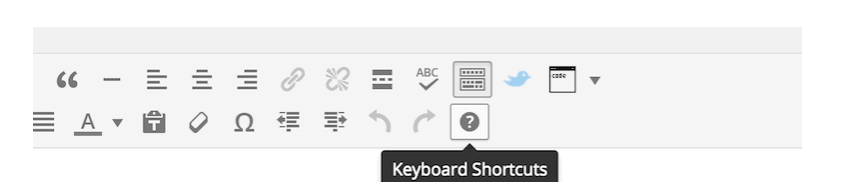
This will display a list of all the shortcuts that you can use in the editor to edit your articles.
10. Get Comment Notifications When Away From Your Computer
If you run a blog, it is important to stay on the top of the comments.
But, we cannot sit in front of our computer 24/7, and wait for comments.
If you like to get notified immediately whenever someone comments on your blog, consider yourself lucky because WordPress has a feature with which you can receive an email notification of the comments right on your smartphones.
To enable this feature, navigate to Settings > Discussion. Then, check the options under Email me whenever.
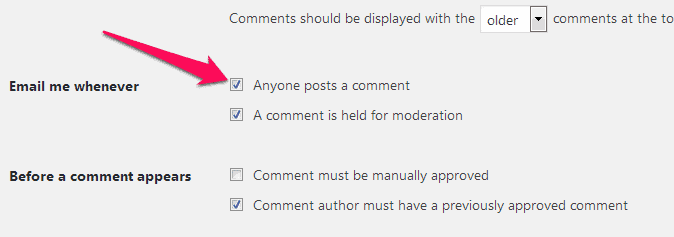
Now you will get email notifications whenever anyone writes a comment on your blog.
Alternatively, if you are using Jetpack plugin on your site, you can turn on the Notification Module. Then install the WordPress app on your smartphone and sign into your site.
You will receive banner notification on your phone like you do from Facebook or any other social media.
11. Auto Embed Certain Types of Content
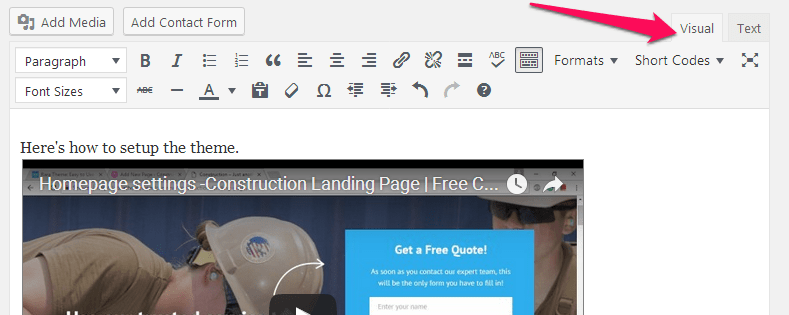
Not so long ago, embedding contents like Tweets and Youtube Videos was a hassle. But, after WordPress 4.1 update, embedding content has become super easy!
To update Tweets, Youtube videos, or other videos, all you need to do is copy the link and paste it in your post. You should copy the embed link to the text editor section.
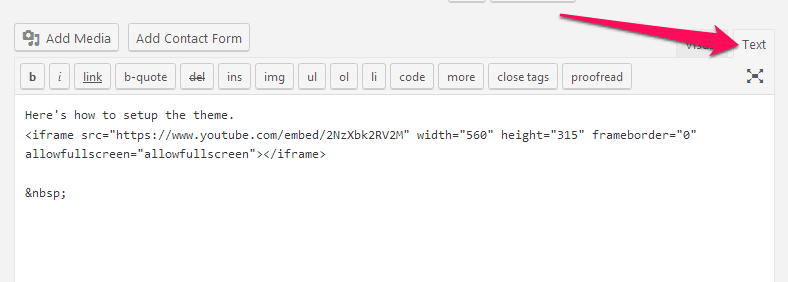
You can only embed links of certain websites because of security reasons. Click here to find out which websites are supported by WordPress auto embed.
12. Quick Edit Posts
If you want to stay productive and be able to quickly edit posts on your site, you will find Quick Edit Posts feature very helpful.
It has some nice editing options such as:
- Edit the post title and slug
- Change the date
- Change the author
- Add or change the category of the post
- Add more tags
- Make the post sticky
- Password protect the post
- Give permission for comments and pings
To quick edit posts on your site, navigate to Posts > All Posts.
Hover your mouse over a post that you want to edit. You will see some options including Quick Edit.
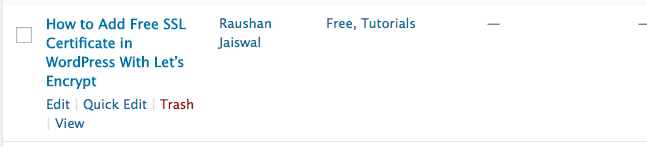
Click on Quick Edit. It will open a set of options that you can edit.
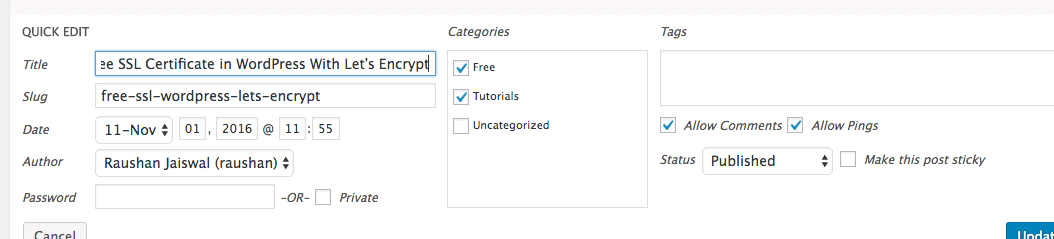
If you want to make quick changes to your posts, using Quick Edit feature can speed up the work, and you can save a lot of time.
13. Create Your Own Permalink Structure
The default permalink of WordPress is not good for Search Engine Optimisation (SEO) and user-experience.
You don’t have to stick with it.
WordPress provides various pre-defined structure options for permalinks. You can even create your own permalink structure easily.
Navigate to Settings > Permalinks.
You will see various options. At the bottom of the options, you will see Custom Structure. Select it to enter custom permalink structure.

Some pre-set structures are…
- %year%
- %monthnum%
- %day%
- %hour%
- %minute%
- %second%
- %post_id%
- %postname%
- %category%
- %author%
This may look complex, but don’t worry. I will walk you through it.
Let’s say you want to include post name, year in which the post was written, and category of the post in your post URL. You can do so by defining the Custom Permalink Structure like this:
/%postname%/%year% /%category% /
If you want the category and author name to be displayed before the post name, you can define the Custom Structure like this:
/%year%/%category%/%postname%/
Usually, if you select the permalink to Post name, you are good SEO and user experience wise.
But, in case, you want a custom permalink structure, you now know how to do it.
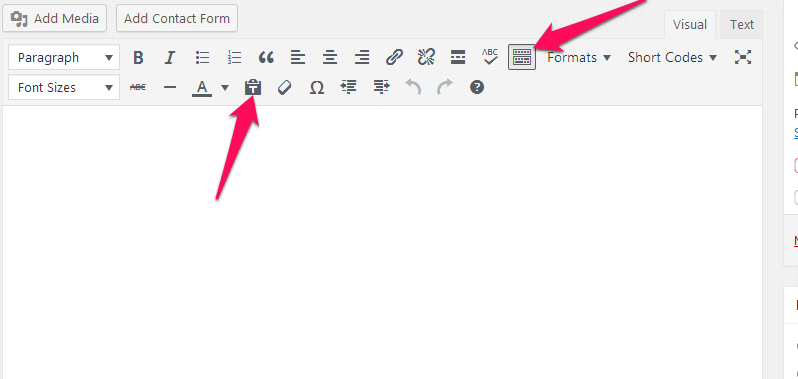
14. The Plain Text Pasting Option
Have you ever noticed that sometimes when you copy and paste something from a web page or writing software, the pasted content looks weird? This happens because styling of the other platform was also copied and pasted.
That can be very irritating! Trust me, I know that feeling.
Good news is, WordPress has an easy solution for this – The Plain Text Pasting Option.
This helpful feature is also hidden in your post editor.
To use this option, click on the Toolbar Toggle to open up the other options in the kitchen sink. In the extended menu, you will see a button shaped like a clipboard with a T on it.
Click on it, whenever you paste something into the editor, to paste the content as plain text.
This will clear all the styling of the other source and won’t mess up your formatting.
15. Import Data
Are you moving your blog from another platform to self-hosted WordPress, or from one WordPress site to another?
Moving data from one site to another is pretty complicated and time-consuming task.
But, thanks to the Import Data feature of WordPress, you can easily and quickly import your content to your WordPress site.
Navigate to Tools > Import. You will see a list of import options to choose from. Select the one that fits you best.
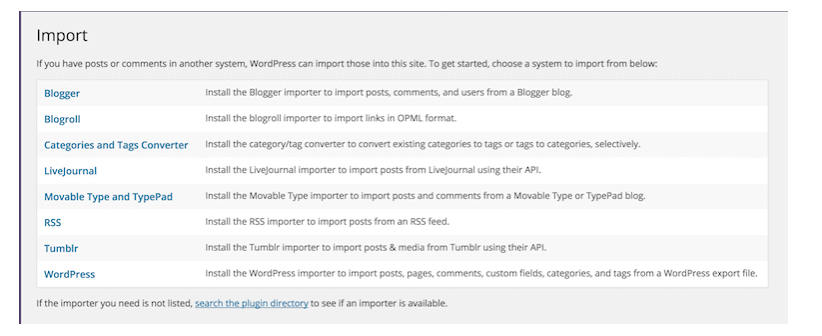
For example, if you are moving to WordPress from Blogger platform, you need to choose “Blogger” from the import option. It will then install a plugin, and you can start importing content from your Blogger site to the WordPress site.
Conclusion
These are just 15 hidden WordPress features. With every major WordPress updates, new features are introduced. So expect this list go grow bigger in the future.
Make the best use of these excellent WordPress features! We suggest you experiment with almost every feature that we mentioned here.
Did I miss any feature? Let me know in the comment below.
Besides, are you a newbie WordPress user and have just installed this platform for your site?
Check out this blog which includes 11 things to do after installing WordPress for the first time. It provides in-depth instruction on how to get the most out of this Content Management System (CMS).
I quite like looking through a post that will make people think. Also, thank you for permitting me to comment!
I must say some of the features you explained here are not noticeable for new users even me not noticed few things before this post am using Wordpress from past 7 years.