WordPress is an open-source platform for creating various types of websites. To design your site using this system, you need to learn the WordPress admin dashboard basics.
Around 40% of the total websites rely on this free Content Management System (CMS). WordPress powers some of the most influential websites, like Microsoft Blog, BBC America, and others.
WordPress allows you to not only create a good website but also to update its content regularly. You can edit web pages, posts, add new users, customize the site appearance, and more.
If you want to learn how to use this tool, please stay tuned. In this blog, you’ll get a detailed overview of the WordPress admin panel. Let’s begin with a brief introduction to the WP dashboard.
What is the WordPress Admin Dashboard?
The WP admin dashboard is a central point where you control most elements in a WordPress site. This backend panel provides complete information regarding what is going on on your website.
You can customize various components of your site using the WordPress admin panel. For instance, it allows you to create, edit, and publish new posts/pages.
With this dashboard, you get to install and activate tons of plugins. The settings you see in the WordPress dashboard changes every time you add new plugins.
If you want to change your website’s appearance, the WordPress dashboard provides options for that too.
Besides, it allows you to install new themes if you want to revamp your site altogether. The web template that you activate on your site will add new adjustment options.
Since WordPress is an open-source Content Management System (CMS), you can use this platform for free. The best part about its dashboard is that you don’t need to learn to program to build or modify your website.
How Do You Log in to The WordPress Dashboard?
Now it’s time to log in to the WordPress dashboard. But before that, you have to get a domain name and hosting for your website. Once you purchase a web hosting package, you get access to log into the cPanel.
You have to search for the WordPress application in that administrative interface. Please install the app and provide every crucial detail, like the WordPress location, site name, username, password, etc.
After that, you will receive an email from the hosting provider regarding your WordPress login URL. That link will look something like this example:
https://yourwebsitename.com/wp-admin/
Click on that link, and you enter the WordPress admin login page.
However, if you don’t get the link in an email, you can still get to this page using another approach. We request you to add “/wp-admin” right after your website’s address in the browser’s search bar.
After inserting that code, press enter. Now the URL changes to something like this:
https://yourwebsitename.com/wp-login.php
This action opens the WordPress admin page, where you get two text boxes. The first box allows you to provide a username/email address, and the second one for a password.
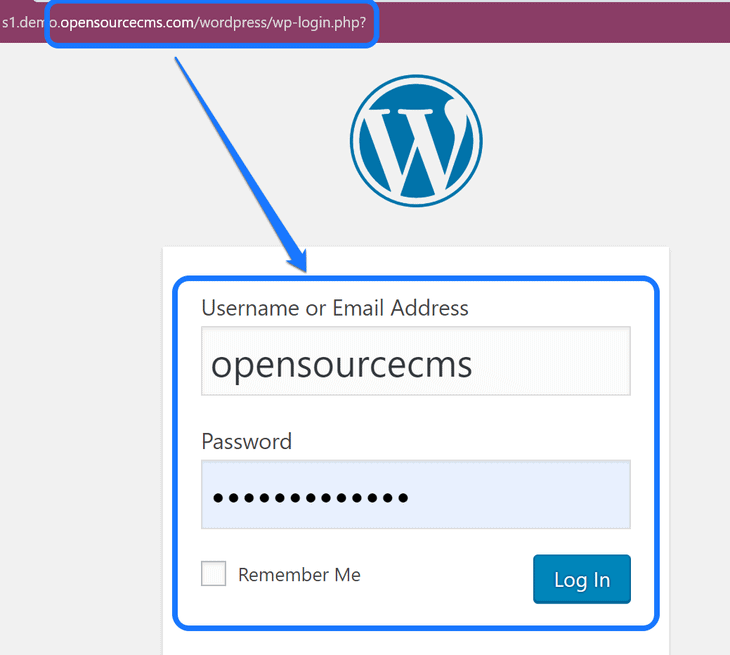
You have to insert the same credentials that you provided in the cPanel while installing the WordPress app. Please press the Login button after that. This action takes you inside your WordPress site’s admin dashboard.
What if you want to use the WordPress dashboard without purchasing web hosting? Is it possible? Yes!
You can log in to the demo WordPress admin panel using the URL given below:
https://s1.demo.opensourcecms.com/wordpress/wp-login.php
Please enter the following credentials for this demo WordPress dashboard.
Username: opensourcecms
Password: opensourcecms
Additionally, you can read this informative post to learn multiple ways to login to find your WordPress login URL.
What are the Basic Functionalities of the WordPress Dashboard?
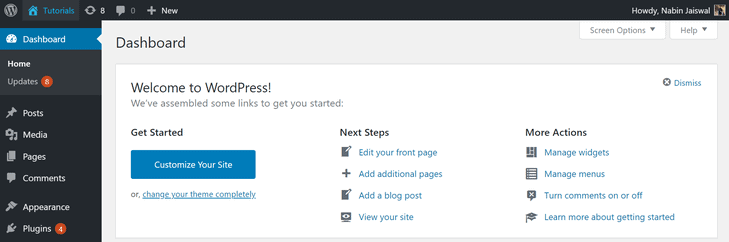
Now that you entered the WordPress admin dashboard, it’s time to explore the basic functionalities. You can see three major components in this panel: admin toolbar, main work area, and left sidebar.
Let us look at the main features of each of these areas.
1. What Options are Available in the WordPress Admin Toolbar?
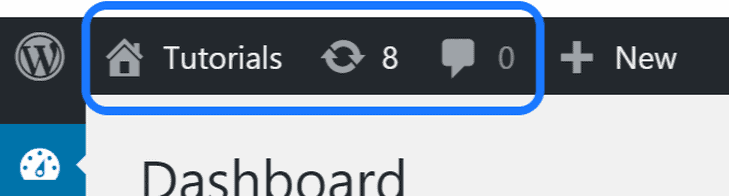
The first thing you will notice in the WordPress dashboard is the black bar at the interface’s top. It is the admin toolbar (AKA admin bar), and your website visitors cannot view it on their browser.

You can see a few options in this bar. Most of them open a drop-down menu when you hover your mouse cursor on top. For instance, the WordPress icon displays buttons for Documentations, Support, Feedback, and more.
Another option you see is the home-shaped icon. It has your website’s name, and you get a live preview of your site by clicking on it. Moving on, the circular icon and the comment-shaped button shows updates and comments, respectively.
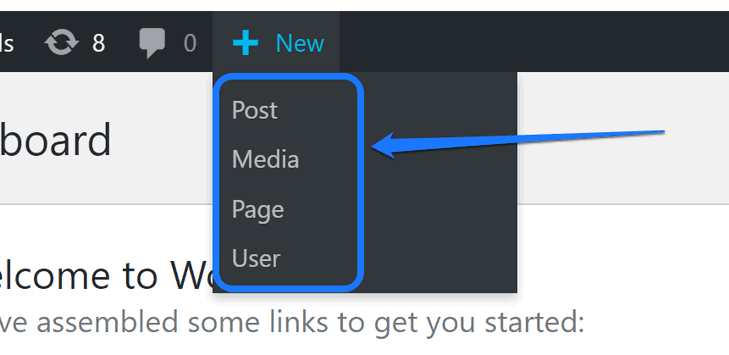
Another option you see in the admin toolbar is the plus icon (+) with the title “New” written here. It has four different buttons inside the drop-down menu: Post, Media, Page, and User. You can create new elements using this feature.
After that, when you look at the right-most corner of this bar, it will display your username and an avatar image. When you hover your cursor over it, it will display buttons to edit your profile and log out of the dashboard.
If you don’t want to view the admin toolbar in your dashboard, you can hide it. We will demonstrate the steps to achieve that in one of the upcoming sections.
2. What Options Can You Find in the WordPress Work Area?
The WordPress work area is a crucial interface where you customize all the components of your website. When you first enter the dashboard, you will get these primary sections:
Get Started
WordPress provides the most critical section at the top of the dashboard. You get two options inside it: Customize Your Site, and Change Your Theme Completely.
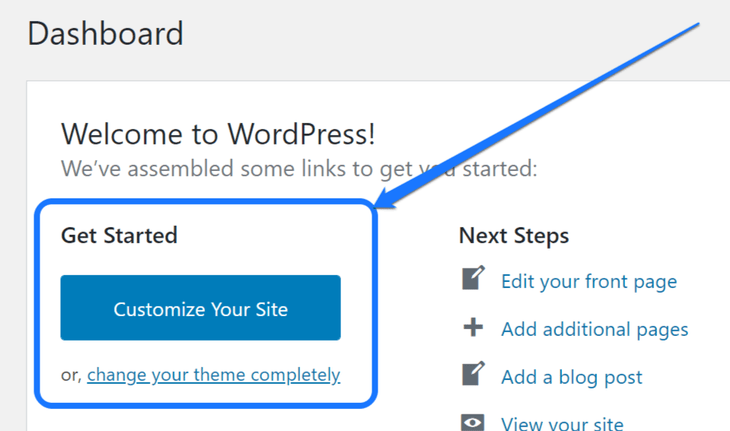
When you click on the first button, “Customize Your Site,” it takes you to the website modification interface. This page displays the settings provided by your currently installed theme.
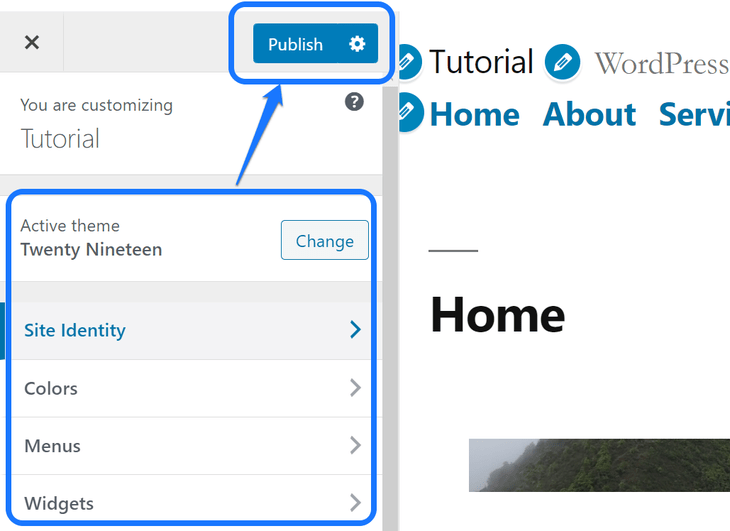
You can make related adjustments to your site and press Publish when done. It also allows you to change your current theme.
Let’s return to the WordPress dashboard and click on the “Change Your Theme Completely” button. With this action, you reach the list of all the installed themes on your website.
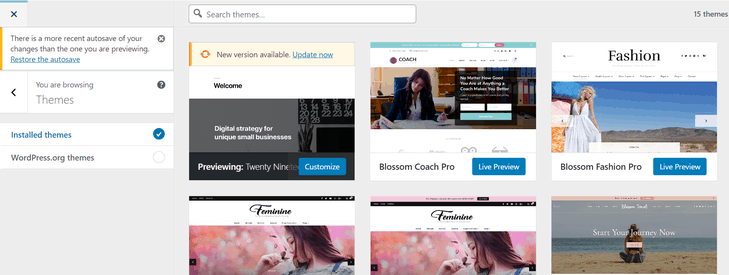
You can view the live preview of any one of these WordPress themes. Later, activate the one that you want for your website.
Next Steps
You will find four different links inside the Next Steps header on the Getting Started section’s left side. These buttons allow you to create the initial content on your site, like making a new blog, editing the front page, etc.
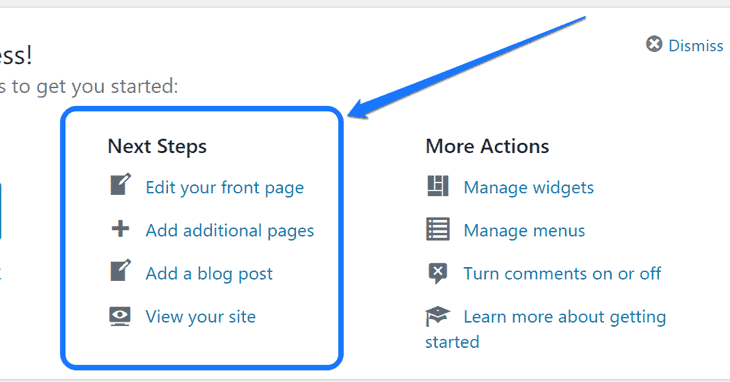
As shown in the screenshot above, the first button takes you to your homepage’s editing interface. On this page, you can add blocks for the paragraph, heading, image, video, etc., add featured images, and more.
When you click on the Add Additional Pages option, you enter a new page’s editing interface. You can use this feature to create About Us, Contact, Portfolio, and other pages.
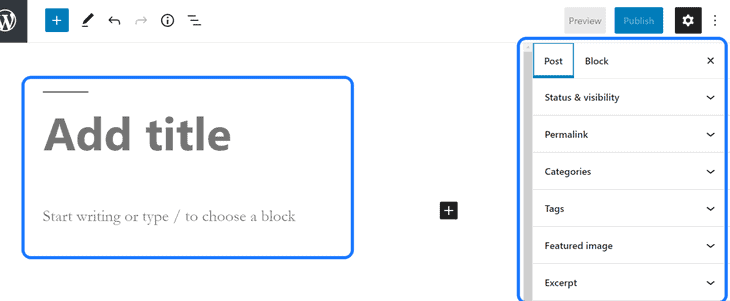
The “Add a Blog Post” button lets you create your first blog. After clicking on it, you enter the editing interface of a new post. You can add a title, write your blog, and adjust its settings using the right sidebar.
The fourth button in this section allows you to view the live preview of your website. You can use this feature to see what changes your site needs before customizing.
More Actions
This section also has four links for managing other essential components of your WordPress site. These buttons help you customize widgets, menus, and comments.
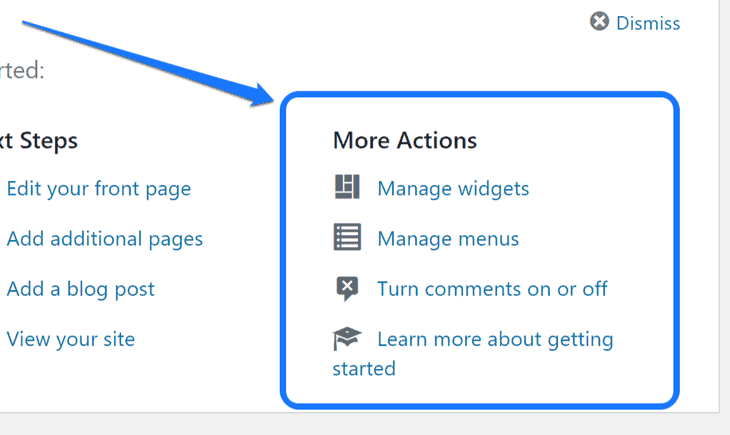
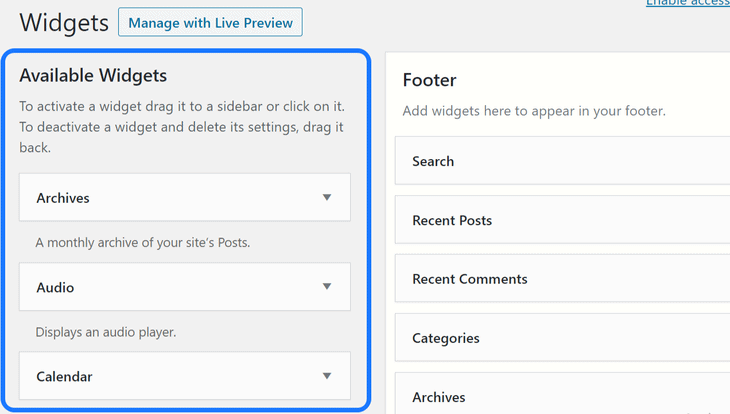
With the Manage Widgets button, you enter the library of all widgets available to include on your website. You need to click on one of the items from the left side. Then, drag it to the sidebar section at the right to display it on your website.
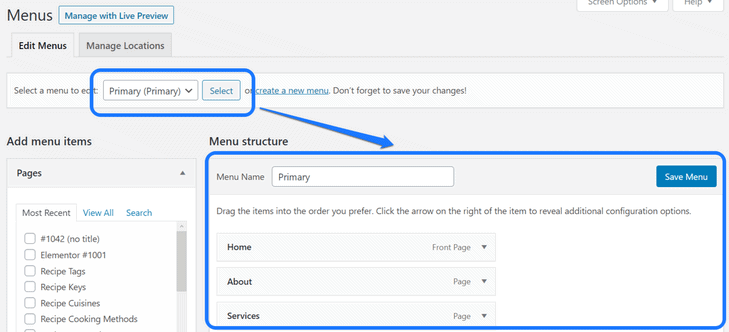
Next, the second button is related to managing menus. When you click on it, you enter the Menus page that lets you select a menu to edit. After that, you can edit, delete, or rearrange the menu items using the interface shown below.
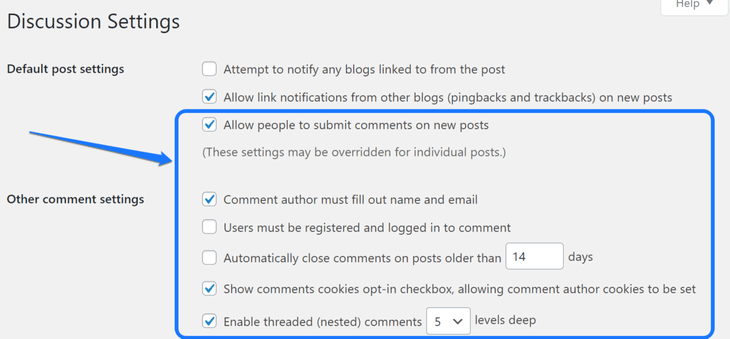
The button is for toggling the comments option on and off. You will see a list of several settings for comments. You can choose whether you want people to comment on your post or not.
The final button in the More Actions section is “Learn More About Getting Started.” As the name says, this button takes you to the Support page of WordPress. You can read the complete guide on using the WordPress dashboard from here.
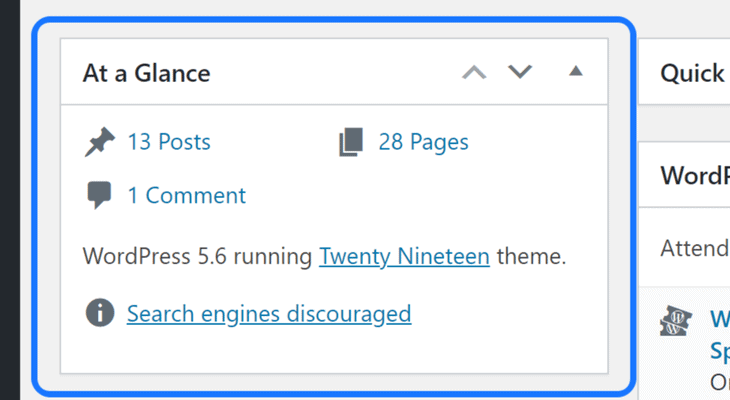
At a Glance
You can view the brief statistics of your website in the At a Glance section. Some of the stats include the number of posts, pages, and comments. Besides, this area also displays the name of the theme that you have currently activated.
Quick Draft
Do you have anything on your mind that you want to note down as a draft? If yes, this section is for that exact purpose. In the Quick Draft area, you can note down the inspiration for your future content.
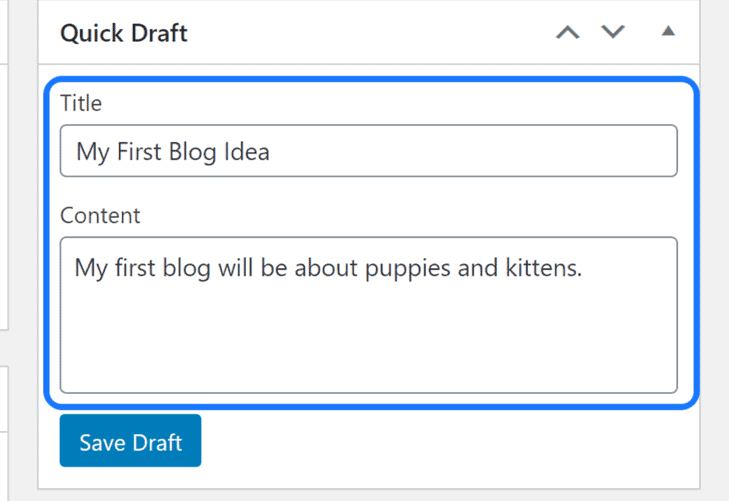
First, insert the title and write your candid idea in the Content text box. Click on the Save Draft button, and you can work on enhancing that post later.
Activity
The Activity section of the WordPress work area displays the essential updates of your website. For instance, it shows the list of recently published posts with its date and time. You can also view the recent comments on the posts.
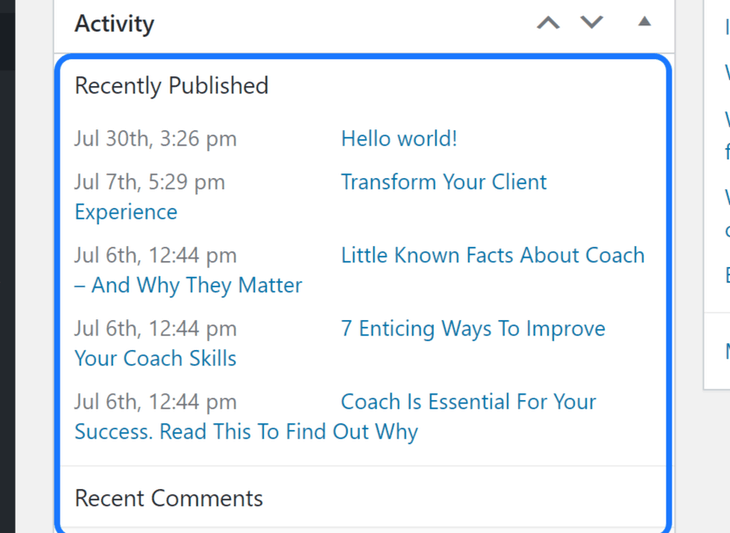
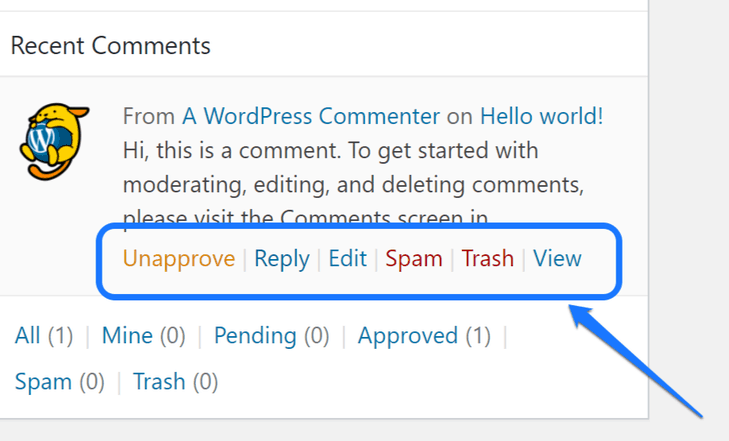
In the recent comments area, you can choose from what actions to take with them. For instance, you can approve the comments, reply, edit, view, or mark them as spam. If you don’t like it, you can also send it to the trash.
WordPress Events and News
In this section, you get a list of all the WordPress-related events happening around your location. Moreover, you can also view the latest news about updates on WordPress and its plugins.

3. What Options are There in WordPress’s Left Sidebar?
If you want an extensive list of WordPress customization options, take a look at its left sidebar. It has many options to change every element of your site. Besides, the number of settings increases every time you add a plugin to your site.
Now let’s observe the primary function of each of the options in this sidebar.
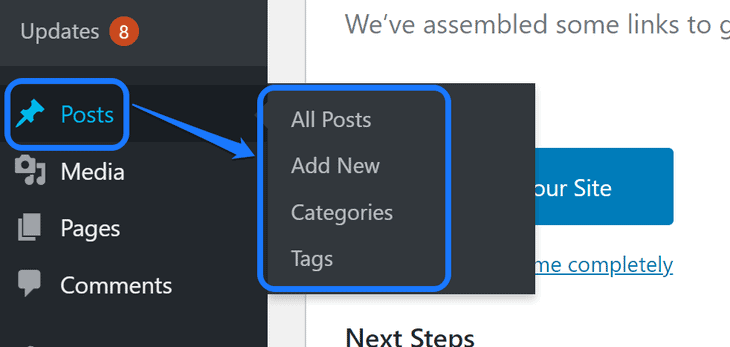
Posts
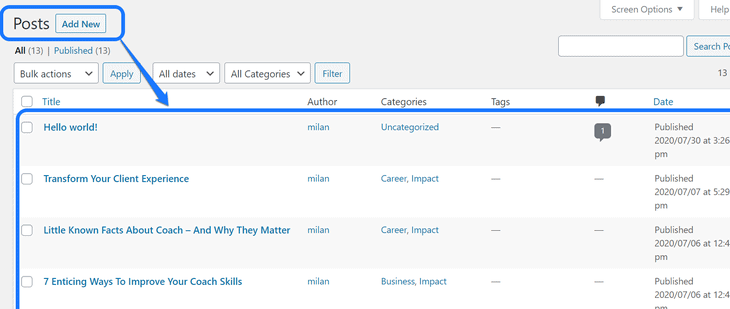
The Posts option lets you add, create, and edit new blogs/posts. Inside its drop-down menu, you get four buttons: All Posts, Add New, Categories, and Tags.
The All Posts button takes you to the list of every post saved on your dashboard. You can view its author, categories, tags, published date, and more. Additionally, it also displays the posts that you saved in drafts.
Next, the second button is for adding a new post. It takes you to the editing interface of a new post to add new blocks and write your content. You can also add media in your posts.
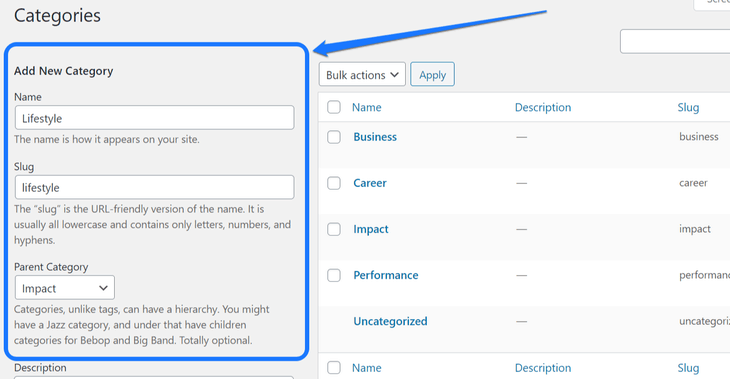
After that, you will see the Categories button. You can click on it to enter an interface to add a new category or edit previous ones. It provides text boxes to enter the new category’s name, slug, and other details.
The last button in the Posts option is for tags. WordPress lets you add new tags to connect them with your posts. You can assign several of them to a single blog/post. It helps your audience to locate blogs related to a similar topic on your website.
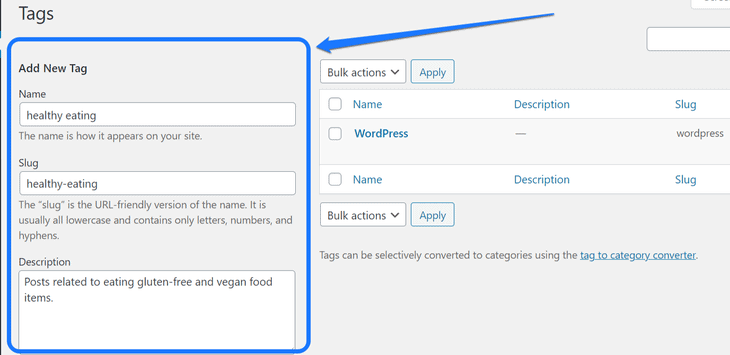
Similar to categories, you can add a new tag by inserting its name, slug, and description in the screenshot displayed above.
Media
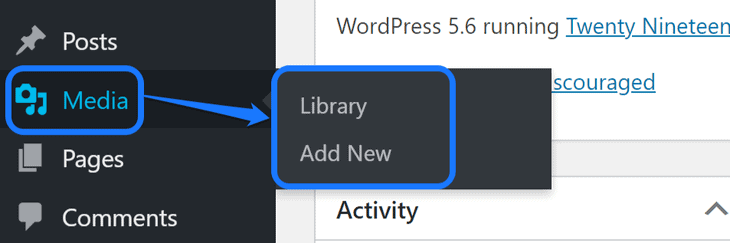
The second option in WordPress’s left sidebar is Media. It relates to adding, editing, and removing images, videos, and other media files on your website. Its drop-down menu has two items: Library and Add New.
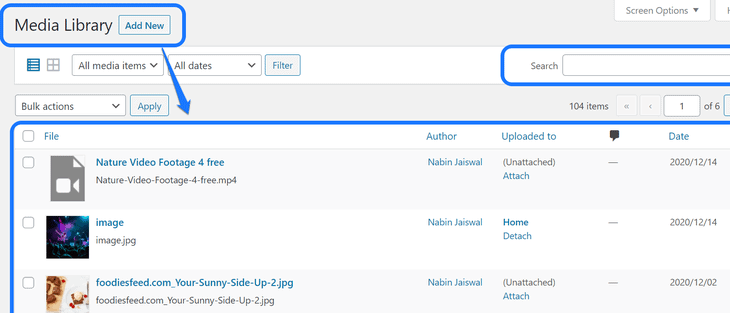
The Library button takes you to the list of all media files you have added to your WordPress dashboard. It displays the Author’s name, uploaded date, attached page/post, etc.
You can also enter your desired item using the search bar at the top-right corner.
Another button is for adding new media items in the library. You enter the Upload New Media page by clicking on this option. We suggest you click on the Select Files button to select a file from your computer’s hard drive.

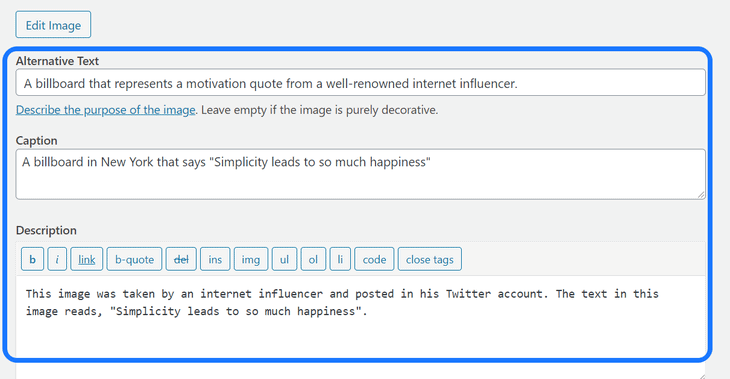
Once the upload is complete, you get an Edit button on the image’s title’s right side. It takes you to the Edit Media, where you can edit the image’s alternative text, caption, and description.
Pages
The next option in this sidebar is for Pages. It is similar to Posts but with few differences, such as you can publish tons of posts. However, a lot of pages on your website might be harder to manage.
You also don’t need to update pages as frequently you would with posts. Some examples of Pages to include on your website are Home, About Me, Features, Get in Touch, Cart, Checkout, etc.
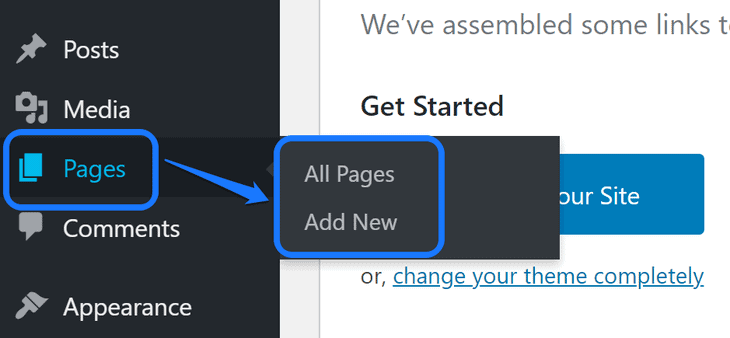
Inside its drop-down menu, you get two options: All Pages and Add New.
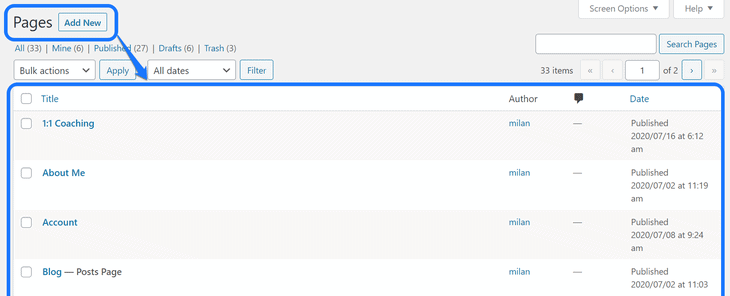
The first button takes you to a list of all the pages on your website. It also shows the author name and published date for each page. Besides, you can click on the title of any one of these pages to enter its editing interface.
When you click on the second button (Add New), it takes you to an editing interface of a new page. You get to insert its title, add written and media content, like images, video, calendar, background, etc., using blocks.
Comments
The next option in the WordPress sidebar is Comments, and it does not have a drop-down menu. When you click on it, you can see a list of all comments provided by your website visitors.
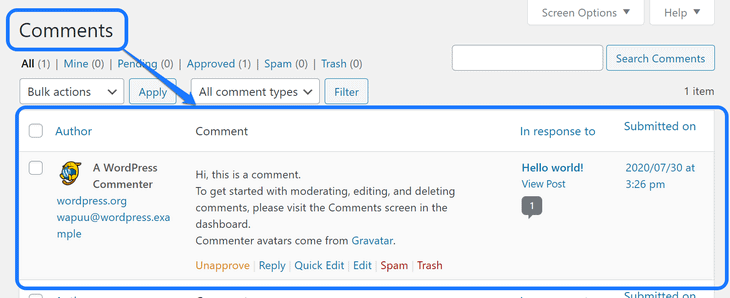
This interface allows you to reply, edit, delete and do other activities with the comments you received. You can view the title of the post where you got the comments with its submission dates.
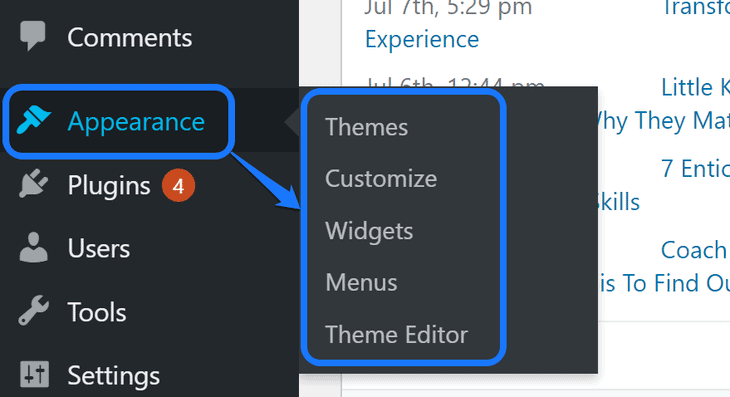
Appearance
If you want to renovate your website, then this is the option that you’ll be using the most. The Appearance section has five buttons inside its drop-down menu: Themes, Customize, Widgets, Menus, and Theme Editor.
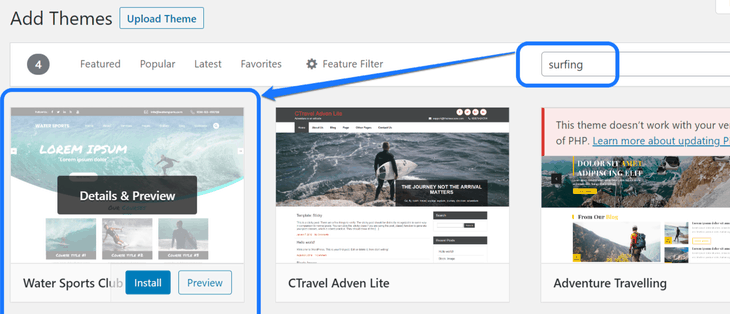
The Themes button displays a list of all the installed web templates on your WordPress site. You can either activate one of them or add a new theme. Please click on the Add New button at the top of this page for that purpose.

This action takes you to the Add Themes page. You can enter a related keyword of your desired niche in the search box. After that, select a theme, look at its live preview, and activate it on your website.
Back in the drop-down menu of Appearance, the second button is Customize. Click on this button to get an editing interface for your website. You also get a real-time preview while making changes.
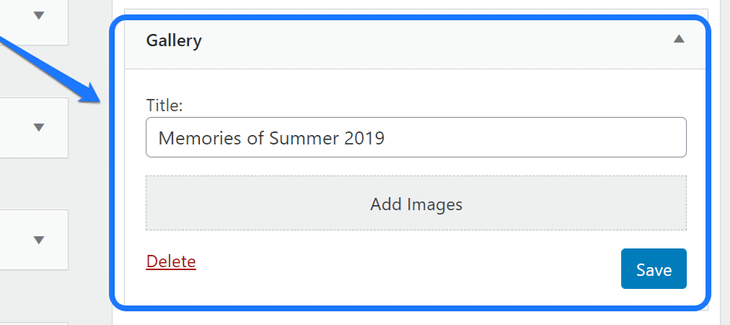
The third button lets you add, edit, and delete widgets on your website. For instance, if you click on the Gallery widget, you have to select a sidebar and press Add Widget. After that, give it a title, add a few images, and click Save.
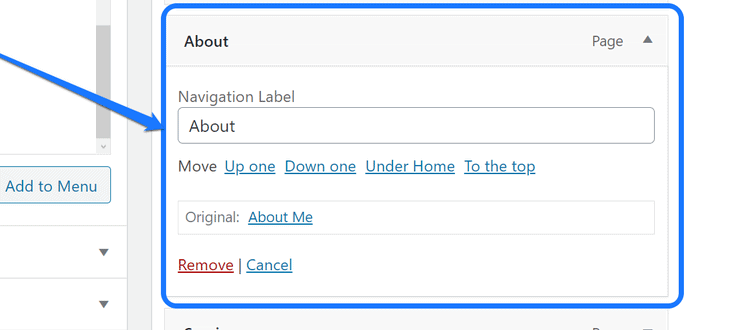
The fourth button inside the Appearance option is for Menus. When you enter its page, you can add pages and posts to your menu bar. On the right side, you can expand an item to manage its settings, like its navigation label, position, etc.
The fifth button is the Theme Editor, and it deals with CSS, PHP, and JavaScript codes. If these programming languages are not your piece of cake, we suggest you not make changes to this page.

Plugins
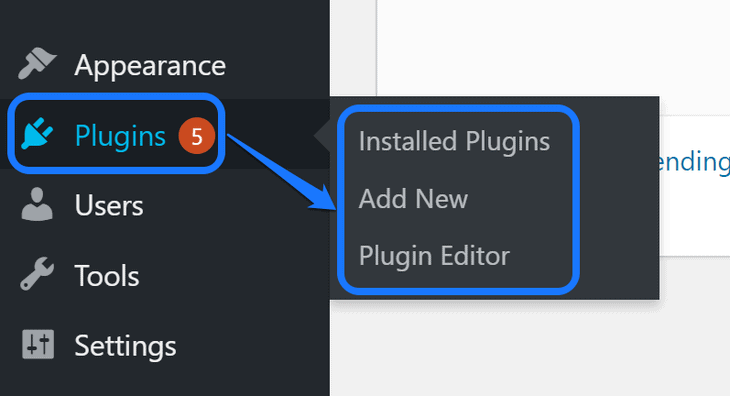
The Plugins option allows you to customize every website settings related to WordPress plugins. When you hover your mouse cursor over it, you get a drop-down menu. It has three buttons: Installed Plugins, Add New, and Plugin Editor.
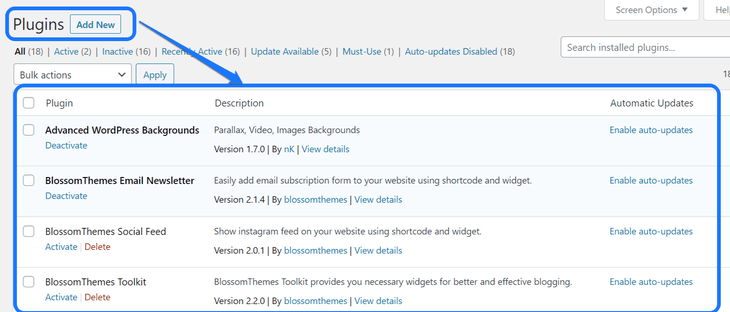
The first button displays a list of every plugin installed on your dashboard. If you have not activated an extension, then it shows two options: Activate and Delete. Besides, the activated plugin displays an option to Deactivate.
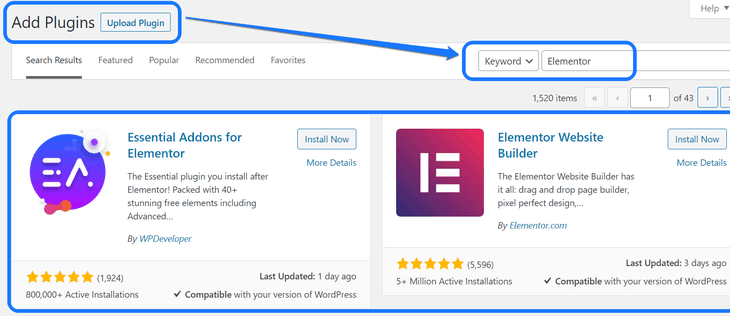
The second button takes you to the Add New page. Here, you have to enter the keyword of a plugin in the search bar and select one from the results. The plugin that you want to add should support your WordPress version.
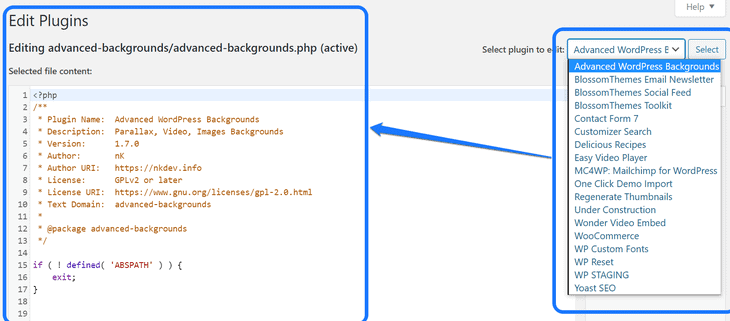
The third option from the drop-down menu takes you to the Edit Plugin page. We suggest you make changes in this area only if you know programming languages. You can select the name of the plugin to edit from a menu on the top-right side.
Users
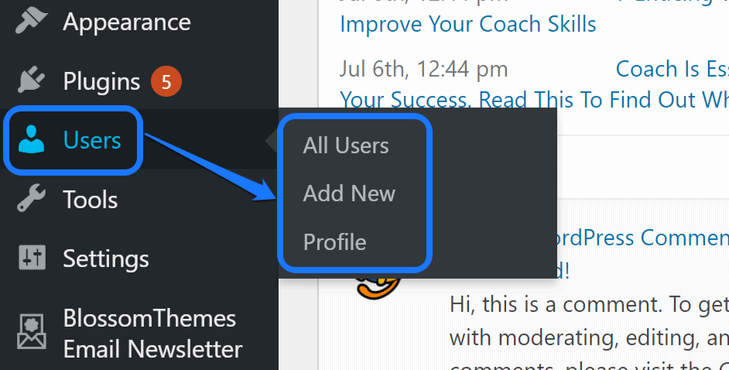
If you want to provide a WordPress dashboard to several individuals, this option will come in handy. The Users section has three options in its drop-down menu: All Users, Add New, and Profile.
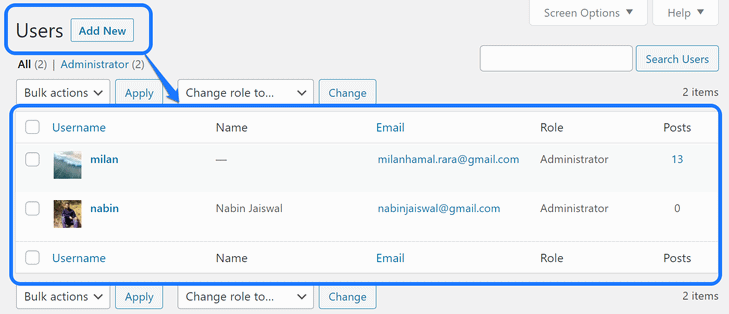
The All Users button takes you to the list of all the members who have access to your WordPress dashboard. Here, you can see the role, email address, name, and other users’ details.
WordPress allows you to provide various roles to your members. Some of them are Administrator, Editor, Author, Contributor, Subscriber, and others.
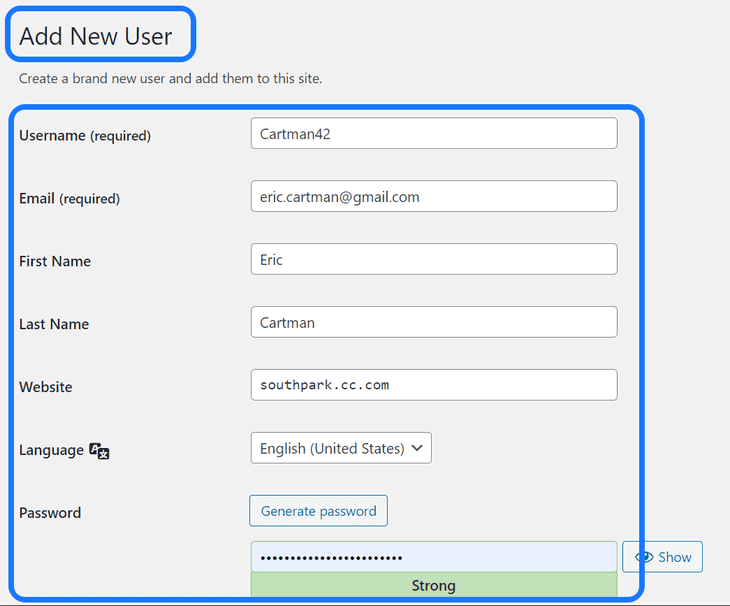
The second button in this section is for Add New. You have to insert your new team member’s details to add them to your dashboard. After you enter all the details, you have to scroll down to the bottom and click on the Add New User button.
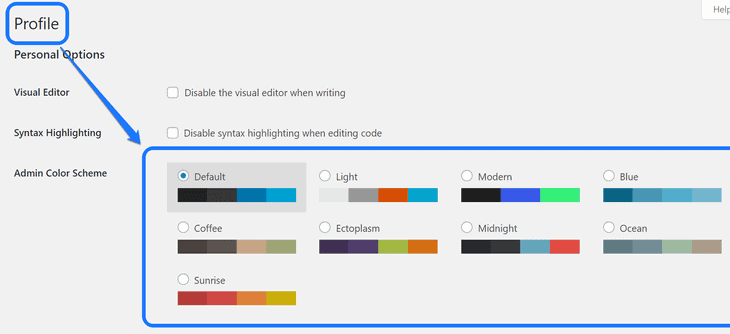
The third button inside the Users option takes you to the Profile page. This area allows you to customize your dashboard’s appearance. You can choose a particular admin color scheme from seven different options.
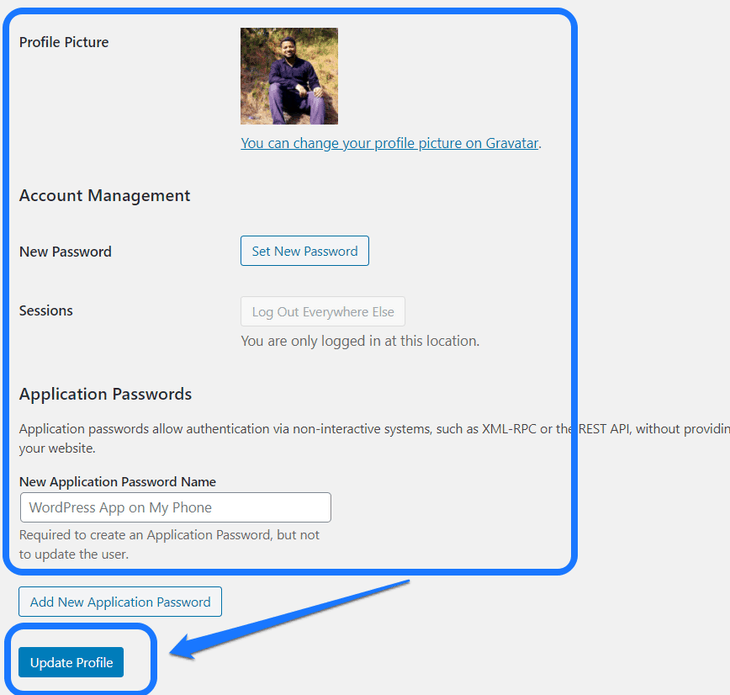
When you scroll further, you get text boxes to insert your details, contact information, password, etc. You can also change the avatar image in this area. At last, you need to click on the Update Profile button to finish editing.
Tools
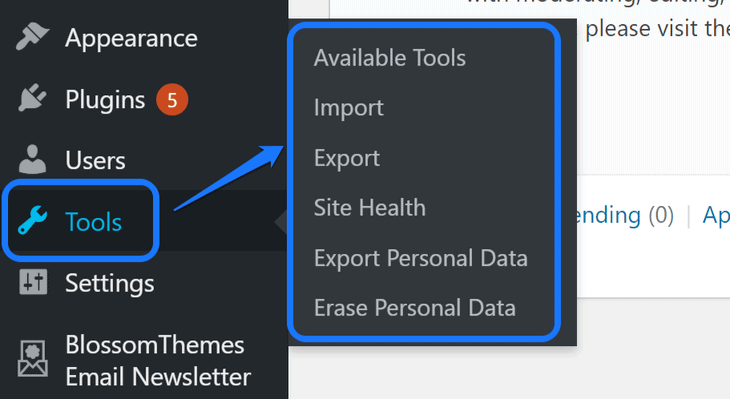
The Tools section provides settings related to importing, exporting, categories, and other website components. It has six buttons inside its drop-down menu: Available Tools, Import, Export, Site Health, Export Personal Data, and Erase Personal Data.
The first button recommends you to convert the categories of your website into tags.
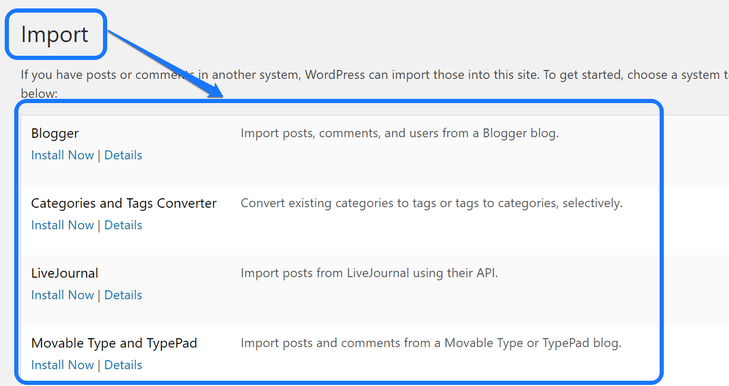
When you click on the second button, you can import posts and comments from other platforms. It lets you bring content from Blogger, Tumblr, LiveJournal, and other systems.
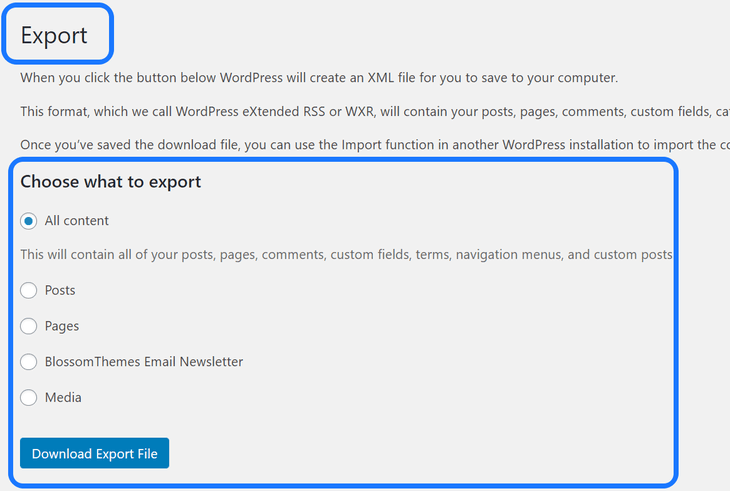
The next button is beneficial if you want to shift your content to another WordPress account. You get to choose any one of the below-given options to export.
When you click on the Download Export File button, it creates an XML file and saves it to your hard drive.
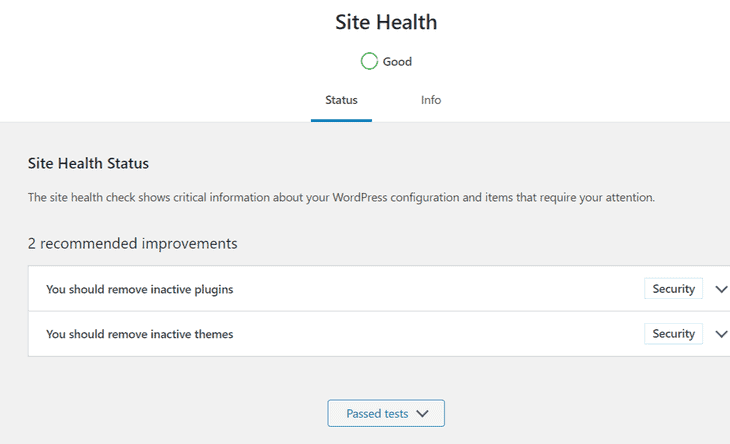
The Site Health button displays how your website is performing at any given moment. You also get a few improvement recommendations that you can expand to learn more about it.
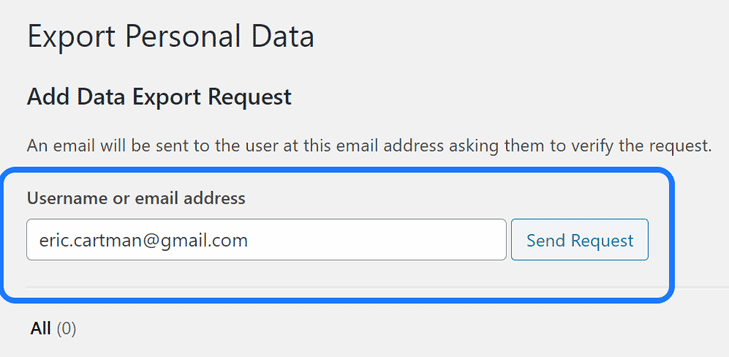
The last two buttons in this section are for unique website content. When you click Export Personal Data, you have to enter an email address to verify your request. You can export these files only after you confirm the request from your inbox.
WordPress requires you to take the same approach for the Erase Personal Data as well.
Settings
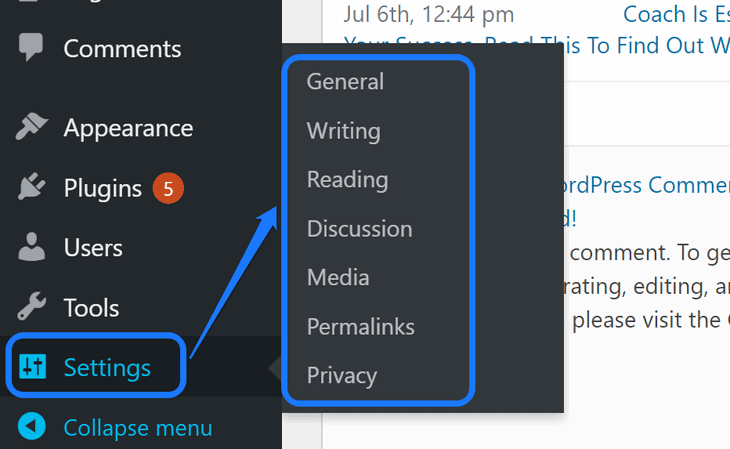
Finally, you get the Settings option in WordPress’s sidebar. It provides various adjustment options for your website. You get seven buttons inside its drop-down menu: General, Writing, Reading, Discussion, Media, Permalinks, and Privacy.
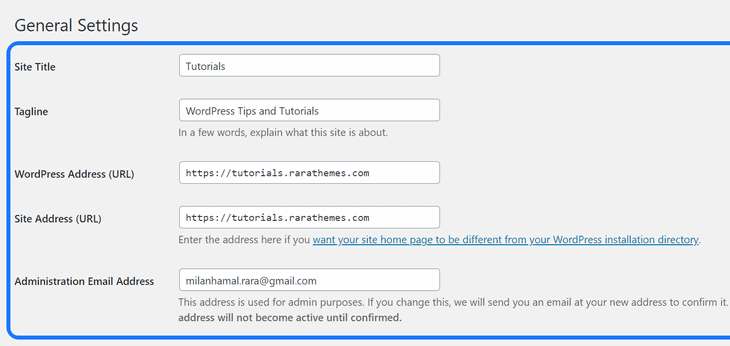
The first button takes you to the General Settings interface. Some settings are for site title, tagline, URL, timezone, date format, administrator email address, etc. You can click on Save Changes after you finish editing.
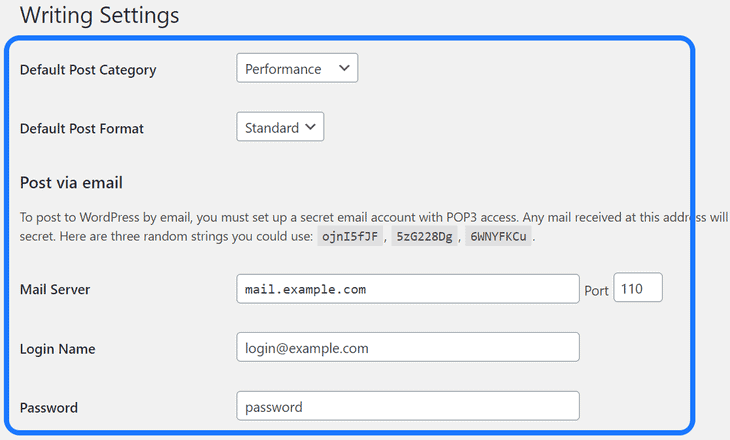
The next button in this section is Writing. When you enter its interface, you get settings for default post category, format, and more. Besides, WordPress provides text boxes for entering email addresses and login credentials to publish your content using mail.
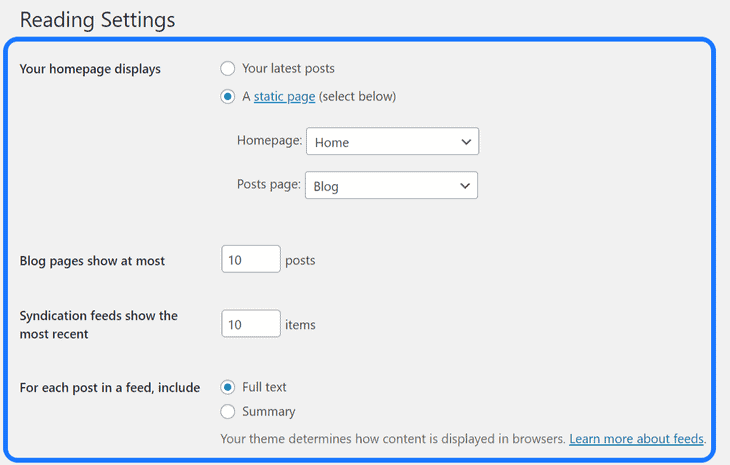
Moving on, Reading is the third button in this section. This interface provides settings related to your homepage, such as which page to display on the homepage. You can also choose the number of blog posts to show.
In the fourth option, you get several discussion-related settings. It includes comment moderation, default post settings, avatar, and more. After making changes, you need to click on the Save Changes button as displayed in the screenshot below.
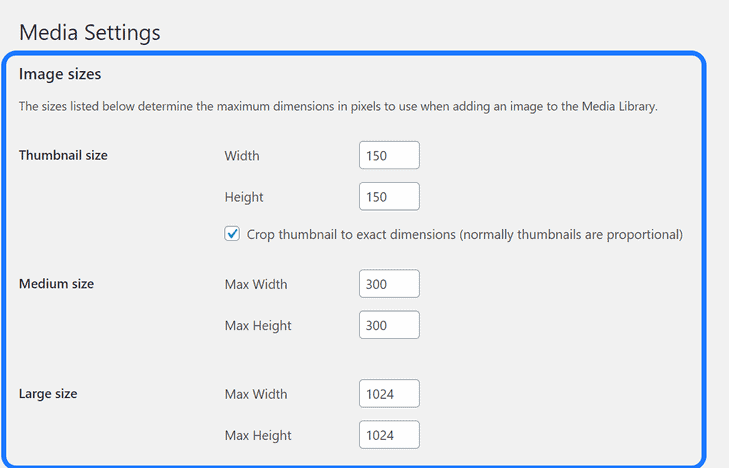
Now you can click on Media inside the drop-down menu of Settings. This interface allows you to organize the uploading feature and customize your image sizes. You can insert the dimensions (height and width) in pixels.
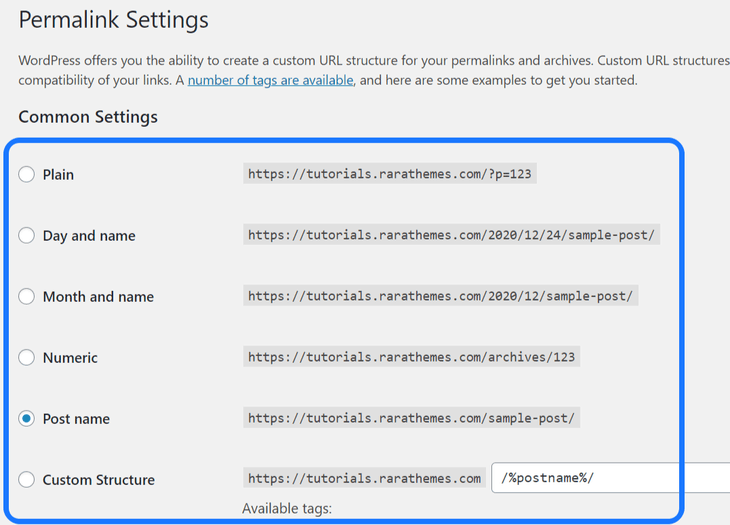
With the Permalink button, you can select a custom URL structure for your posts. Besides, it provides different options, such as Plain, Day and name, Post name, etc. An optimized URL improves usability and enhances your site for SEO.
The last option in this section allows you to add a Privacy Policy page. Here, you can either create a new page or select a page from your list to consider it as policy content.
How to Change the Default WordPress Login URL?
We recommend you to change the default URL of the WordPress admin panel. This approach prevents your website from hacking attempts.
If someone wants to enter your WordPress site, they can easily reach the login page using the default URL. Hackers need to add “wp-admin/” at the end of your website address for this purpose.
Once hackers reach the login page, it makes your website vulnerable to getting hacked. Even if they cannot enter the dashboard, those hackers can still bring your site down with countless login attempts.
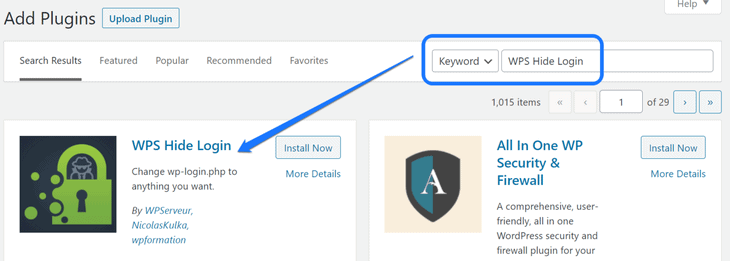
We will demonstrate a method to alter the default URL using the WPS Hide Login plugin. This lightweight extension changes the URL of your dashboard without changing your core files.
To install this plugin on your website, go to the Add New Plugins page in the WordPress dashboard. Once you get there, enter its title in the search box and press enter.
Please install and activate the first option you see in the results. After that, you need to go back to the dashboard and search for the left sidebar’s Settings option. Hover your mouse cursor over it till you get a drop-down menu.
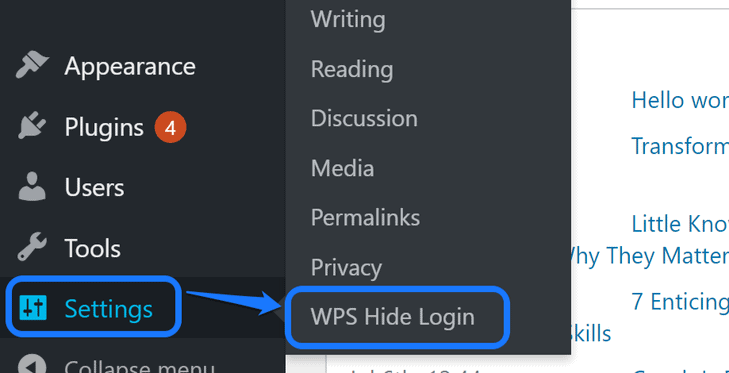
You have to click on the WPS Hide Login button inside that menu.
This action takes you to the WPS Hide Login section of the General Settings page. Here, you get two text boxes to customize the login URL and redirect URL.
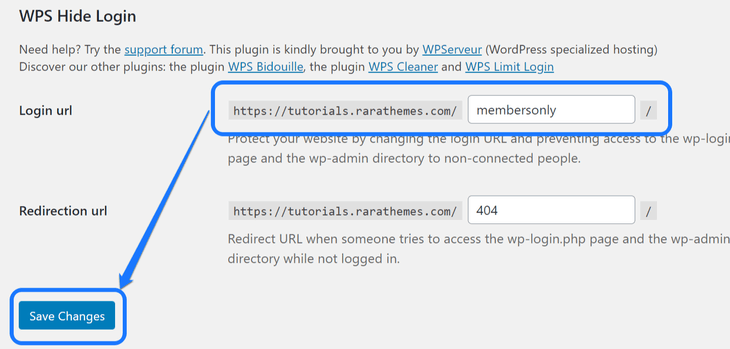
Provide the new login URL on this page. Make sure you save the new address in a notepad or Google doc files. After that, you should click on the Save Changes button at the bottom of this page.
How to Customize the WordPress Dashboard Appearance?
Do you want to change the appearance of your WordPress admin panel? If yes, this section helps you get a fully-customized dashboard.
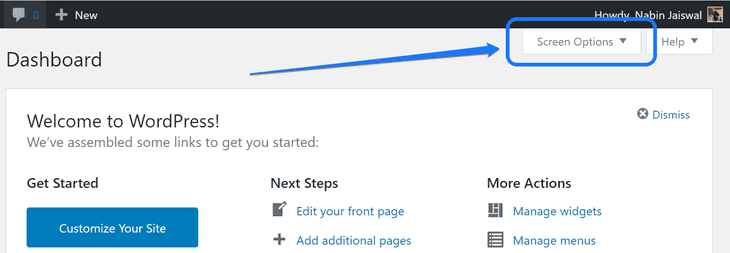
The first thing you can do is choose the sections you want to display in the dashboard. Please click on the Screen Options right below the black toolbar in your admin panel.
This action opens up a window with several elements. You get a box at the side of every component. When you insert a tick mark in one of these boxes, that item will display in your dashboard.
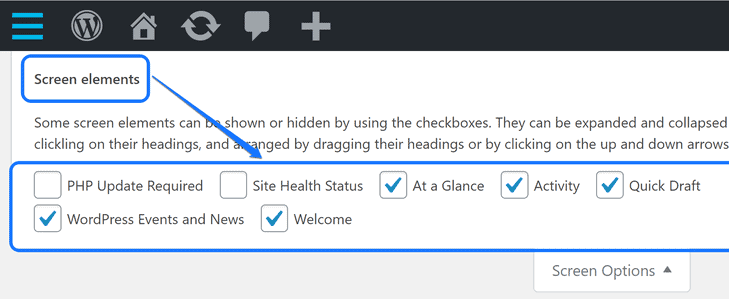
Please select all the items that you want to include on your dashboard. After that, click on the Screen Options option once again to close this window.
Apart from this small change, you can adjust several other aspects of your admin panel. For that purpose, you need a powerful WordPress plugin to make your customization simpler.
Absolutely Glamorous Custom Admin helps you change several elements of your WordPress dashboard. For starters, you can hide or change the admin bar items, add custom menu items, edit default color, text, images, and more.
To install this plugin on your website, please visit the Add New Plugin page. You need to insert its name in the search bar at the top-right corner. After that, select the first option from the results.
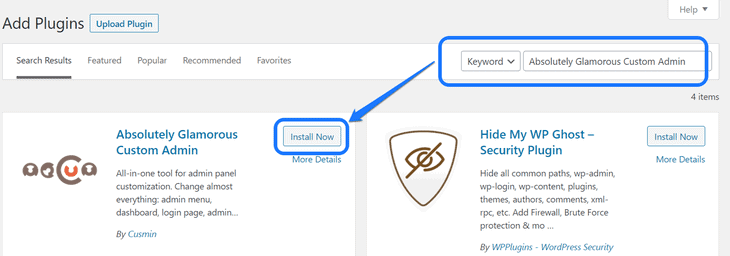
Please click on Install Now at first and wait for a while. After you see the Activate option, click on that as well.
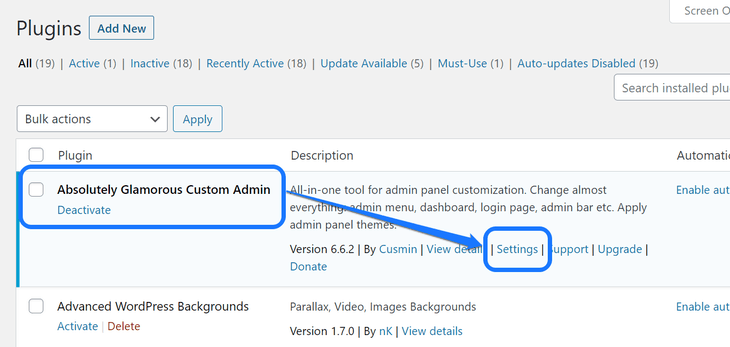
After that, you’ll reach the Installed Plugins page. Here, you have to search for the Absolutely Glamorous Custom Admin extension. Please click on the Settings button below its title once you see this plugin.
Now you enter the editing interface of this plugin. The first list of options you see in this area is for General Settings. You can select the Admin Bar, Footer, Dashboard, and other sections from its menu bar.
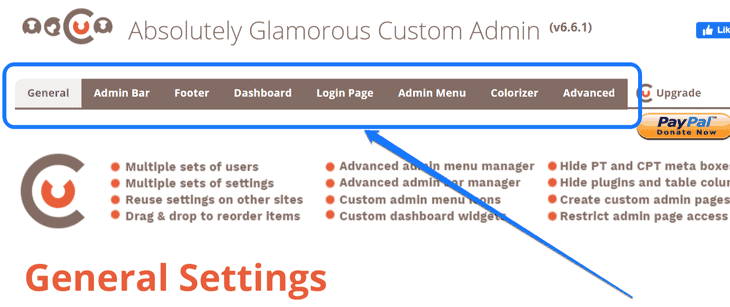
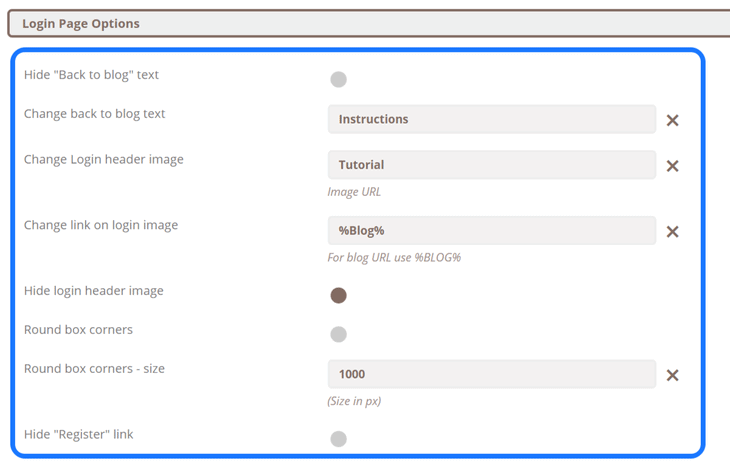
Every section has powerful customization options. You can take a look at the Login Page settings in the screenshot below. It allows you to change your login header name, login image name, and other titles.
After you complete customizing the settings, scroll down to its end and click Save Changes.
How to Create and Publish a Page Using the WordPress Dashboard?
In the above sections, we have briefly stated how to create a new page for your website. Now you are about to learn the entire procedure to create, edit, and publish your first webpage.
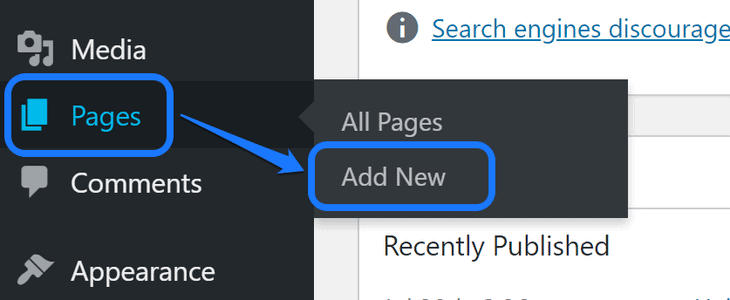
The first step you have to take is to hover your mouse cursor over the Pages option. It brings up a drop-down menu, where you have to click on Add New.
This action takes you to the page editing interface. Now you need to add content using blocks. Please click on the plus (+) icon at the top-left corner and choose a block from the drop-down menu.
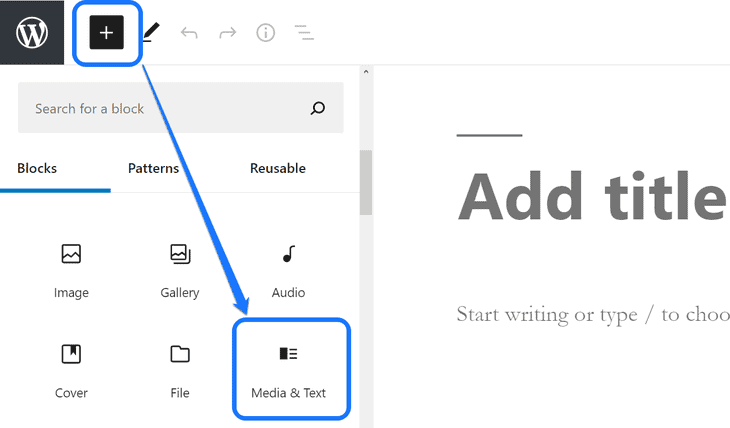
We picked the Media & Text block for this demonstration. After that, we’ll get the option to upload new media, write descriptions, and add a title. WordPress allows you to add multiple blocks to enhance your page.

Now, you have to insert the content on your page. When you look at the top-right corner of this interface, you can see the settings icons. Please click on it to expand the customization menu and select the Block section.
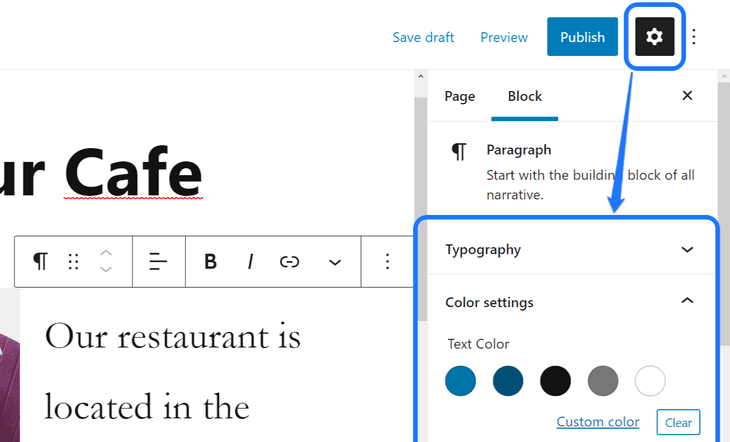
The above screenshot displays typography and color customization settings inside the drop-down menu. We suggest you enter the Page section as well. For that, click on the Page button, which is below the header bar.
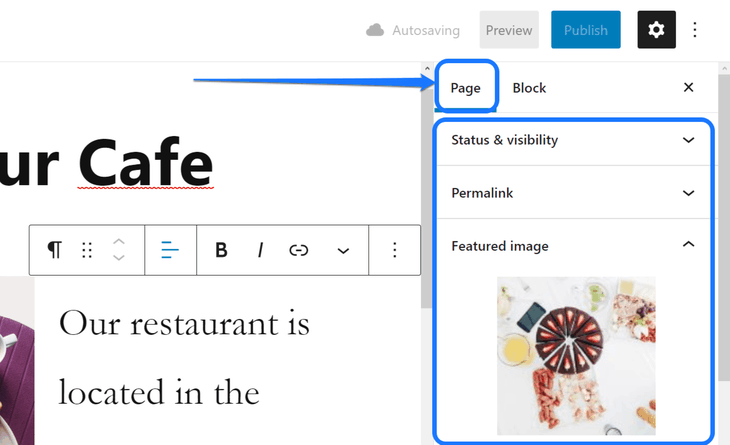
You can customize the page’s permalink, featured image, and several other elements in the page section.
After you’re satisfied with the content on that page, please click on Preview at the top-right corner. It displays the demo of your newly created webpage.
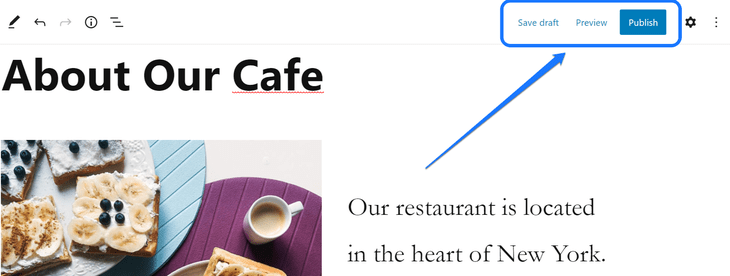
We suggest you click the Save draft button for making changes later. However, if you don’t want to make further changes, please click on the Publish button.
With this action, you’ve successfully published your first page on your website.
Frequently Asked Questions (FAQs) On WordPress Admin Dashboard
Q. What could be slowing down my WordPress admin dashboard?
A. One of the common reasons that slow down your WordPress dashboard is the overload of media content. The next reason could be the use of resource-heavy plugins. You may want to replace those plugins with their lightweight alternatives.
Q. What resources do I need before entering the WordPress dashboard?
A. Usually, the first requirement is a hosting account. You also need to install the WordPress CMS on your cPanel. You should also have the login credentials sent by your hosting provider.
Q. What is the role of an administrator in the WordPress dashboard?
A. The administrator has complete control of the WordPress admin panel and can make all the required changes. Besides, they are free to add or remove other users to the WordPress dashboard.
Q. Can I disable the toolbar display in the WordPress admin panel?
A. Yes. You can disable the display of your WordPress toolbar by visiting the Your Profile page. In this interface, uncheck the box that reads “Show Toolbar” and save the settings.
Q. How can I remember the WordPress admin panel URL?
A. When you are using a custom URL to access your WordPress panel, it might be tough to remember the address. So, we suggest you save the address on Google docs or bookmark the login page in your web browser.
Wrapping Up!
Are you eager to explore your WordPress admin dashboard? After reading this blog, you are ready to customize every setting on your website. We recommend you to create your desired site using WordPress right away.
Please mention in the comment section if you want to learn more about this Content Management System (CMS). We will help you resolve your query and provide more in-depth insight into the WordPress panel.
If you want to read more useful articles regarding WordPress, you can take a look at the following: