Running a website with an outdated PHP version makes your site slower. The loading time increases while the performance decreases.
Studies have shown that any site that takes seven seconds to load results in a 53% bounce rate in the number of visitors. The bounce rate rises with more time your site takes to load. You surely don’t want your hard-earned visitors to skip your site, do you?
That is why it is essential to update the PHP version for the WordPress website. Updating the PHP version not only makes your site load faster, but it also makes your site more secure.
In this guide, you will learn how to update the PHP version for WordPress website in no time.
Why Should You Update the PHP Version?
The main benefit of upgrading your PHP version is improved site loading speed, improved security, and improved SEO.
1. Improved Loading Speed
There are many ways to improve your site’s loading speed. Updating the PHP version is one of them. It is a guaranteed method to boost speed by almost three times. So, if you want a fast site, updating the PHP version is your ticket.
2. Improved Security
PHP is a programming language with an open-source nature. This makes PHP a potential target for malware and hackers. All the PHP updates come with an improved security measure to ensure that does not happen. Thus, updating the PHP version ensures better security for your website.
3. Improved SEO
The site’s speed plays a significant role in Google’s ranking factor. Speed is crucial for on-page SEO. A better speed means more improved user experience, more visitor retention, higher ranking on search engines, thus, more sales. There are other on-page SEO techniques as well, but speed is a sure shot approach.
What Should You Do Before Updating the PHP Version?
We believe that now you are in line with the idea of updating the PHP version and are eager to do it. But wait a minute. Here are a few things you should do before updating the PHP version:
1. Backup Your Site.
Before tweaking around with WordPress, we recommend backing up your site as the first step. The same thing applies when updating the PHP version as well. Here are the reasons to backup your WordPress site:
- WordPress themes and plugins are also in PHP format. If any theme or plugin has a bad script, compatibility issues may arise after you update.
- You may make mistakes or may face technical issues such as internet failure, power cut, and so on. If this happens when you are updating the PHP, it may take down your entire site.
Thus, backing up your site is a reverse ticket if something goes wrong when updating the PHP. If you are not sure about the backing up process, here is our guide on how to backup your WordPress website. Check it out.
2. Update Your Theme and Plugins.
The theme and plugin version you are currently using may not support the PHP version after updating it. It may crash your site due to an incompatibility issue. Thus, updating your WordPress theme and plugins before updating the PHP is a good idea.
- Log in to your WordPress dashboard.
- Click on the Dashboard option from the left sidebar. It is located at the top of your page.
- Click on the ‘Updates’ option.
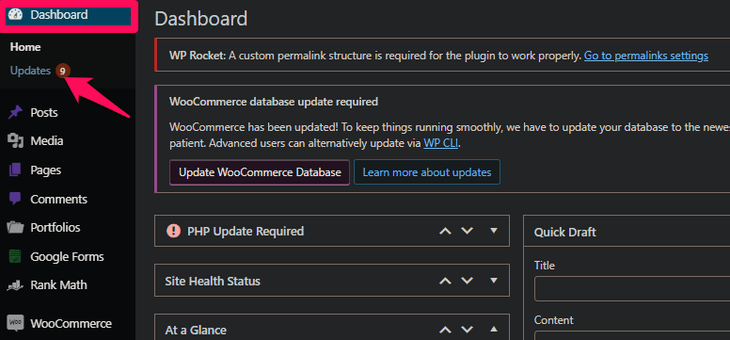
- Install all the available updates from here.
3. Check the PHP compatibility.
After updating the theme and plugins, you need to test whether they are compatible with the new PHP version. For this, you can use the PHP Compatibility Checker plugin.
- Log in to your WordPress dashboard.
- Scroll down to the ‘Plugins’ option on the left sidebar.
- Click on the ‘Add New’ option.
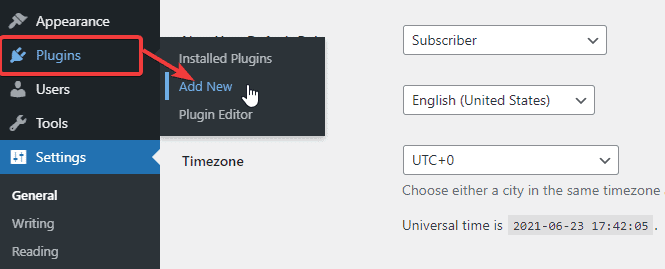
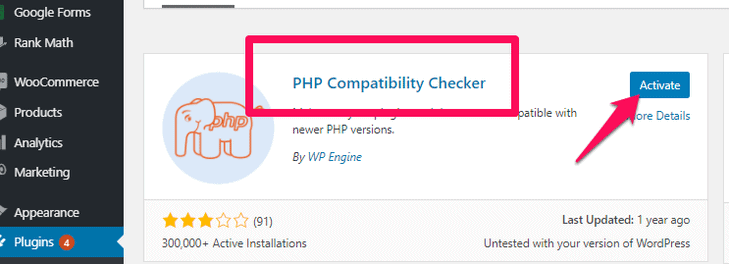
- Search for and install the ‘PHP Compatibility Checker’ plugin.
- Activate the plugin.
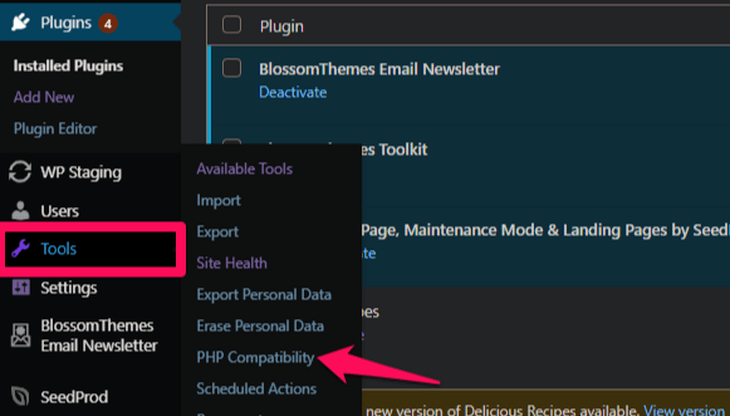
- Scroll down to the ‘Tools’ option on the dashboard.
- Click on the ‘PHP Compatibility’ option.
- Select the latest version of PHP on the list.
- You can choose to scan all the plugins and themes or only the active ones.
- Now, click on the ‘Scan Site’ button at the bottom.
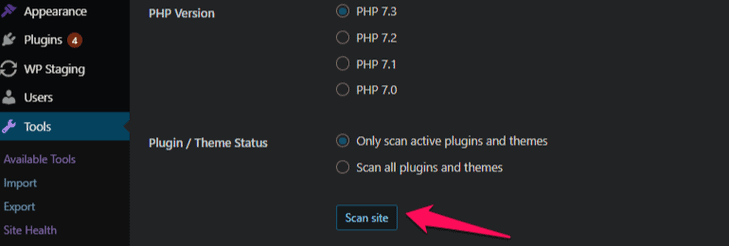
The plugin scans and shows whether the theme and plugins are compatible with the newest PHP version. If it displays an error, you can remove the theme or plugin, causing it, and try again. You can always find an alternative option for any plugin and theme.
How to Update the PHP Version for WordPress Website?
Now that you have backed up your site, updated the theme/plugin, and checked for PHP compatibility, you can now proceed with the PHP updating process.
There are two ways to update the PHP version.
Method 1: Updating the PHP Version Using cPanel.
Method 2: Contacting Your Hosting Provider
Method 1. Updating the PHP Version Using cPanel
Every hosting provider has a varying method of updating the PHP. The cPanel dashboard differs according to your hosting provider. However, the main gist remains the same as follows:
- Log into your control panel.
- Locate and click on the ‘Select PHP Version’ tab.
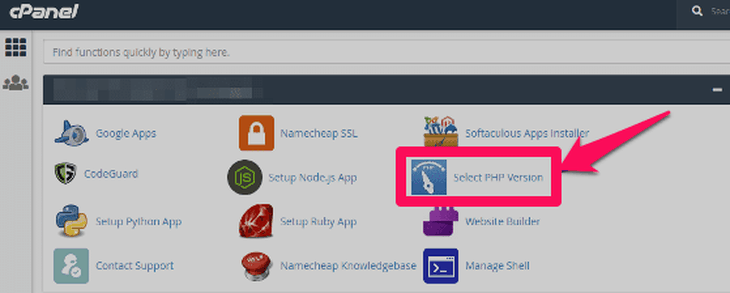
- You will see your current PHP version on the next page.
- From the drop-down menu, select the latest PHP version.
- Click on the ‘Select as current’ button at the side.
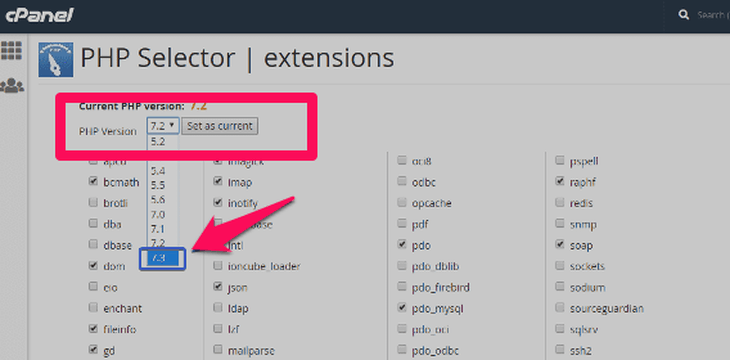
That’s it. You have successfully updated the PHP version of your website using cPanel.
Method 2: Contacting Your Hosting Provider
If you didn’t find the updating PHP option on your cPanel dashboard, contact your hosting provider. They may provide you instructions or update the PHP for you as a part of their customer support.
Check Your Website
No matter whichever method you followed to update PHP version for your WordPress site, carry out these two steps in the end:
1. Check your site for visible errors
Updating the PHP version may induce some errors on your site. All the plugins, themes, and content may not keep up with the update and may show errors. It is a good idea to check all the pages and content on your website. See if you notice any error in the way your website should normally behave.
If there is no error, then great. You can stay on your new PHP version and enjoy its perks. However, if you do notice any faulty signs, you have to find it.
2. Revert to the previous PHP version if necessary
If you find an error on your site after updating the PHP version, chances are any plugin is incompatible with the new version. You need to locate that plugin and replace it with the similar plugin that is compatible with the new PHP version.
- Inactivate all the plugins on your WordPress.
- Now activate the plugins one-by-one. After activating each plugin, check if your site is working.
- When your site shows error, the last plugin you activated is the culprit.
- Delete it and install another plugin that does the similar job. Also make sure that it is compatible with your updated PHP version.
If you don’t want to delete the plugin causing the error, you need to revert your PHP to its earlier version. You can do it by choosing the earlier PHP version on your cPanel.
FAQs (Frequently Asked Questions)
Q. How do I update the PHP version in WordPress?
You can update the PHP version either by using cPanel or by contacting your hosting provider.
Q. Which PHP version is my WordPress using?
You can check your WordPress PHP version as follows:
• Log into your control panel.
• Locate and click on the ‘Select PHP Version’ tab.
• You will see your current PHP version on the next page.
Final Words
WordPress and PHP keep receiving frequent updates for something. Those updates may bring significant changes to the website or fix some minor bugs. Either way, we recommend keeping your PHP and WordPress up-to-date.
You can use any of the two easy methods we have mentioned above to update the PHP. Check your website after updating the PHP version. See if everything on the site is working as it should. It usually takes about 20 minutes for all the changes to come into effect. If your site gets a lot of traffic, it may even take a few hours.
We recommend keeping an on your site for the next 24 hours after updating the PHP version.
Also, check out our articles on How to Resolve the WordPress Memory Limit Error?