Editing your live site can be risky. You never know which edit might go wrong, especially when using a new theme, plugin, or feature. Such action can cause your whole site to break down–this is where a staging site comes in handy.
WordPress allows you to set up a staging environment to test plugins, themes, features, and all functionalities before putting your site live. You can find errors on your site, if any, and find a solution to it without touching your live website.
But the problem is, not many users know how to set up a WordPress staging site. If this is your problem too, this guide will help you out.
After going through this guide, you can set up a WordPress staging site on the go.
Sit back, relax, and read below:
What is a Staging Website?
A staging website is a replica of your existing site. A staging website lets you make changes on your site and test it before taking it to your live website.
Thus, a staging site is a clone of your site where you can examine any new changes you want to bring on your actual website.
A staging website has two key difference as compared to your live website:
- A staging website you create is only available to you. The public cannot access it.
- Any changes you make on a staging environment does not affect the live website.
Why Set Up A WordPress Staging Site?
Here are some of the reason to set up a WordPress staging site:
- You can make changes to the site without worrying about the damage to your real website.
- You can rest assured that your visitor’s browsing experience is not disturbed while you are making changes.
- Your real site works normally until you put the changes live.
- You can troubleshoot any issues relating to the theme, plugin, shortcodes, without disturbing your live site.
- It eliminates the risk of a crash website.
- You can trace the impact of the changes at your own pace. There is no time-constraint.
How To Set Up A WordPress Staging Site?
Most of the users install WordPress locally on their computer for testing purposes. After they finish testing, they upload it on their live server. This method may seem like a solution to your staging site need, but it has one major issue. What if the changes you make on your localhost do not appear on your live server?
More than often, local hosts and the live server use different environments. Making a change in your local system does not guarantee expected results when you upload it on a live server.
In this section, you will learn various methods to set up a WordPress staging environment.
Method 1. Setting Up A WordPress Staging Site Using Plugin
We recommend using the WP Staging plugin to set up your WordPress staging site. The WP staging plugin is easy to use and has over 50k active installations.
Here is how you use this plugin:
- Go to your WordPress dashboard.
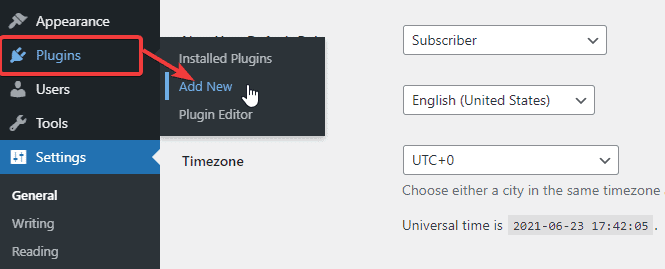
- Search for ‘Plugins’ on the left side panel and click on ‘Add New.’
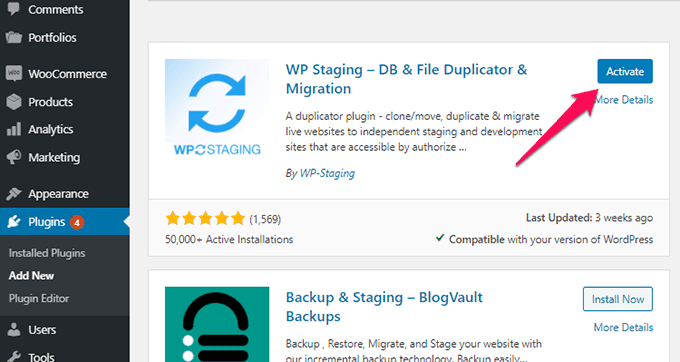
- Search for ‘WP Staging’ on the search field.
- Install and activate the plugin.
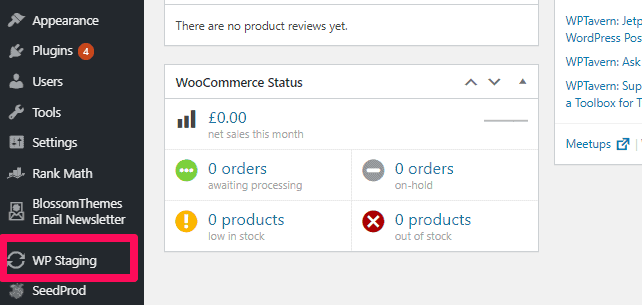
- You should see a new option labeled ‘WP Staging’ on your dashboard’s left side panel. Click on it.
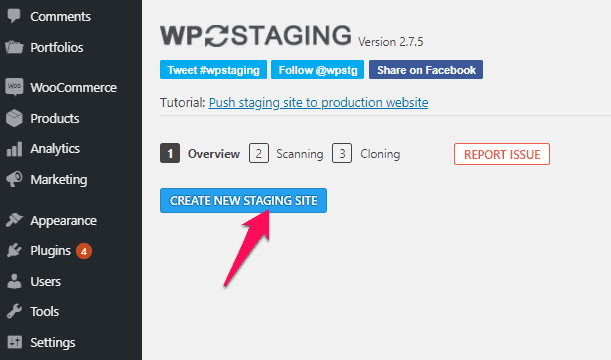
- Click on the ‘Create New Staging Site’ button at the top of the page.
- Type the name for your staging site in the field.
- Click on the ‘Starting Cloning’ button at the bottom of the page.

Note: The time of finishing the cloning depends on the size of your site. Once the process ends, you will get a prompt. Now log in with your usual username and password. Now start testing the features on your new staging environment.
Method 2. Setting Up A WordPress Staging Site Manually
If you want to get experimental with the custom codes, this method will help you out. This method is for creating a WordPress staging site using a subdomain. Here are the steps to do so. But before carrying on with this method, make a backup of your site.
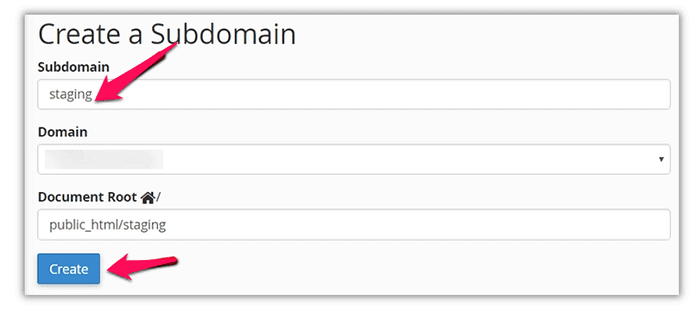
Step 1: Create a subdomain using cPanel.
To get on with this method, you first need to create a subdomain to house the staging site.
- Go to the cPanel and look for the ‘Subdomain’ option.
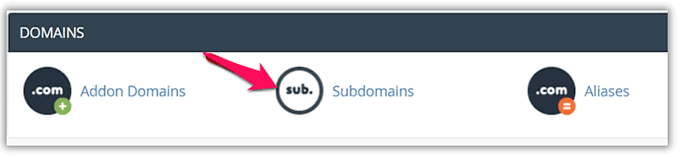
- Give a name to your subdomain. You can name it ‘Staging’ or anything else.
- Click on the ‘Create’ button at the bottom.
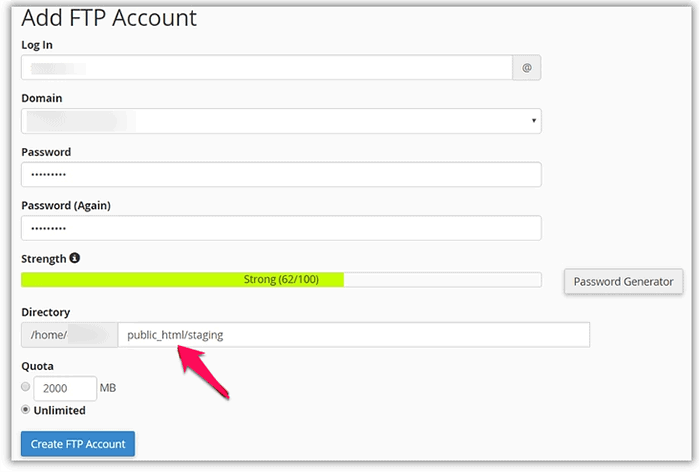
Step 2: Create An FTP Account
Creating an FTP account makes sure to keep everything separate for your subdomain.
- Find the ‘FTP Accounts’ option on your cPanel and click on it.
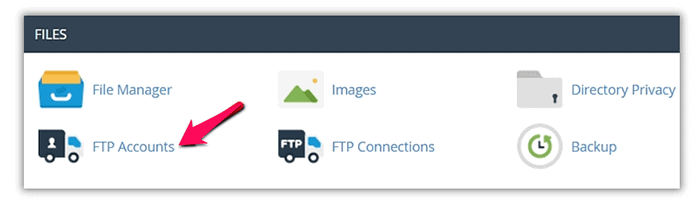
- A page opens up. Enter your FTP account details here.
- Make sure that the ‘Directory’ matches the directory of your subdomain.
- Click on ‘Create FTP Account’ at the bottom.
Step 3: Upload your WordPress files to your staging site
Next, use the FTP account you just made to upload your website’s files. Download the latest WordPress version and upload the files.
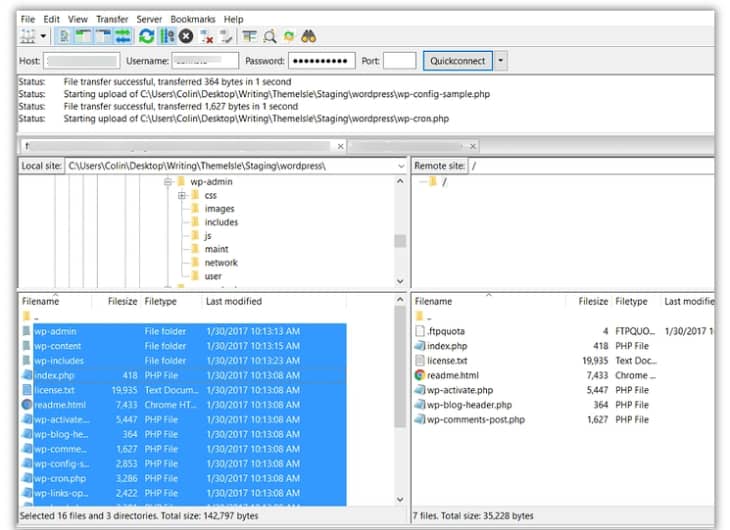
You also need to copy the following folders from the current WordPress site:
- …/wp-content/uploads
- …/wp-content/themes
- …/wp-content/plugins
Copying these files can take time, depending on the size.
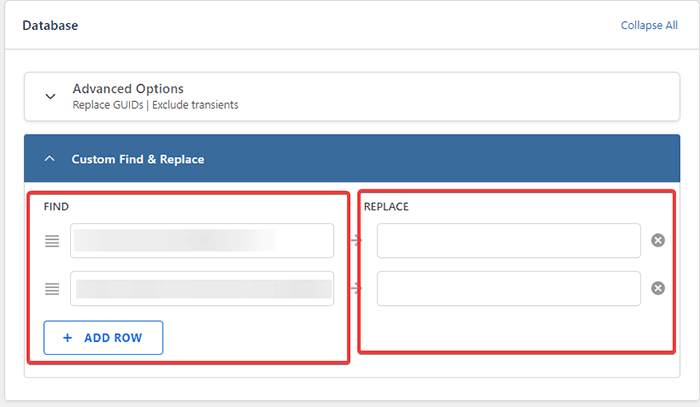
Step 4: Export/Import Database
Now you need to export your live website’s database and import it to the staging site.
- Install and activate a plugin named ‘WP Migrate DB‘ on your WordPress dashboard.
- Go to ‘Tools’ and click on ‘Migrate DB.’
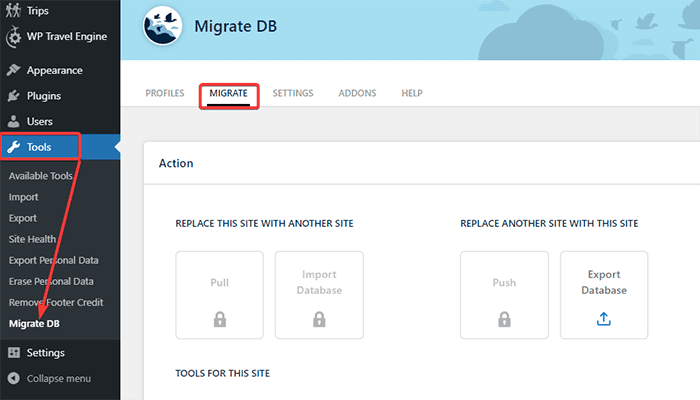
- Make sure to enter the same URL and directory you used to create your subdomain.
- Click on the ‘Export’ button at the bottom.
Now, create a new database for the staging site and import the data.
- Go to your cPanel and find ‘MySQL Databases.’
- Click on it and create a new database.
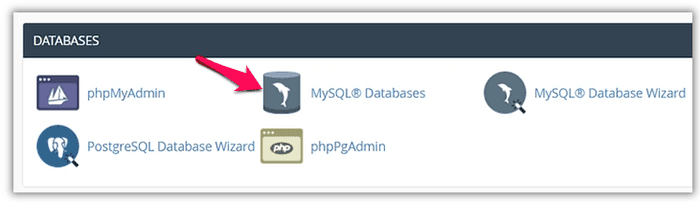
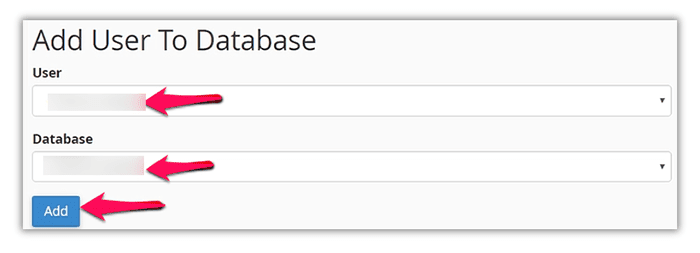
- Create a new user database table.
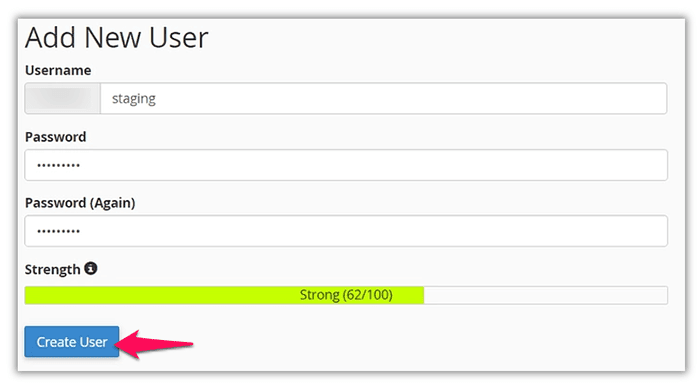
- After creating the user database table, give that user access to the database.
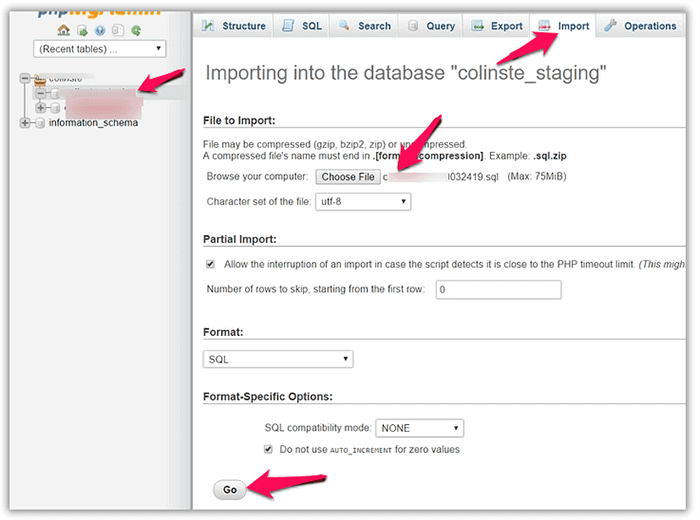
- Go to phpMyAdmin and find the database you created.
- Click on ‘Import’ and select the file that you exported using the WP Migrate DB plugin.
- Click on ‘Go’ at the bottom of the page.
Step 5: Edit wp-config.php on a new database
Check if the database prefix matches the one on your live site. If you are editing the ‘wp-config-sample.php’ file, rename it to ‘wp-config.php.’ Now you need to configure wp-config.php.
- Open the wp-config.php from the subdomain you created.
- Add the following lines:
define( ‘WP_HOME’ , ‘http://subdomain.domain.com’ );
define( ‘WP_SITEURL’ , ‘http://subdomain.domain.com’ );- Upload it back to your server.
Note: Replace “subdomain” to your newly created staging domain and “domain”to your original domain name.
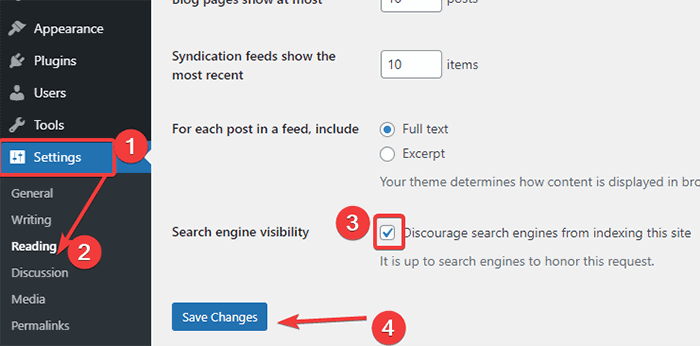
Step 6: Restrict Access to Your Staging Site.
Now, you should be able to log in to the staging site using your live website’s username and password.
- Go to ‘Settings’ on the left side panel.
- Click on the ‘Reading’ option.
- Check on the ‘Discourage search engines from indexing this site.’
- Save the changes.
You can test the functionalities or any element of your site now.
Migrating WordPress Staging To Live
Many hosting providers allow you to push the changes of a staging site live at a click of a button. SIteground offers a one-click staging solution with their GrowBig and GoGeek plans. However, once you have tested the functionalities and find they don’t have an issue, manually run the changes on your live site. This way consumes more time but is safe.
There is another way to migrate WordPress staging to live.
- First, you need to create a duplicator package on your staging site.
- Download the archives and installer on your computer.
- Create a backup of your live WordPress.
- Delete all the files and folders of your live site.
- Import the staging site to your live server.
Note: These steps are risky as your site can shut down even if you make a simple error. Proceed with the steps only if you know what you are doing.
Frequently Asked Questions
Q. What is WordPress staging?
WordPress staging is the process of creating a clone of your live site to test the changes, plugins, themes, or any other WordPress element. WordPress staging environment makes sure to keep your live site safe and free from any editing errors. We have mentioned easy methods on how to set up a WordPress staging site above. You can follow the steps to create your WordPress staging environment.
Q. What is a staging URL?
A staging URL is the location of your staging site. You can use it to preview how your site will look after you make certain edits on your staging site.
Wrapping Up
Setting up a WordPress staging site is very easy and useful. You can test unlimited features, functions, and much more in WordPress without worrying about any possible damage. We have mentioned two methods on how to set up a WordPress staging site.
You can also opt for a hosting provider that offers you a build-in site staging option. This way is a lot easier and safer, as well.
Also, check out our articles on How to create a child theme.
We hope you are now ready to start cloning your website and make the changes you need.