Running across errors is quite common in WordPress. One of such errors is the HTTP error. Users mostly encounter an HTTP error when uploading images to WordPress. While this error is quite straightforward to resolve, it can be annoying that you have to pause your workflow.
This comprehensive guide covers multiple proven ways to fix HTTP errors when uploading images to WordPress. First, let us know what the HTTP error is and what causes it.
Let’s begin:
What is an HTTP Error in WordPress?
WordPress displays an HTTP error when something goes wrong while uploading media such as images and videos to your site. You can regard an HTTP error as a code that signals something faulty in the file upload process.
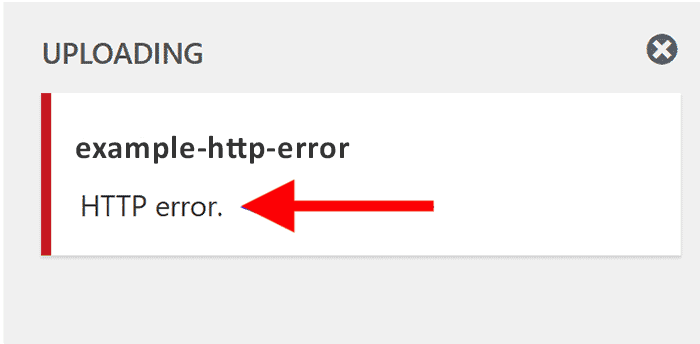
The “HTTP error” is a vague term without any signal of what exactly went wrong. It might be confusing even to begin troubleshooting the error as there may be many causes for the failure. WordPress does not know the exact reason and thus shows the error message as below:
What Causes the HTTP Error When Uploading Files to WordPress?
There can be many scenarios when the HTTP error might occur, such as:
- Large file size
- unsupported format
- Older WordPress version
- Interfering plugins or theme
- The unsupported file name, and more.
WordPress is not sure which reason is causing the problem while uploading the file. Thus, it displays the generic error message to sum it all. Since the error message does not give you a clue of the cause, you have to try various ways to solve it.
Here are a few easy ways that will help you fix the HTTP error in a breeze:
How to Fix it?
Following are 13 easy ways to help you fix the HTTP error:
1. Confirm the HTTP error.
Sometimes, due to a temporary glitch in the server, WordPress may display the HTTP error. So, it is best to confirm if the HTTP error exists even after a few tries. Wait a few minutes and upload the file you were trying to earlier. If the error persists, move on to the other solution on the list.
2. Refresh the Page.
After confirming the error a few times, try refreshing your website or even the browser. Check your internet connection. You may even restart the router. Now, check if you can upload the file in WordPress.
Refreshing the page is quite an obvious step. However, it is the most common solution to the HTTP error.
The first reason that this step works could be that your browser might have temporarily lost the internet connection. Due to this, the upload process fails. It could be due to a connection hiccup with the WordPress host or an ISP glitch. So, refreshing the page and browser may solve the error if this is the case.
The second reason could be that your WordPress login session expired. We have seen coming back to the WordPress editor from another tab kicks you out of WordPress more often than not. It is a signal that your login session expired.
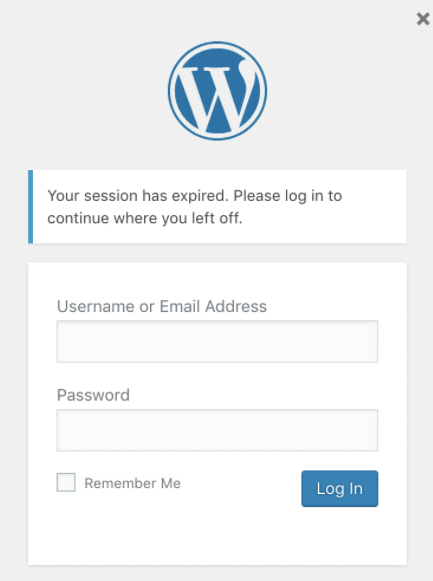
In such a case, log back in and manually refresh the page. Now, uploading the file should complete.
3. Switch Browsers.
Sometimes, the issue may not be in your WordPress but your web browser. You can try uploading the file using a different browser. Doing this will confirm if the problem is browser-related or not.
4. Resize the Image File.
You may even want to edit the file and try uploading it again. You could reduce the pixels (height and width) or decrease the file size. You can use third-party image optimization plugins to do this automatically.
One of such plugins is Imagify. Imagify lets you shrink the file size without losing quality. There are many other plugins too that you can find online. Whichever you use, make sure they don’t optimize the files locally. If the plugin localizes the optimization, it impacts your site’s performance.
It is okay to upload high-resolution images. However, if you are not a photographer or a business house that needs HD images, we recommend keeping the size under 100 KB and not more. Sometimes the PNG and JPG format may also determine the image size and quality. Try both the formats to see which one works.
5. Renaming the File.
WordPress automatically adds a number if you try to upload a file with the same name twice. You cannot rename the file of the uploaded file. So, you need to rename the file locally and upload it back.
If you are going to upload a file with a number in its name, make sure to add a dash sign—for example, image-1, image-01, and so on. Also, make sure not to use special characters and symbols in the file name like an asterisk, apostrophes, and so on.
6. Temporarily Deactivate Your Plugins and Themes.
Sometimes, plugins and themes even create a nuisance when trying to upload a file in WordPress. The most common of such plugins are image optimization plugins and security plugins. Thus, we recommend deactivating all the plugins on your WordPress and check if you can upload the file or not.
- Go to your WordPress dashboard.
- Scroll down the ‘Plugins’ section at the left sidebar.
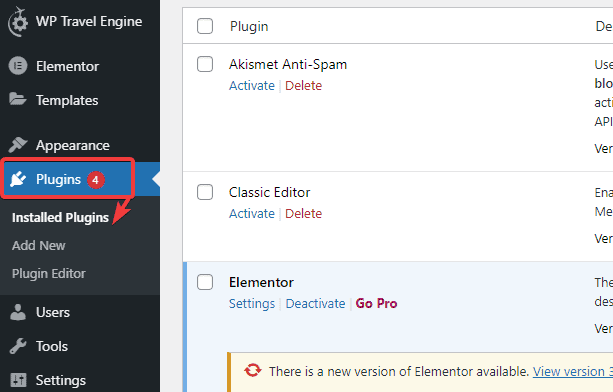
- Select the ‘Deactivate’ option in the bulk action menu and click on the ‘Apply’ button.
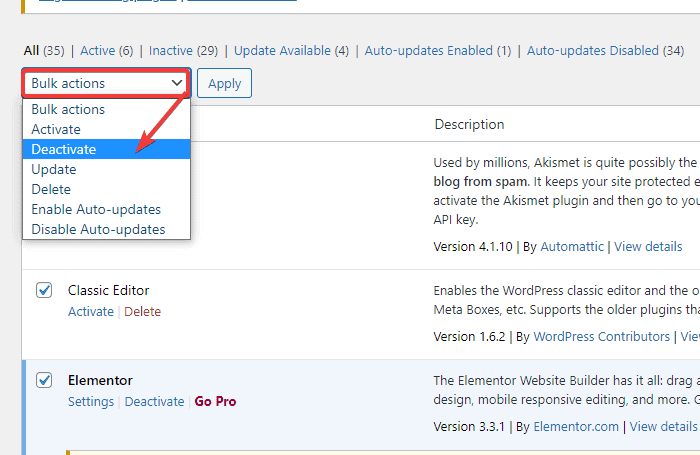
If you can upload the file now, then activate the plugin one by one. Don’t forget to check if you can upload a file after activating each plugin. If you can’t upload the file, then the last plugin you activated is the culprit.
Either find its alternative or reach out to the plugin developer for support.
Similarly, you can also try switching your WordPress theme to the default Twenty Seventeen theme. See if it fixes the error. The settings and content are all in the database, so you don’t need to worry about losing content. You can even set up a WordPress staging site if you are cautious.
Also, make sure that your plugins and theme are up to date. An outdated plugin and theme can also cause an HTTP error.
- Log in to your WordPress dashboard.
- Click on the Dashboard option from the left sidebar. It is located at the top of your page.
- Click on the ‘Updates’ option.
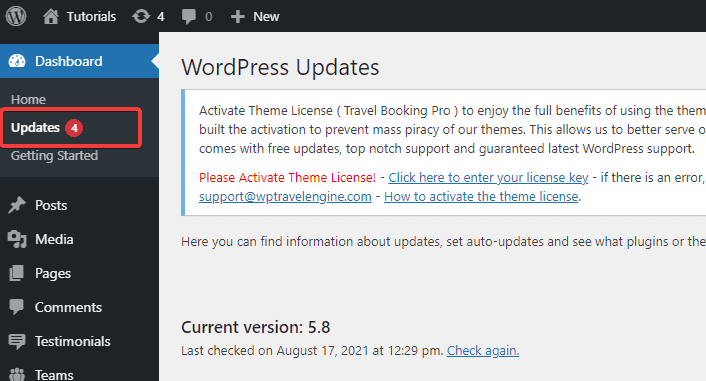
- Install all the available updates from here.
7. Increase Your PHP Memory Limit.
Another reason for the HTTP error while uploading images could be your server lacks the available memory to store the files. By default, the memory allocation for WordPress is 64M. But when your site exceeds that limit, you may receive the HTTP error.
Increasing the PHP memory limit on your WordPress can solve the issue here. Here is how you do it:
- Log in to your website with an FTP client or a file manager.
Here is an example of accessing the website using FileZilla.
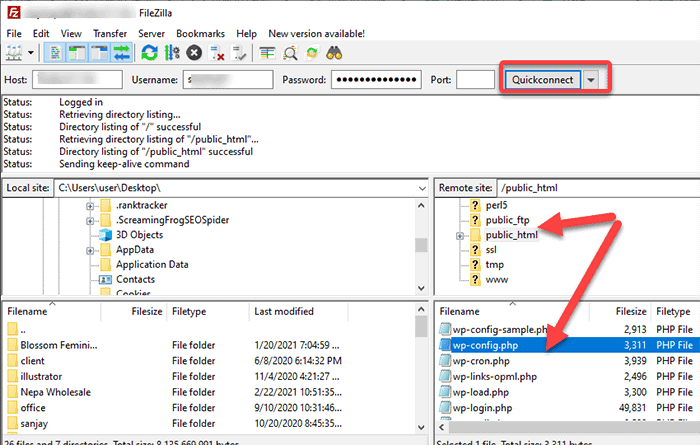
The right quadrant shows the list of folders that contain your website’s file.
- Scroll down to your website’s root folder. Mostly, it is named after your domain name or public_html. Open it.
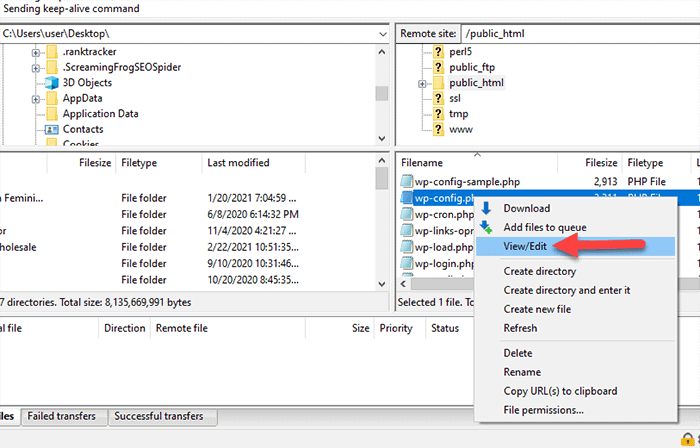
- Right-click on the wp-config.php file
- Click on the ‘Edit’ option.
Don’t tamper with any other file or code line except the one we will discuss below. Backing up your WordPress files is a good idea here. By creating a backup, you can restore any unwanted changes you make in the files.
- Paste the following code above the line that reads, “That’s all, stop editing! Happy blogging.”
define( 'WP_MEMORY_LIMIT', '256M' );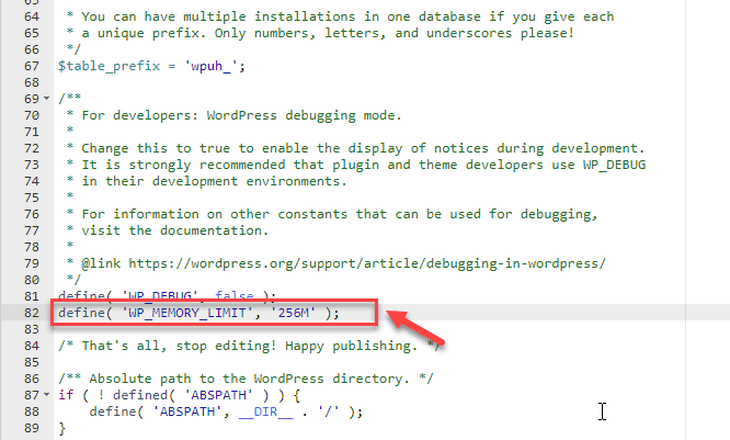
256 MB memory allocation is sufficient for most of the websites.
- Save the changes and exit the editor.
- Check if you can upload the file now.
For more information, check out How to resolve the WordPress Memory Limit Error?
8. Update to the Latest PHP Version.
If increasing the memory limit did not work, you could try updating to the latest PHP version. An outdated PHP version can result in poor security, performance and even cause an HTTP error.
But before updating to the latest PHP version, it’s best to backup your WordPress site and check for PHP compatibility.
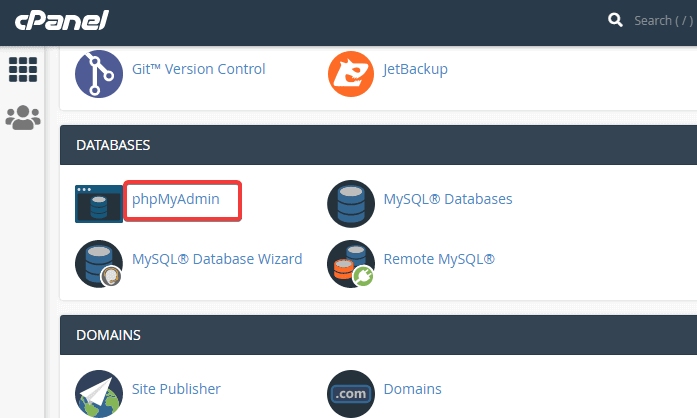
After doing so, here is how you update the PHP version:
- Log into your control panel.
- Locate and click on the ‘Select PHP Version’ tab.
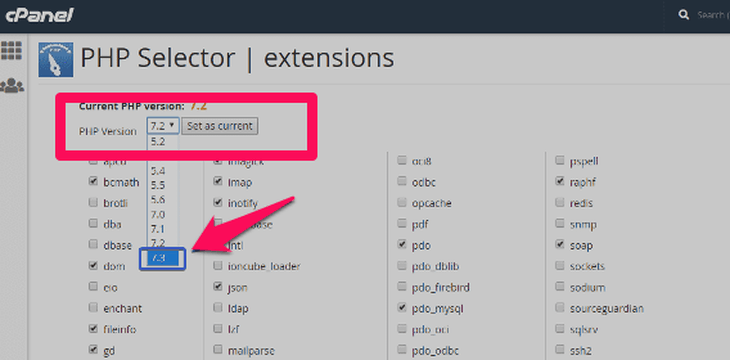
- You will see your current PHP version on the following page.
- From the drop-down menu, select the latest PHP version.
- Click on the ‘Select as current’ button at the side.
You may even contact your hosting provider for this. They may provide you instructions or update the PHP for you as a part of their customer support.
9. Check the Uploads Folder Permission.
Incorrect or error in the folder permission can also block WordPress from writing to the directory. It then results in the HTTP error when you try to upload images or other files. Here is how you fix it:
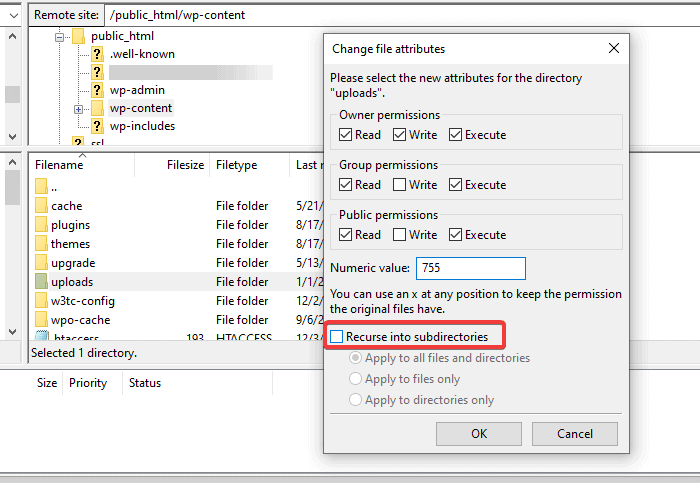
- Go to wp-content on your FTP client and click on the “uploads” folder.
- Check the “Recurse into subdirectories” and the “Apply to directories only” options.
10. Changing Your Default Image Editor.
WordPress has two different PHP modules for managing images – Imagick and GD Library. While both of these modules are great, Imagick is slightly infamous for exhausting the memory limit. In such a case, your WordPress may show the HTTP error. Thus, changing your image editor to the GD Library may help sort the problem:
- Access the functions.php file from your FTP client (wp-content > themes > your theme name > functions.php)
Or,
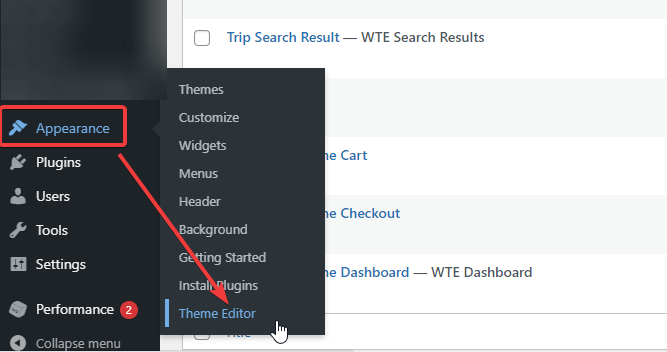
- Go to your WordPress dashboard.
- Go to the Appearance > Theme Editor.
- Now select the “functions.php” from the theme files options at the right-hand side list.
- Now paste the following code:
function wpb_image_editor_default_to_gd( $editors ) {
    $gd_editor = 'WP_Image_Editor_GD';
    $editors = array_diff( $editors, array( $gd_editor ) );
    array_unshift( $editors, $gd_editor );
    return $editors;
}
add_filter( 'wp_image_editors', 'wpb_image_editor_default_to_gd' );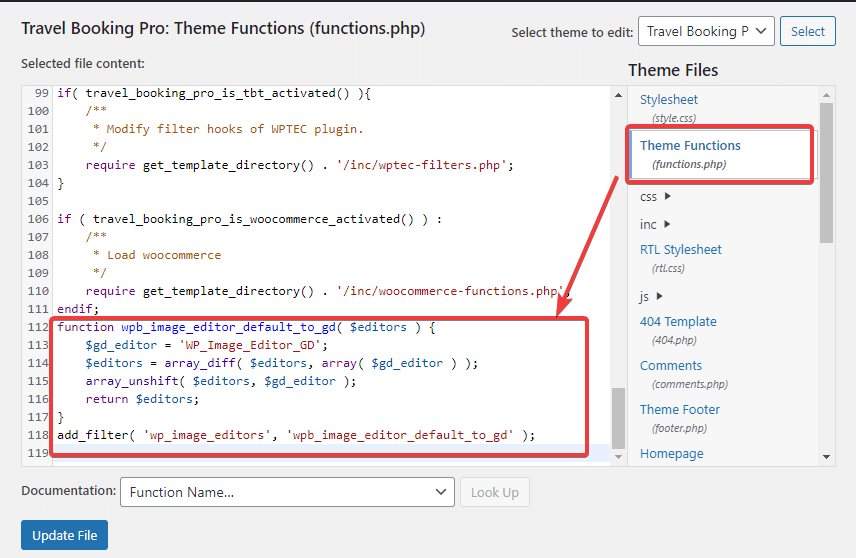
- Check if you can upload the image to WordPress now.
11. Using the .htaccess File.
Many shared hosting providers set Imagick to use multiple threads. While it promotes faster image processing, it may also result in HTTP errors when you upload images. You can sort this by adding the following code to your .htaccess file:
- SetEnv MAGICK_THREAD_LIMIT 1
Adding this code limits Imagick’s ability to use a single thread while processing images.
Check if it solved the HTTP error. If not, you can also try the following code snippets:
<IfModule mod_security.c>
SecFilterEngine Off
SecFilterScanPOST Off
</IfModule>

Or,

# Exclude the file upload and WP CRON scripts from authentication
<FilesMatch "(async-upload\.php|wp-cron\.php|xmlrpc\.php)$">
Satisfy Any
Order allow, deny
Allow from all
Deny from none
</FilesMatch>
12. Remove Library Path for Custom Media.
Sometimes, the HTTP error may occur due to incorrect media library path setup. It commonly happens when migrating a local development website over to production.
- Go to the “Settings” on your dashboard.
- Click on the “Media” option.
Typically, the options should look as follows:
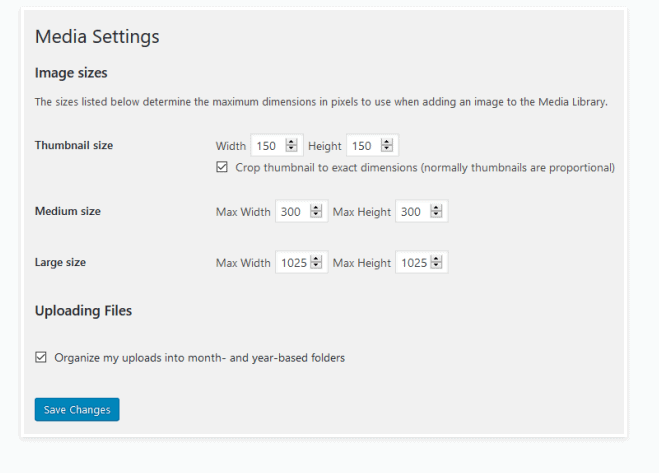
There should not be a library path on this page. If you do see a media library path with a certain value, delete it and save the changes.
13. Take Help From Your Hosting Provider.
If you have tried all of the steps that we have mentioned above but still face the HTTP error, it is time to take help. You can ask your WordPress hosting provider to help you out. Many hosting plans come with 24/7 dedicated support. Don’t feel shy to reach them.
Summary
As you see, there are multiple ways to fix the HTTP error. You may already be familiar with some of the steps, while some steps are a bit advanced. Nevertheless, the HTTP error is quite a common experience in WordPress. So, knowing how to fix the HTTP error is helpful.
You just learned 13 different ways to fix the HTTP error when uploading images to WordPress. Which one worked for you?
Let us know in the comment section.