An effective way to enhance the visual appeal of your website is by creating a video background section. It intrigues your visitors and encourages them to stay longer on your site.
WordPress provides various approaches using which you can integrate video background.
If you don’t know any of these methods, then allow us to guide you through the process.
You will learn three hassle-free techniques to add video as a background section in this blog.
#Why Do You Need a Video Background in WordPress?
We all know the importance of adding appealing background images to our website. They captivate your audiences’ attention and communicate faster than a written description.
However, another form of media is 100 times more powerful than pictures, graphics, and other illustrations. If you’re thinking about video, then you can pat yourself on your back!
Two guest bloggers in the YouTube Blog provided statistics proving that video outshines picture ineffective communication. You have heard that an image speaks a thousand words, right?
Well, according to these guest bloggers’ insight, a video speaks a million words.
Thus, you can add videos as a background on your website to communicate essential information to your audiences. You can add a short video to describe your brand’s story, your product’s working mechanism, etc.
A video section encourages your website visitors to engage with it. They might want to turn on the media volume, enlarge the player, or replay the entire video.
Besides, your audiences will want to learn more about your brand after watching the introduction video. If your visitors spend an extended duration on your website, your bounce rate drops, which boosts SEO performance as well.
#Tips for Selecting a Perfect Video Background
Now, you know the significance of video integration on websites. We present you with some tips on selecting a great video to add to your WordPress site. Here are five crucial points that you might find helpful.
1. Compressed but High-Quality Video
You must compress your video files before uploading them to the background section. A website with a large video size loads slowly and provides a terrible user experience.
Moreover, Google will not rank your site on the top results of relevant search results. Compressing the video will put less load on the server, and your website runs faster.
But, make sure you don’t ruin the quality of your video while compressing. Your audience doesn’t want to watch a blurry video. You have to find a middle-ground where the video is compressed but still has a decent resolution.
You can use a tool like VideoProc that lets you compress your videos to the best size. The VideoProc Converter tool works with any video you shot with your GoPro, DJI, iPhone, Android, camcorder, or any other 4k camera.
2. Short Video Clip Duration
Another thing to consider while adding a video to your website is to make it short. First of all, online audiences have a low attention span. They will not watch a half-hour video that provides your entire company’s history.
Instead, upload a short video of under one minute with a smaller file size. It will take a short duration to load and will grab your website visitors’ attention as well. Besides, you can also put stock footage in a loop.
3. Complimenting Your Website Content
Your visitors will enjoy the video only if it compliments your website content. For instance, you own a coffee shop site, then a sports bike video certainly will not complement your site.
Going out of context irritates your audiences, increasing the chance of losing their attention. So, create a suitable video of your brand to add to the background. You can also display relevant stock footage instead.
4. Option to Enable/Disable Audio
When someone enters your site, they might not be expecting auto-playing audio. Your audience can browse your website in a library, office, classroom, or other silent places. A sudden sound will startle them, and they’ll close the tab to get rid of it.
Autoplaying multimedia content is among the top website attributes that people hate. You can avoid this situation by adding a toggle option to enable/disable the audio. This way, the visitors can only play the audio when they feel the need.
5. Responsive Video Background Section
Your website visitors will browse your content on various digital devices. For instance, they might watch your video on mobile devices, laptops, or more. A non-responsive video won’t provide the same dimension on all these screen sizes.
Thus, you have to make the video background responsive. With this feature, your video loads with correct dimensions on all display devices.
#Three Methods to Create a Video Background Section
There are three main ways to add a video as a background section on your website. In this section, you get an in-depth explanation of each of the techniques. You can select any one of these options based on your preference.
1. Create a Video Background Section Using Website Builder
Website/page builders are perfect for helping you design web pages without working with codes (HTML, CSS, etc.). These tools also help you add various multimedia components, like carousel slider, image lightbox, animation, etc.
- Elementor Website Builder
Elementor is an all-in-one website-building plugin. It lets you design various elements, like header, footer, product page, etc. This page builder supports almost every WordPress theme and plugin.
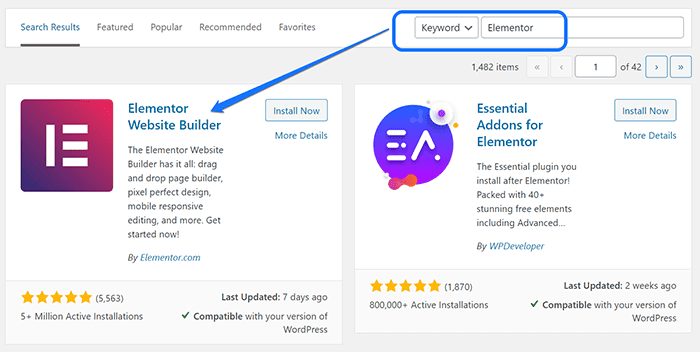
First, install this page builder from the Add New Plugin page. Go to the search bar and look for “Elementor. Now, install and activate the first option that has the publishers’ name: Elementor.com.
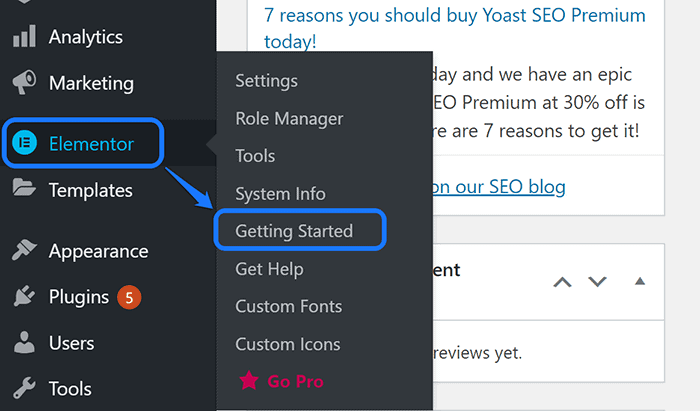
Now go back to the dashboard and hover your mouse cursor at the top of the Elementor option in the sidebar. Click on the Getting Started button from the drop-down menu.
This action takes you to the Welcome page of Elementor. You can see a “Create Your First Page” button. Please click on it to proceed.
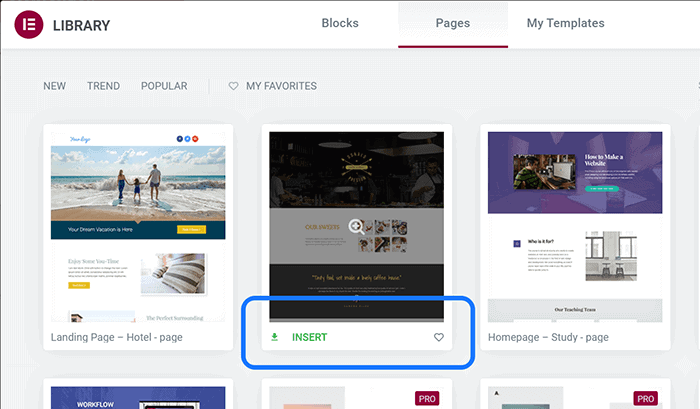
You will reach the drag-and-drop editing interface of Elementor Website Builder. Let us create a new page template using this plugin. Click on the Folder icon that you see inside the dotted box as shown in the screenshot.
It brings up a pop-up window with tons of pre-designed page templates. Hover the mouse pointer on top of your selected layout. This action shows you an Insert button, which you need to click to add the template to your website.
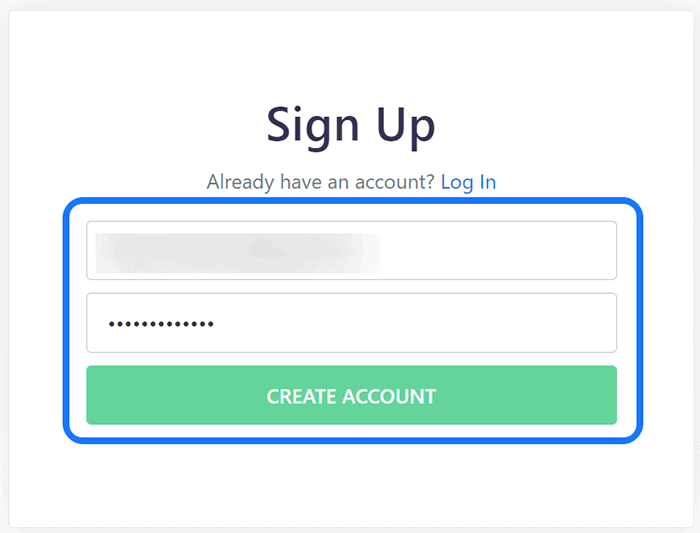
You get another window after selecting one of the layouts. Click on the Get Started button, which takes you to the Sign Up page of Elementor. Please create an account with this builder plugin to proceed.
Elementor provides you an option to connect your website with its template library. Click on the Connect button. After that, you reach back to its editing interface.
You can select any section where you want to display a video as its background. If you’re going to adjust its size, click on the Edit Section button denoted by six dots at the top.
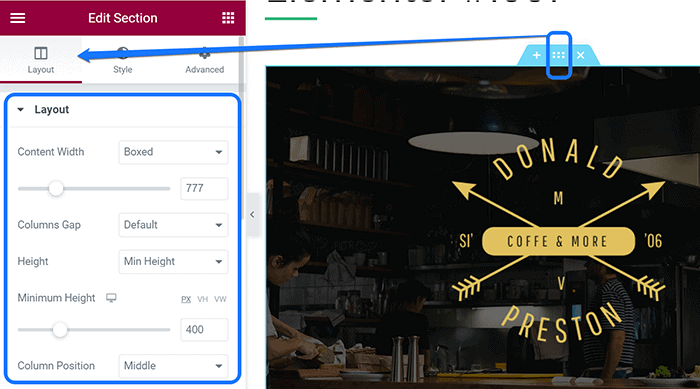
Now you can change its settings, like height, width, and gap, from the Layout option.
Please go to the Style option after adjusting this section. You get to choose four different background types: image, video, gradient, and slideshow. Select the Video icon and paste the URL of a YouTube video in the text box.

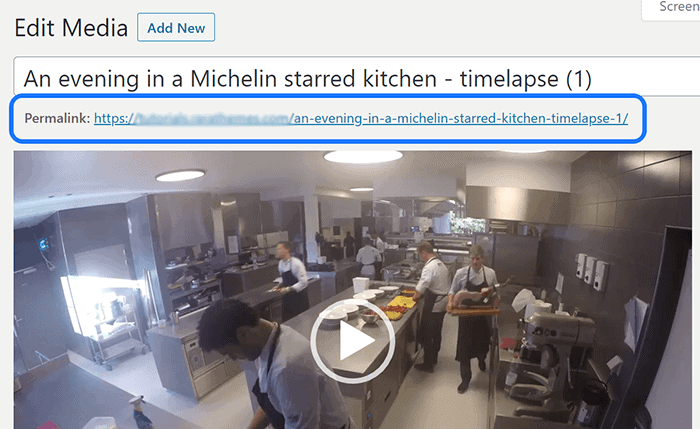
If you don’t want to display a YouTube video, you can upload an MP4 format file instead. For this method, you need to copy the permalink of that video from the media library. After that, paste it into the same text box in Elementor’s interface.
Moving on, you can adjust other settings for your selected video. For instance, you get to customize the background color overlay for your section. Besides, you get to choose whether to play the video on mobile devices or not.
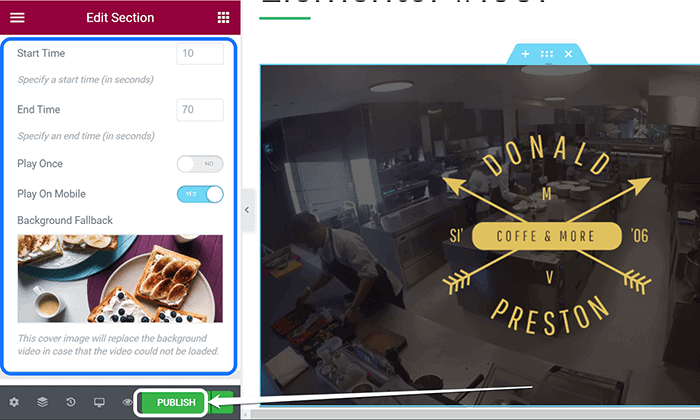
You can also upload a fallback image that comes to display if your video fails to load. Finally, click on the Publish button once you are satisfied with your background video.
- WordPress Page Builder – Beaver Builder
Beaver Builder allows you to edit the front page of your website using its flexible drag-and-drop interface. It supports various content modules, like the photo, button, heading, icon, audio, video, etc.
Please go to the Add New Plugin to add this builder extension to your WordPress dashboard. Insert its name in the search bar and select the first option, which has 300,000+ active installations.

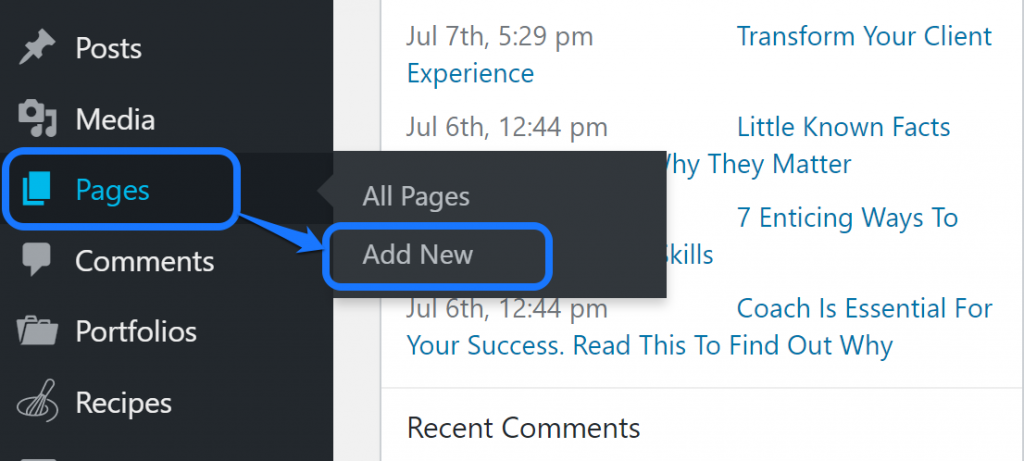
You need to install and activate this extension and go to the page where you add a multimedia background. If you want to create a new page, click on the Add New button in the Pages option’s drop-down menu.
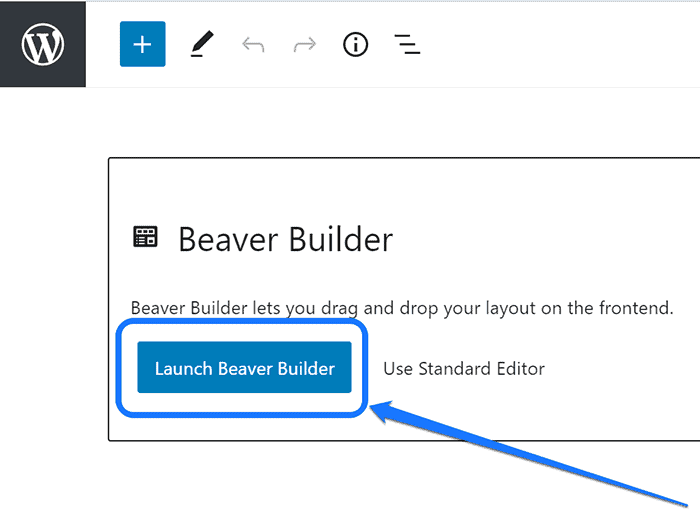
You enter the editing interface of a new page. Since you installed this drag-and-drop builder plugin, you can customize the page from the front end. Please click on the Launch Beaver Builder button as shown in the screenshot.
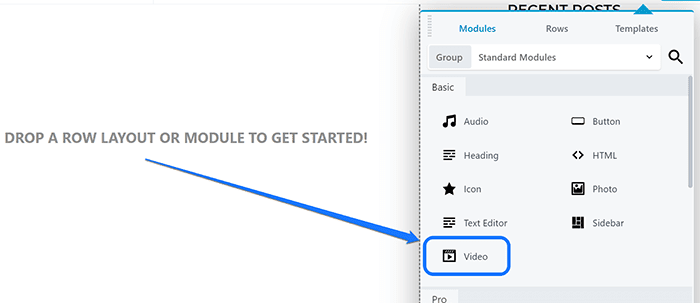
This action takes you to the front-end editing interface. Beaver Builder displays various modules in the right sidebar, such as Audio, Heading, Photo, etc. Click on the Video icon and drag it to the dotted box.
It creates a video block and opens up a window to adjust video settings. You should first set the video type from two options: Media Library and Embed. If you picked the first alternative, you get to upload a video from either MP4 or WebM file formats.
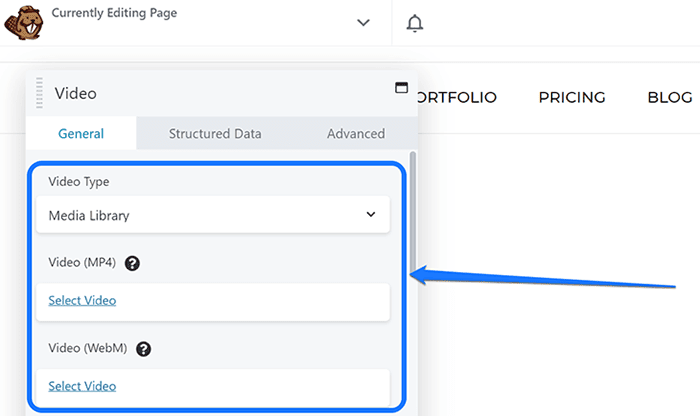
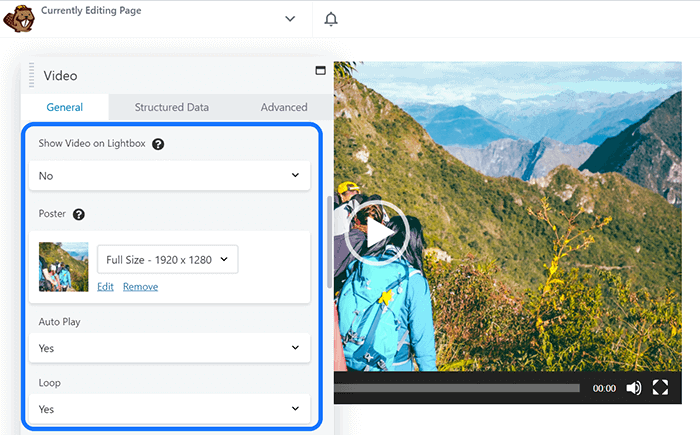
Click the “Select Video” button from any one of these options. You need to select a video from the Media Library or upload it from the drive. Beaver Builder lets you make a few adjustments, like uploading posters, autoplay and loop toggle, etc.
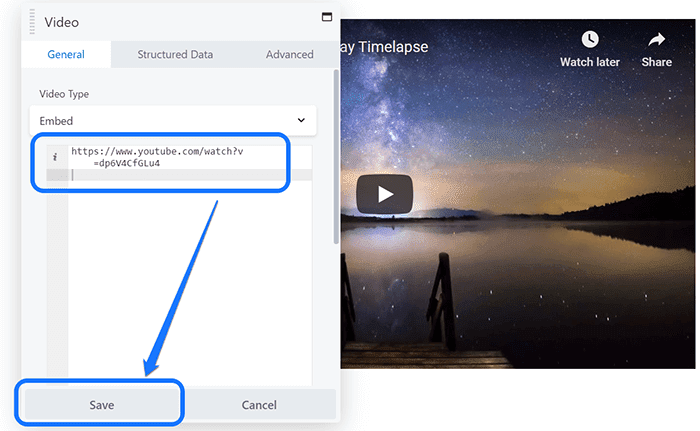
On the contrary, if you select the Video Embed option, it lets you paste the URL of your YouTube video. Once you insert the URL, you get a preview of the video in the background. Click on the Save button after making final edits.
Beaver Builder displays a preview of your embedded video on its interface. Please click on the Done button at the top-right corner. After that, you see four new buttons: Discard, Save Draft, Publish, and Cancel.
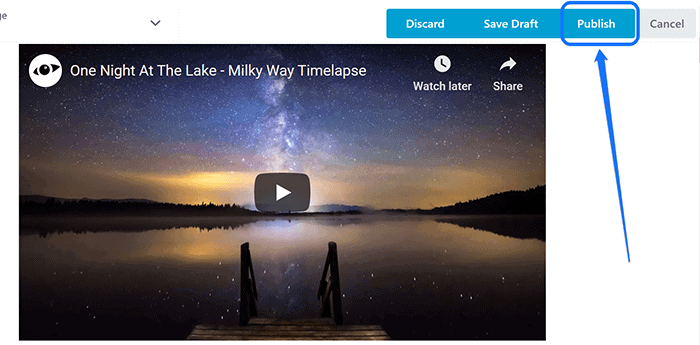
Click Publish after that to save your updates. We suggest you load your website to check how the video background is working. If you want an alternative to website page builders, look at the next section: Plugins.
2. Create a Video Background Section Using WordPress Plugins
Plugins are an excellent way to add extra features to your website. You have the option to choose from various extensions to add a video background to your site. We have explained the process of adding this feature using two plugins.
- Advanced WordPress Backgrounds
With Advanced WordPress Backgrounds, you can display various background types. For instance, you can add an image, pattern image, color, uploaded video, and YouTube/Vimeo videos.
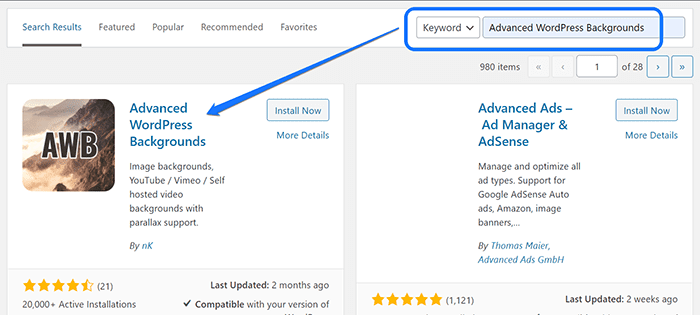
Please explore the Add New Plugin page in your WordPress dashboard. Enter Advanced WordPress Backgrounds in the search bar and install the first option from the results.
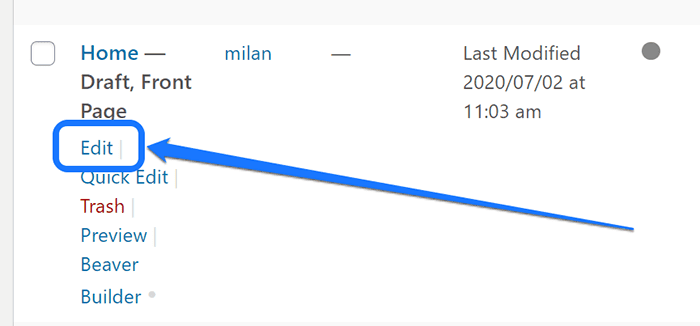
Activate the plugin after you install it. Then, go to the page where you want to add a video background section. For this tutorial, we picked the homepage of our website. Please click on the Edit button, which is at the bottom of the page title.
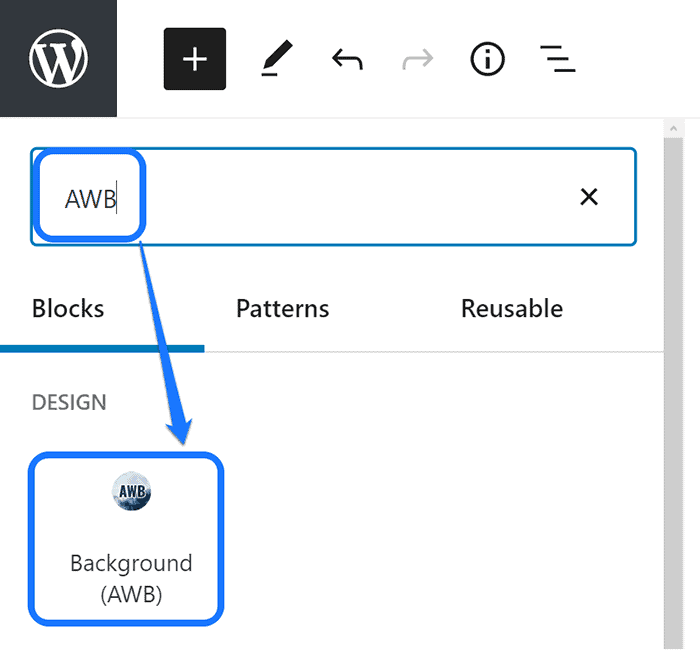
Inside your homepage’s editing layout, click on the plus (+) sign to open up a search bar. Enter the term “AWB” and select the Background (AWB) block option. You get a new block added to your page.
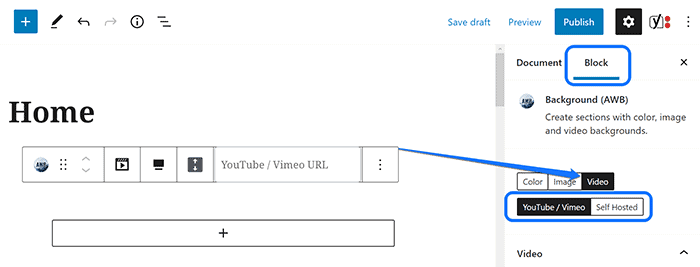
In this block, you get to add either a color, image, or video. Click on the Type button on the Block Settings bar. Select the option “Video” from the drop-down menu that you see in the screenshot below.
![[Screenshot Name: Pointing at the Video button inside the drop-down menu of Background (AWB) block]](https://rarathemes.com/blog/wp-content/uploads/2021/12/Pointing-at-the-Video-button-inside-the-drop-down-menu-of-Background-AWB-block.png)
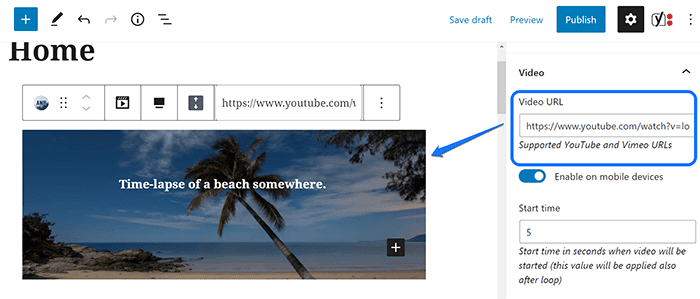
This plugin provides an interface to add a video using two methods. First, click on the Block button at the right sidebar. Right under the Video option, you can choose from either YouTube/Vimeo or Self Hosted option.
When you select the option for YouTube/Vimeo, you get a text box to enter the URL of your video. You can also set the video start time to start precisely from where you want it to play.
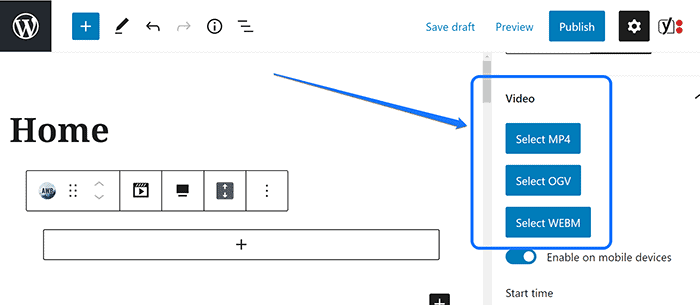
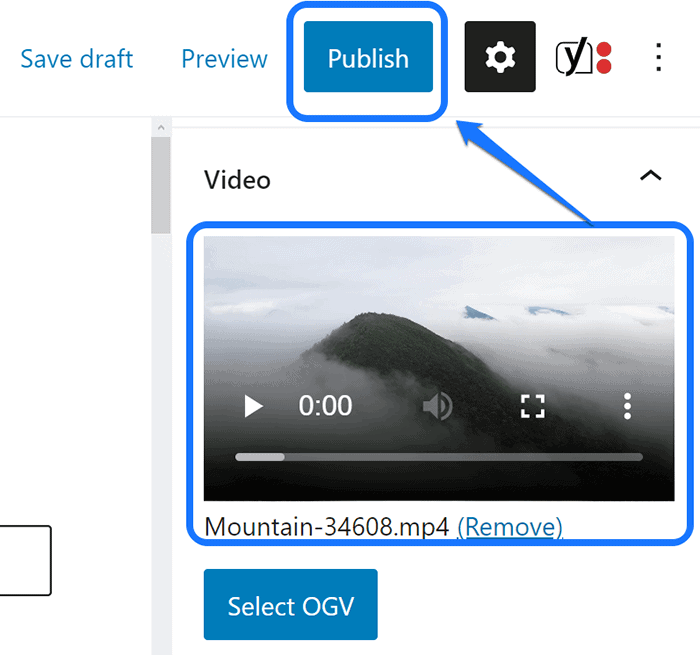
Another option is the self-hosted video. You get to upload a video by selecting one of these three formats: MP4, OGV, and WEBM. Click on one of these buttons and pick a video from your Media Library.
If you don’t have a video at the Library, upload one from your drive. Once you insert a video, you can see its preview in the same sidebar. After that, click on the Publish button at the top of the page.
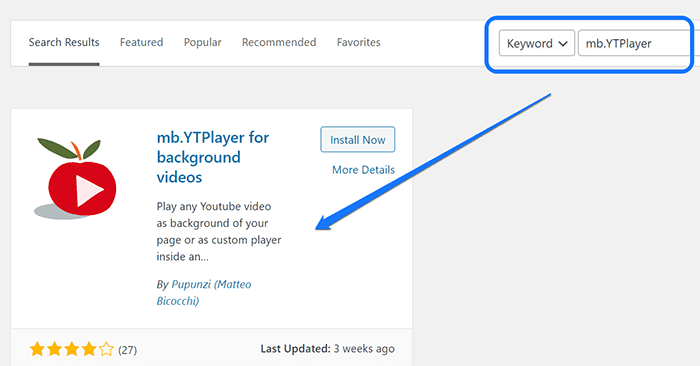
- mb.YTPlayer for Background Videos
The mb.YTPlayer for Background Videos plugin lets you integrate YouTube videos into your website. With its pro version, you can edit the video opacity, quality, aspect ratio, and other features.
Similar to the previous plugins, you can install mb.YTPlayer from the Add New Plugin page. Insert its keyword as shown below and activate it to your WordPress account.
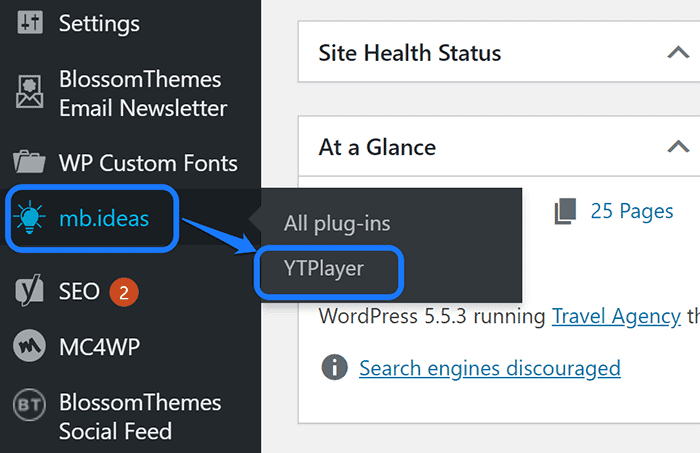
Please go to your WordPress dashboard after installing it. After that, hover your mouse cursor on the “mb.ideas” option at the left sidebar. Click on the YTPlayer button that you see in its drop-down menu.
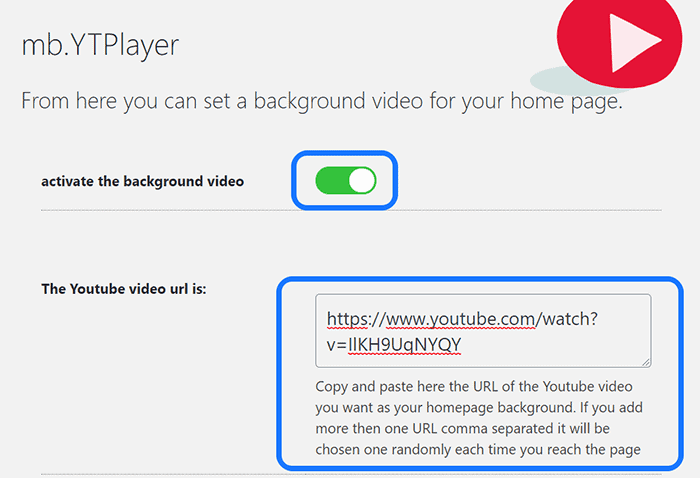
You enter the editing interface of the YT.Player extension. First, click on the toggle button to activate the background video. After that, insert the URL of a YouTube video in the text box as displayed in the screenshot.
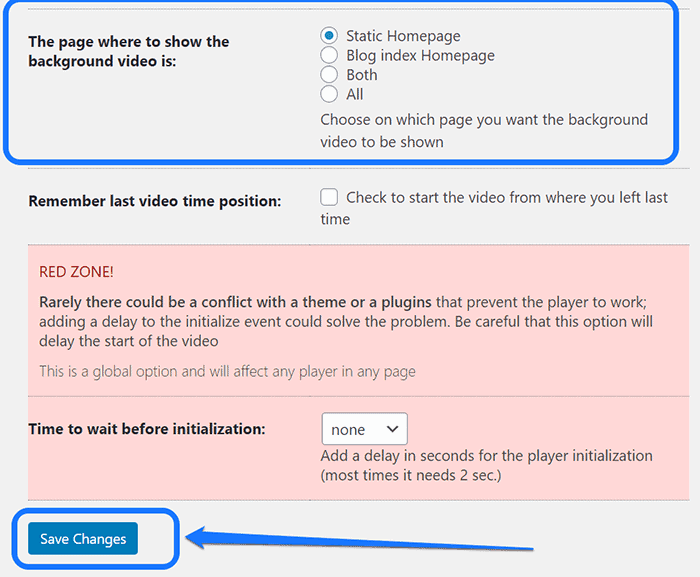
Scroll down the page, and you see a section to choose a page where you want to integrate the video. We picked the Static Homepage for the demonstration. You can click Save Changes after finishing the edits.
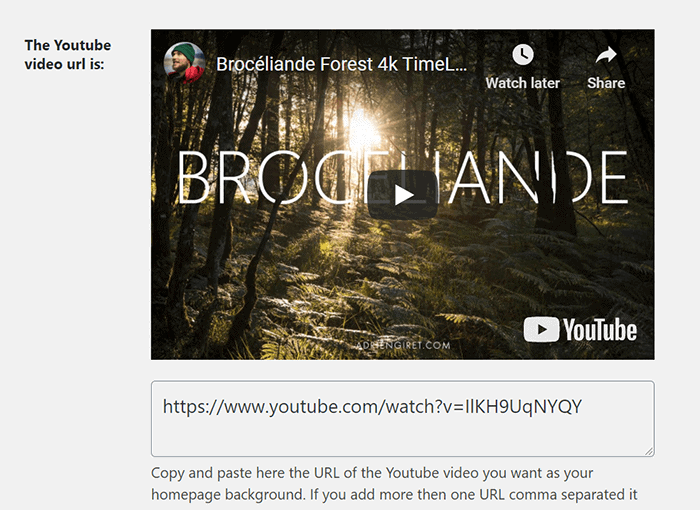
After you save the changes, you get to see your selected video’s thumbnail on this page. You can also add multiple video URLs separated by a comma. Your audience can randomly see anyone of these videos every time they visit your website.
- Slider Hero With Animation, Video Background and Intro Maker
The Slider Hero plugin helps you create responsive sliders for your website. You can add text carousel, Call-to-Action (CTA) buttons, and several other elements on the slider. Besides, it lets you add a video as a background section as well.
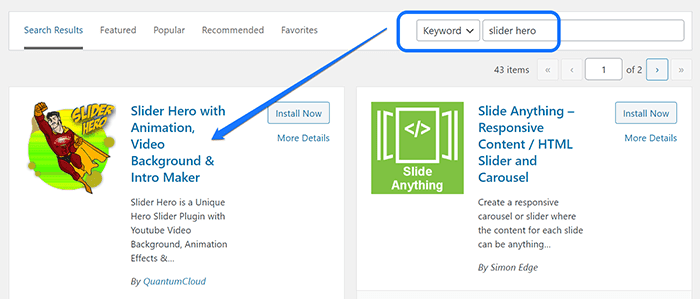
Like any other free extension, you can install it from WordPress’s Add New Plugin page. Enter its keyword “Slider Hero” in the search bar. Select the first option that has Quantum Cloud as the publisher’s name.
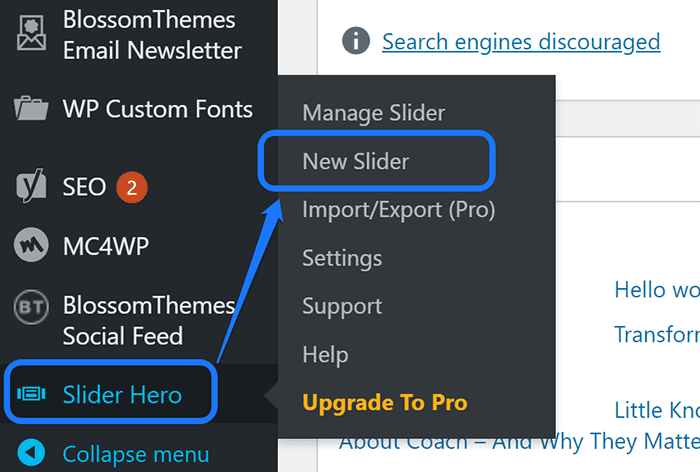
Now you have to go to the dashboard and search for the Slider Hero option in the sidebar. Please hover your mouse cursor on top of it to bring a drop-down menu. Click on the New Slider button from the menu.
You are now in the editing interface of this plugin. It provides seven distinct slider effects for you to choose. Click on the slider option that you want to edit. We chose the first option: No Effect.

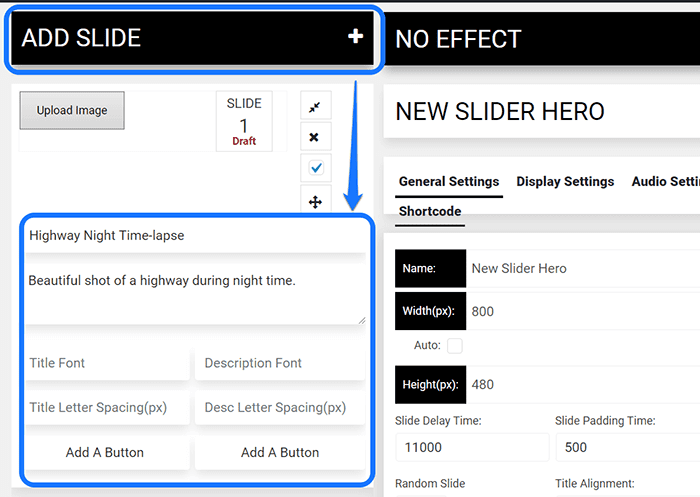
The following page includes two sections. The first one allows you to add sliders, while the next lets you customize its effects.
We suggest you click on the Plus (+) symbol at the top of the left section. It creates a draft slide where you can write the title and description. Besides, you get to add two CTA buttons for each one of them.
Moving on to the right section, you need to select the menu bar’s Video Settings option. It shows a drop-down menu with three video background alternatives. Choose the YouTube Video background option.
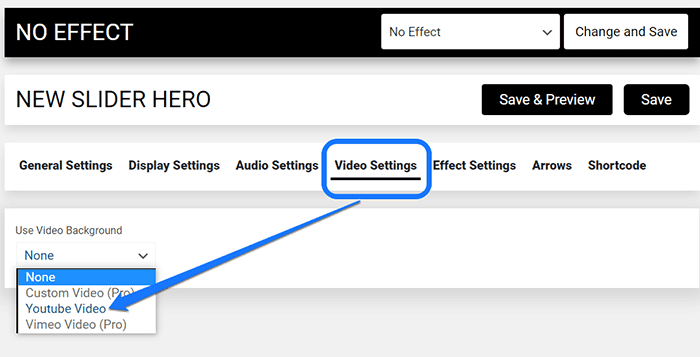
You can use the other two options only with its premium plugin version.
Slider Hero displays various video slider settings with this action. You get a text box to include a YouTube video’s ID. To get this code, you can paste the entire URL of your video in this space.
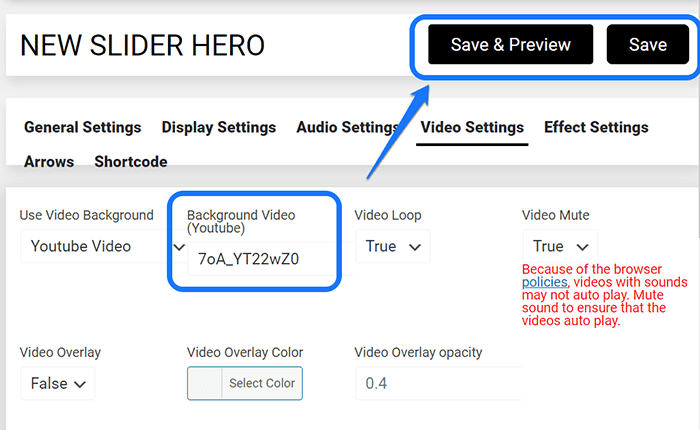
Please click on the Save button after finalizing the adjustments. After saving the changes, click on the Shortcode option at the right-hand corner of the menu bar. Slider Hero provides a shortcode that you can paste into any page of your site.
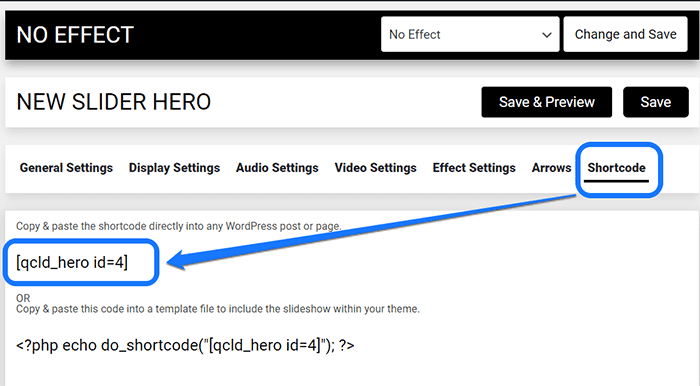
Copy the code highlighted above and paste it into a notepad. Now you can look for the Pages option in the WordPress sidebar. Hover your mouse pointer on top of it to bring a drop-down menu.
After that, you have to click Add New to create a new page. When you enter the new page, you have to paste the shortcode in the body area. Click on the Save draft button after finishing the edits.
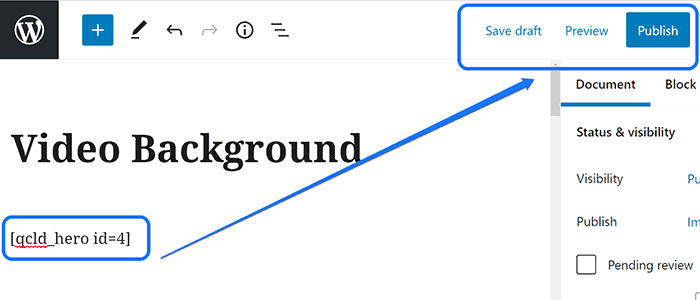
You can also click on the Preview button to check how the video is working. Click on the Publish button once you finish adding other page elements.
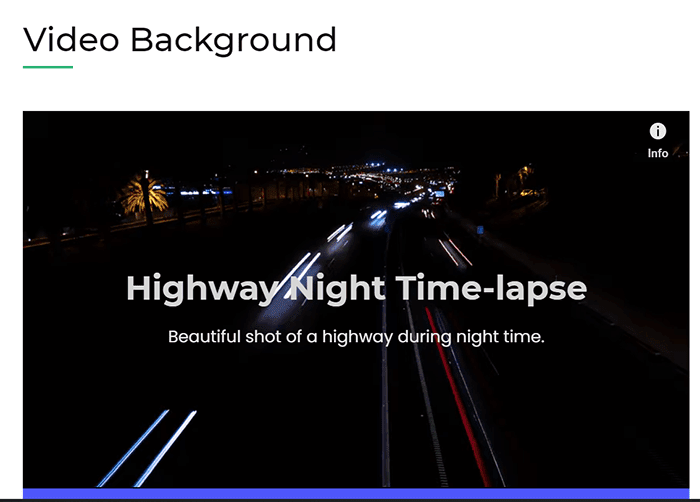
The screenshot below illustrates how the background video will be going to look.
3. Create a Video Background Section Using WordPress Themes
An easy way to integrate a video background is to install a WordPress theme that supports this feature. With a multimedia supporting theme, you don’t need an external extension to add video sections to your site.
Here are three websites that have powerful themes that support video backgrounds.
- WordPress.org – Free Themes Repository
WordPress.org includes various free themes and plugins to power your website. It works with minimal setup. Besides, this open-source tool allows you to share your stories, products, and services with convenience.
You can search for a relevant theme from its search bar. Enter the term “video background” and select any one of the items from its results. Besides, you can download any template and install it on your WordPress dashboard.
Please read its description before downloading to ensure it supports the feature that you want to add. You have to upload the theme’s ZIP file to your WordPress account and activate it afterward.
- Theme Forest – Premium WordPress Themes
Theme Forest includes thousands of themes and templates for WordPress, eCommerce, marketing, CMS, etc. They are the largest theme marketplace in the globe, with unique items for varying projects.
If you want a premium web template, then we recommend this website. Similar to WordPress.org, you need to enter the keyword to search for a relevant theme. It lets you sort the results based on price, best match, etc.
After installing it on your WordPress dashboard, you have to read its documentation to add a video background. If it does not include the relevant instruction, then you need to contact their support team.
- Rara Themes – Free and Premium WordPress Themes
Rara Themes has a collection of some of the best website templates. Their themes are ideal for creating websites of different niches including travel, business, education, fashion, personal blogs, and more. Each of its website templates allows you to integrate video in the header background.
You can use both its free and premium themes for this purpose. We will explain how to set up the video background section using one of its products. For this demonstration, we picked the Chic Lite.
Please install and activate this theme and go to the WordPress dashboard. Hover your mouse pointer at the Appearance option in the sidebar. Then, click on the Header button from the drop-down menu.
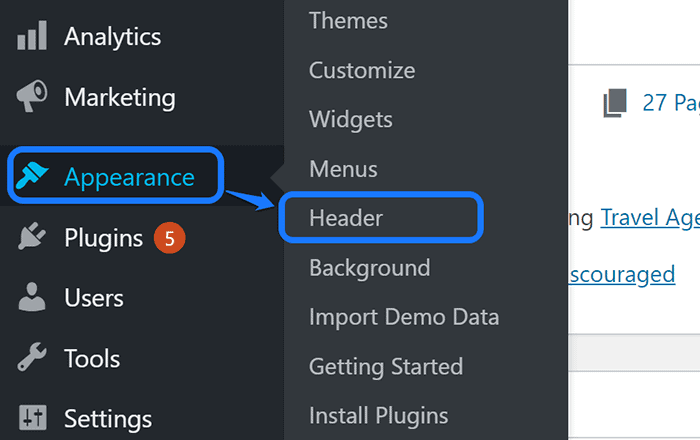
With this action, you enter the front page customization settings for your Banner section. You can see the title to add the Header video at the left sidebar. Click on the Select Video button, as shown below.
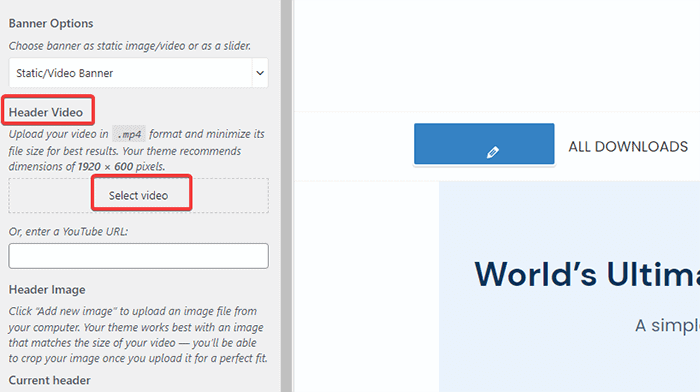
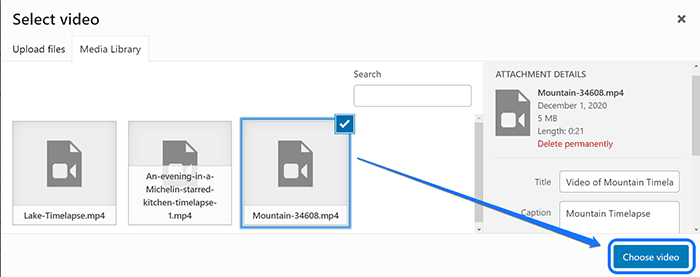
You reach the Media Library page, where it allows you to choose a video to display. Select the video that you’re planning to upload, then click on the Choose Video button. It lets you change the file title, caption, and description.
If you haven’t uploaded a video already, you need to go to the Upload Files section. You can add a video in the library and choose to display it in the header area.
Go back to the customization setting, and you can see the thumbnail for the video you picked. Besides, if you want to integrate a YouTube video, you can enter its URL in the space highlighted below.

The video plays automatically without audio. Your audience gets the option to pause and play the video while browsing the website.
Where to Find Stock Photos for Your Video Background Section?
Until now, you must have a clear idea of how to add a video background to your website. But, do you have a ready-made video to insert? If not, then allow us to make it easy for you.
If you are a video maker or have hired one for your project, you don’t have to worry about it. However, if you want a generic video clip to enhance your site’s aesthetics, you can use stock footage.
Stock footages are royalty-free content that you can use without copyright issues. Let’s look at the list of four websites that provide both premium and free stock videos.
1. Shutterstock
Shutterstock lets you download various multimedia elements, like images, graphics, music, footage, etc. Google, BuzzFeed, Marvel, and several other reputed brands rely on their stock library to power their creativity.
You can categorize the videos based on topics, such as animal/wildlife, holidays, science, education, nature, and more. Shutterstock has more than a million stock videos of 4K, HD, and SD quality.
2. Envato Elements
Envato Elements has more than 50 million digital assets, such as graphic templates, videos, audio, photos, fonts, etc. They got every kind of b-roll footage and video clips for nature, business, and background.
3. Pexels
Pexels is a free-stock library of images and videos. You can search for any footage categories, like houses, cafes, nature, children, family, and more. It also allows you to donate to creators if you feel like supporting them.
4. Pixabay
Pixabay has a community of talented creators with more than 1.8 million stock photos and videos. You can use, modify, and also distribute their elements without giving credit. Similar to Pexels, you get to donate one or more creator(s) if you want.
Frequently Asked Questions (FAQs)
Does the Slider Hero Plugin Support Auto-Play Feature on YouTube Videos?
Slider Hero supports the auto-playing feature of your YouTube video only if it does not have audio. In case your video has sound, then it might/might not auto-play depending on various factors.
Which Video Background Plugin is Best for My Website?
The Advanced WordPress Backgrounds plugin will work best on your site. It lets you integrate video using easy-to-use block elements and supports both self-hosted and YouTube videos.
When Should I Not Use a Video Background on My Website?
There are a few cases where video background might not be a significant component to include. For instance, if you want your visitors to read a particular text, then video might be a distraction.
Should I Upload a Self-Hosted Video or Embed a YouTube Video Instead?
You need to consider your website’s load speed while making this decision. If you use self-hosted videos, then it might slow down your site. So, we recommend a YouTube video background instead.
Can I Remove the Share and Subscribe buttons from an Embedded YouTube Video?
No. YouTube does not allow you to remove the Share and Subscribe button from an embedded video. This function was available only before September 2018.
Wrapping Up!
You can create a great video as a background using the tips and techniques of this blog. Do you know some more plugins/extensions for adding this feature to your website? Please share your answer in the comment section below.
Also, did you find our blog informative? Feel free to provide your honest feedback so we can improve our future content.