WordPress lets you create multiple sites using the same WordPress installation. Such a feature gives the liberty to run numerous websites while empowering the user to control all the sites from a single dashboard.
It saves you time and effort.
In this writeup, you will learn how to set up a WordPress multisite network and add sites, themes, and plugins to that network.
We have also answered some repeated questions regarding the WordPress multisite network.
But first, let’s begin with the introduction:
What is the WordPress Multisite Network?
The WordPress multisite network is a feature that lets the users create, manage, and run multiple WordPress websites from the same WordPress installation. In other words, it is a collection of websites that share the same WordPress installation, plugins, themes, and database.
All the sites in a multisite network are virtual. Although the sites have unique identities, they don’t have separate directories on the server. However, they do have different directories for tables and media files.
The concept was initially known as WPMU or WordPress Multi-User. It let the users set up a blogging network. Later in 2010, the multisite networking concept came out as a feature of WordPress. It took WPMU a step further and allowed the users to set entirely different sites. So now, one site could be a blog, while the other could be an e-shop, portfolio, business, or any other genre.
A well-known example of a multisite network is WordPress.com (which has 37 million+ websites) and Edublogs (which has 4.3 millions+ websites).
Differences Between a Regular Website and a Multisite Network
1. Super Administrator
On a regular website, the highest level of permission you can get is the “Administrator.” But on a Multisite Network, the highest level is the “Super Administrator,” who has access to control and manage every site on the network.
2. Network Admin Dashboard
Every regular website has its admin dashboard. Similarly, every site on the Multisite Network also has its own dashboard. But there is also another admin dashboard on the Multisite Network, known as Network Admin. The Super Admin can manage the entire network settings from this dashboard.
3. Plugins and Themes
Plugins and themes installed in the network admin are available for any site in that network. The super admin can “network activate” a plugin or “network enable” the theme.
4. Files and Folders
Enabling the multisite in WordPress adds a few lines of code in the wp-config.php file. These codes activate the multisite for use. Also, the wp-uploads folder now has a sub-folder for each website in the network. Those sub-folders have the website’s numerical ID for their names.
5. Database
A standalone WordPress installation sets 11 database tables to store the website’s content and settings. In a multisite, nine of those tables duplicate for each website on the network.
Features of Multisite Network
Multisite Network comes with several unique features. You can run and manage as many websites as you want in a single network. A multisite network allows you to create a network of subdomains. You can also have different domains for each website.
As a Super Administrator, you can control and manage the entire network and manage multiple websites from a single dashboard. You can also assign separate admins for each website on the network. However, the website admins can only manage their individual website.
The Super Administrator can install and activate the plugins and themes for multiple websites on the network. Similarly, you can create a website or online shop intended for a specific currency, region, or language.
Pros and Cons of Multisite Network
Now, here are some pros and cons of using the Multisite Network.
Pros:
- You can easily manage multiple websites from a single dashboard as the network administrator.
- Each website on the network can have its own admin.
- You can install and activate plugins and themes for multiple sites with a single download.
- With Multisite Network, you can easily manage updates for all of the websites that are on the network.
Cons:
- If the network goes down, all sites will also go down as all the sites share the same network resources.
- Editing the theme distributes the changes across all the sites.
- If one of the websites gets hacked, then the entire network has to bear the consequences.
- It is difficult for beginners to manage traffic and server resources. An unexpected increase in traffic in one of the sites will affect all the other sites on the network.
- Some WordPress plugins don’t support Multisite Network.
- You can restrict plugins to certain websites in the network.
- Not all web hosting providers support the Multisite Network.
Who Should Use WordPress Multisite Network?
Wanting to start a multisite in WordPress does not mean you need it. There are other third-party tools that let you maintain multiple websites. Some plugins you can use are ithemes sync and Infinite WP.
Here are some cases where setting up a multisite network makes sense:
- A magazine site that has different sections and needs various teams to manage it.
- A business site with multiple subsites for its branches and locations.
- An NGO or government site for various departments, divisions, locations, and regions.
- Personal site operating on multiple subdomains.
- Education centers that allow students to create their blogs on school servers.
Requirements to Set Up WordPress Multisite Network
If you have decided to set up a multisite network in WordPress, no matter the reasons, here are a few requirements you must meet first:
1. Web Hosting Service
A good web hosting service is the first thing you need for a multisite network. As all your sites will be sharing the same network resources, you must make sure the hosting service is up for the job.
If you expect low traffic, a shared hosting plan may be your getaway plan. But as you get more visitors, switching to cloud hosting or VPS hosting is your best bet.
You can choose among SiteGround, Bluehost, or DreamHost. All these hosting services are WordPress-recommended and offer suitable hosting plans for every need. Here are the other 10 best hosting services of 2022. Check them out.
2. WordPress Knowledge
You also need to know how to install WordPress on your system.
Even if you know how to install WordPress, you still need to backup your site. You might want to check this guide- How to backup WordPress.
3. FTP Access
It would help if you made some edits to the site directory for setting up a WordPress multisite network. For this, you need access to your FTP or cPanel.
4. Choosing Subdomains Vs. Subdirectories (Multisite Domain Mapping)
Before setting up a multisite network, it is important to be sure if you want to use subdirectories or subdomains.
Subdomain
Each subsite you want to create on your network has a URL such as http://website1.example.com/. Here “website1” is the individual site name, while “example.com” is your leading site’s domain name.
For creating a subdomain, you need to activate the wildcard subdomains for your hosting. We will show that in the next section.
Subdirectory
If you want to create a subdirectory on your network, your URL will look something like http://example.com/website1/. Here “example” is your main site’s domain name, and “website1” is a directory in it.
Activating Wildcard Subdomains
To use subdomains for subsites in a multisite network, you need to activate wildcard subdomains. Here is how you can do it:
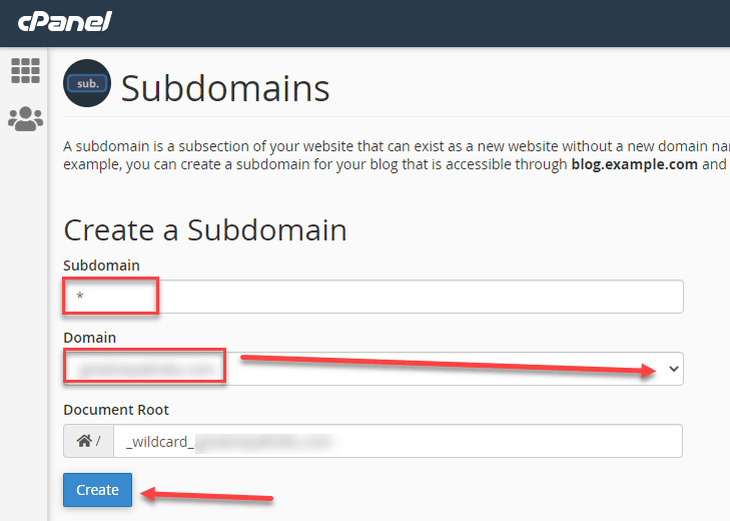
- Log in to your cPanel dashboard.
- Look for the “Domains” section and click on the “Subdomains” option.
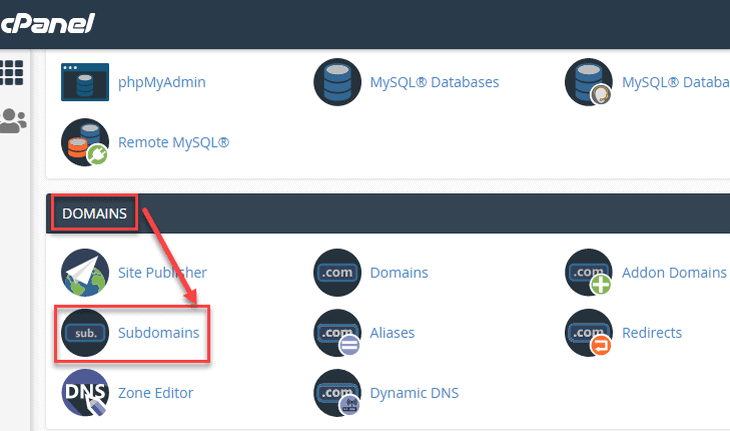
Your cPanel dashboards might look different depending on your hosting provider.
- Enter the asterisk (*) sign in the subdomain field. Choose your primary domain from the drop-down menu.
- Click on the “Create” button below. It will add your wildcard subdomain.
Enabling WordPress Multisite Network
A multisite network is a built-in function of WordPress. You need to install WordPress like you usually would. After that, create a backup of your WordPress. Now, to enable the multisite network, follow these steps:
- Connect to your site using FTP or cPanel.
Here is an example of accessing the site using FileZilla.
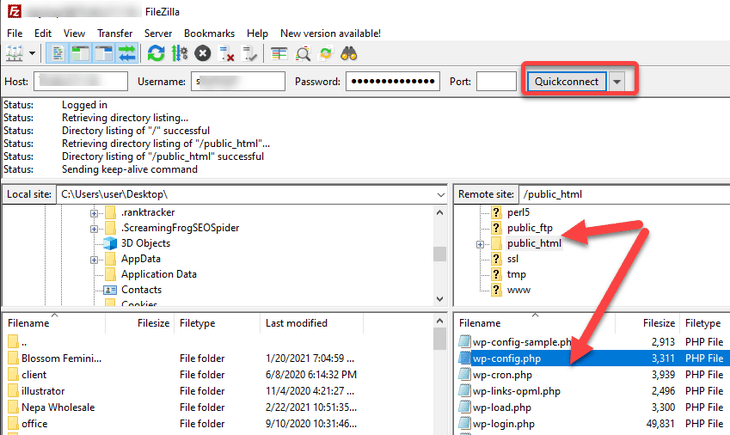
The right quadrants show the list of folders that contain your website’s file.
- Navigate down to your website’s root folder. Mostly, the root folder is named after your domain name or public_html. Double click to open it.
- Right-click the wp-config.php file and click on the ‘Edit’ option.
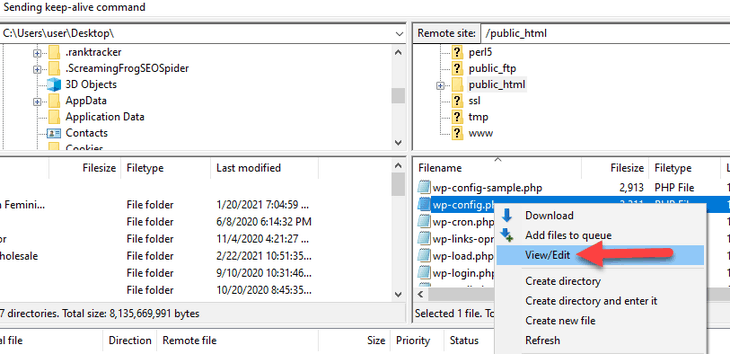
Don’t touch any other file or line of code except the ones we are about to discuss below. Backing up your files is a good idea. You can restore the changes if you delete or make any mistake in the files.
- Look for a line that reads, “That’s all, stop editing! Happy blogging.”
- Now, copy and paste the following line just before that quote.
define( 'WP_ALLOW_MULTISITE', true );- Save the changes and exit the editor.
You have successfully enabled the WordPress multisite network.
Setting Up WordPress Multisite Network
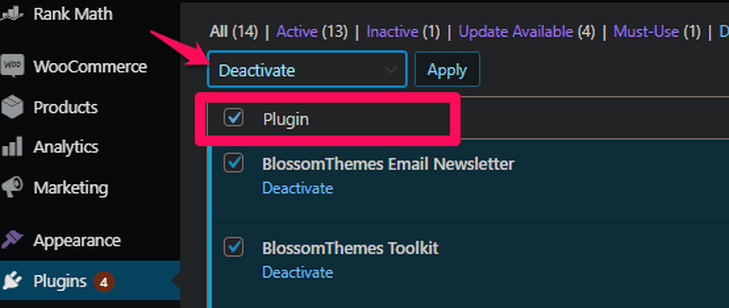
After enabling the multisite, you still need to set it up. If you are setting a multisite network on a site that you already run, you need to deactivate all the plugins there first:
- Log in to your dashboard.
- Scroll down to ‘Plugins’ on the left side panel.
- Click on the ‘Installed Plugins’ option.
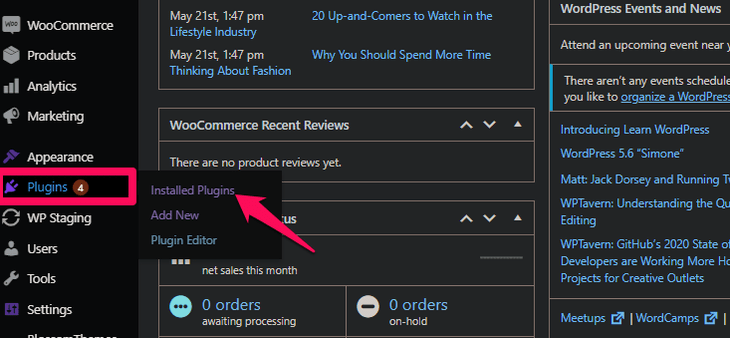
- Click on the ‘Plugin’ option at the top to select all the plugins at once.
- Choose ‘Deactivate’ option from the drop down option and Click on Apply.
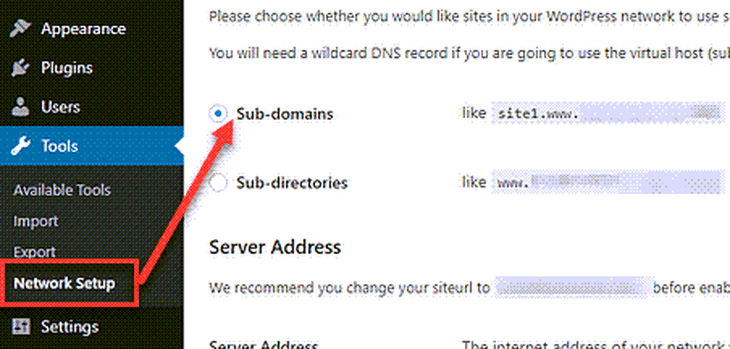
You can now configure your multisite network as follows:
- Navigate to the ‘Tools’ option on your dashboard.
- Click on the ‘Network Setup’ page.
- Choose either subdomains or subdirectories option. We have discussed the differences in the above section.
- Enter the network title and your email address in the respective fields.
- Click the ‘Install’ button at the bottom once you are done.
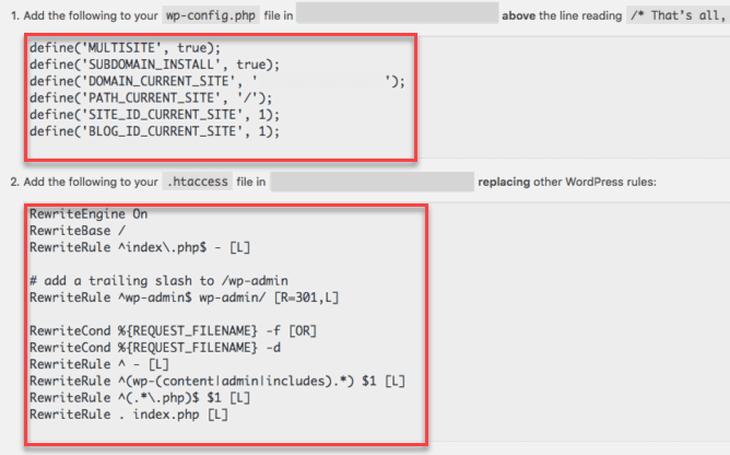
After doing this, WordPress shows some codes. You need to add those codes to the config.php and .htaccess files. You can use an FTP client or cPanel to copy those codes on the respective files.
- Refresh your WordPress and re-login.
How to Add New Sites to the Multisite Network
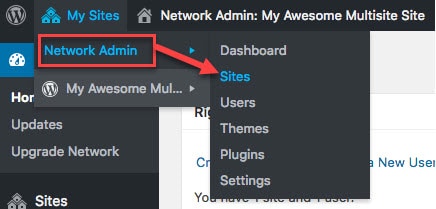
You have successfully set up the WordPress multisite network. You now see the multisite dashboard after re-logging to your dashboard.
To add sites on the multisite network site you just created, follow the steps below:
- Click on the ‘My Sites’ at the top of the page and go to the ‘Network admin’ option.
- Click on the ‘Sites’ option from the list.
A page showing a list of sites on your multisite network shows up. By default, WordPress lists your primary site here. It is the only site on the list right now.
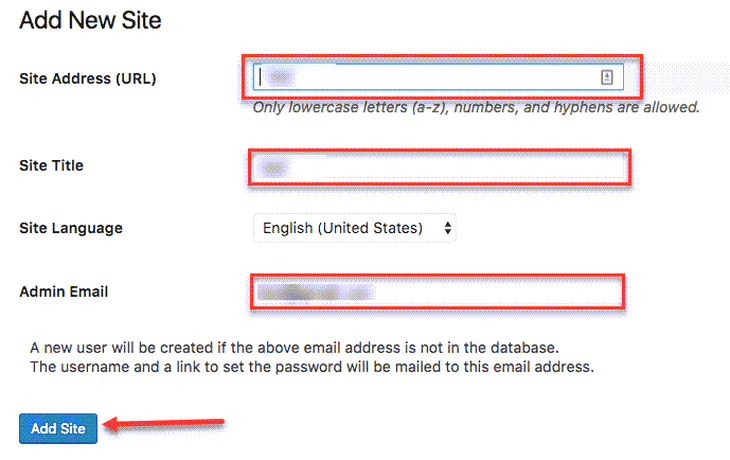
- To add a new site on the multisite network, click on the ‘Add New’ button at the top.

- Enter a site title and admin email address on the respective fields.
- You can use an email address besides the one you are currently using. WordPress automatically creates a new user if another user does not use the email address you entered. It sends the username and password to that email address.
- Click on the ‘Add Site’ button at the bottom.
Adding Themes to the WordPress Multisite Network
You can add themes on the WordPress multisite network as follows:
- Click on the ‘My Sites’ at the top of the page and go to the ‘Network admin’ option.
- Click on the ‘Themes’ option from the list.
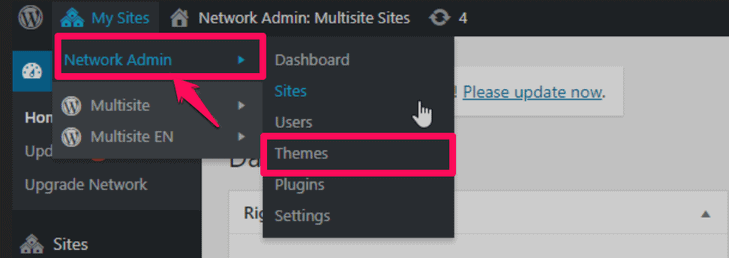
- Now, you can add themes as you normally would. Click on the ‘Add New’ tab at the top. You can apply the theme throughout the network by clicking on the ‘Network Enable’ option.

Adding Plugins to the WordPress Multisite Network
You can add plugins on the WordPress multisite network as follows:
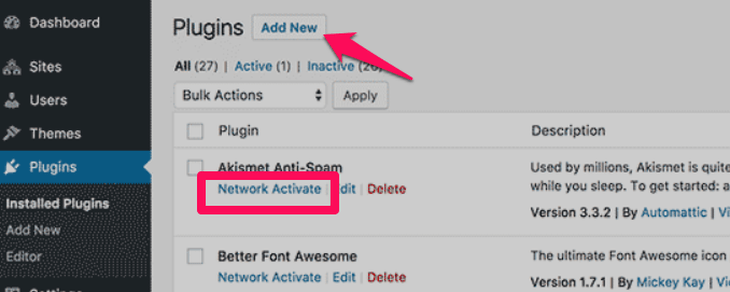
- Click on the ‘My Sites’ at the top of the page and go to the ‘Network admin’ option.
- Click on the ‘Plugins’ option from the list.
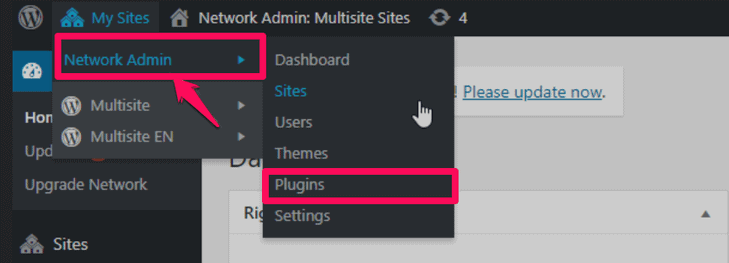
- Now, add plugins as you normally would. Click on the ‘Add New’ tab at the top. You can activate the plugin throughout the network by clicking on the ‘Network Activate’ option.
Note: Only super-admin can add or delete new themes and plugins. Site admins can only activate and deactivate them; that too if super-admin allows it.
Conclusion
You just learned how to set up a WordPress multisite network, configure it, and add themes and plugins to it. It may seem like a headache when you skim through the steps we mentioned. But rest assured, they are easy to execute even by a beginner.
A multisite network has several advantages. It lets you manage multiple sites all at once from a single dashboard. It will save you much time on website monitoring. However, don’t forget to backup your WordPress. After all, bearing a little precaution does not harm but saves you from a lot of troubles instead.
Frequently Asked Questions
Can I have multiple websites on WordPress?
Yes, you can have multiple websites on WordPress. WordPress has a built-in feature that lets you set up a multisite network. You can control all the sites on that network from a single dashboard. We have explained how you can set up a WordPress multisite network in this guide. Check it out.
Does a WordPress multisite network make my website load faster?
Your website’s speed depends on your hosting plan. On a shared hosting plan, you may have limited resources. For a website that receives huge traffic, VPS or cloud hosting would be a better option.
You can check out these 10 best hosting service of 2022.
How many free WordPress sites can you have?
You can have as many free WordPress sites as you want.
Are subdomains separate websites?
Technically, subdomains are a part of your main website. However, search engines consider subdomains as a separate entity.