Do you want to know how to change the WordPress theme? If yes, we can help you with that in this blog. There are several quick and easy options available that provide hassle-free ways to alter your web template.
Besides, it is a great way to find a perfect template for your website. You need to change your current theme a couple of times before you find an ideal option.
In this blog, we have included the approaches to change a theme using both WordPress and cPanel dashboards. Let’s dive into these methods, starting from the basics.
What is a WordPress Theme?
If you are new to website designing, it becomes a hectic task to create an appealing website manually.
HTML, CSS PHP, and other codes might be nerve-wracking.
Worst-case scenario, you don’t want to deal with the coding aspect of website creation.
In that case, WordPress themes are your go-to.
Wordpress themes are a pre-made design of your site that includes various features, styles, layouts, settings, etc., to provide a hassle-free website building experience.
This type of web template provides several powerful features that take your website to a new level. For instance, you may want your homepage to display the banner elegantly. In that case, you can download a theme with a carousel slider option.

WordPress themes let you customize your website the way you want it to appear. It does not change any of your content, like blogs, images, contact information, etc.
Moreover, you get to choose from both free and premium themes for your website. Their difference remains in the attributes. Premium web templates have comparatively higher features than free ones.
How to Pick a Perfect WordPress Theme for Your Website?
We recommend you give the right amount of thought regarding which website template you should use. Here you can see a list of seven essential things to consider while selecting a perfect theme.
1. Meets Your Website Requirements
It is essential to make sure your selected WP theme meets your website requirements. Otherwise, it will be a real bummer to find out the theme you chose cannot perform your desired task appropriately.
So, you need to create a list of all the attributes you want on your site. For this, write down a detailed list of all your requirements.
For starters, you need to find the purpose of your site. Is it to promote your business or simply to write casual blogs?
Besides, you also need to know how your website should look. If you are aiming to create an educational site, you should not install an eCommerce theme.
Make sure that you set your budget before-hand. With that in mind, you can quickly filter the price range while choosing a perfect website template.
2. Responsive/Mobile Friendly Design
Responsive or mobile-friendliness means that your website loads with correct dimensions on all display devices. Examples are laptops, desktops, smartphones, tablets, etc.
It is a crucial feature that you should never ignore in a WordPress theme.
You will provide a terrible user experience to about half of your website visitors without this attribute. Your audience will not be able to interact with your buttons and view your site information properly without this property.
3. Free vs. Premium WordPress Themes
Are premium themes better than free ones, every time? Not necessarily!
Free themes might not provide as many features as premium ones. But based on your requirements, it might be the exact thing that you need.
Let us consider that you cannot pick an ideal theme among three options. You like all of their designs and functionality. But, you need to test them before purchasing, right?
In such cases, free themes come in handy. You can install the free version of any one of them and check how your audiences react to your site for about a month. After that, you can either purchase its premium version or switch to another free theme.
4. Compatible With Plugins and Page Builders
After you set up a website, you will need to install a variety of plugins. They help you add additional features to your site. Some of the common ones are Rank Math, Google Analytics, Jetpack, etc.
Moreover, if you want a comfortable webpage building experience, you can install a reliable page builder. Examples include Elementor, Beaver Builder, WPBakery (Visual Composer), and more.
All and all, your desired WordPress theme should be compatible with the plugins and page builders that you might later require.
5. Rich With Customization Options
Once you install a theme, you might want to change its various elements to get your desired site appearance. If it contains limited customization options, you will need to compromise on your requirement.
For this reason, you need to install a WordPress theme with lots of adjustment settings. You should be able to change your site’s color, typography, navigation, page layout, and more.
What You Need to Do Before Changing a WordPress Theme?
The process of changing a WordPress theme is un-complicated. But, you should take safety measures before-hand. It saves you from losing essential website components and messing up your site in the process.
Please have a look at these essential precautions that will protect your site while changing a web template.
1. Create a Backup For Your Website
You need to backup your site to prevent the site from data loss while switching to a different theme. Additionally, backing up your website protects your site from server disasters, malicious attacks, etc.
Please use the UpdraftPlus plugin for this purpose. Its easy-to-use interface lets you backup and restores your content with a single click.
To install this plugin on your WordPress account, you need to visit the Add New Plugin page. After that, write its name in the search bar and pick the first option.
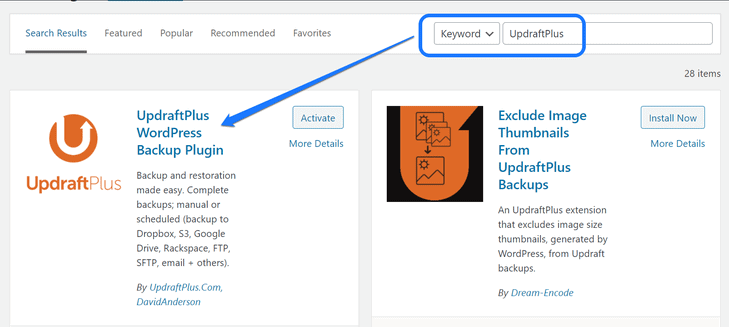
Click on the Install Now button and then on Activate to use it for your site. After installation, you reach the Installed Plugins page. Scroll down until you see UpdraftPlus – Backup/Restore title. Click on the Settings button below it.

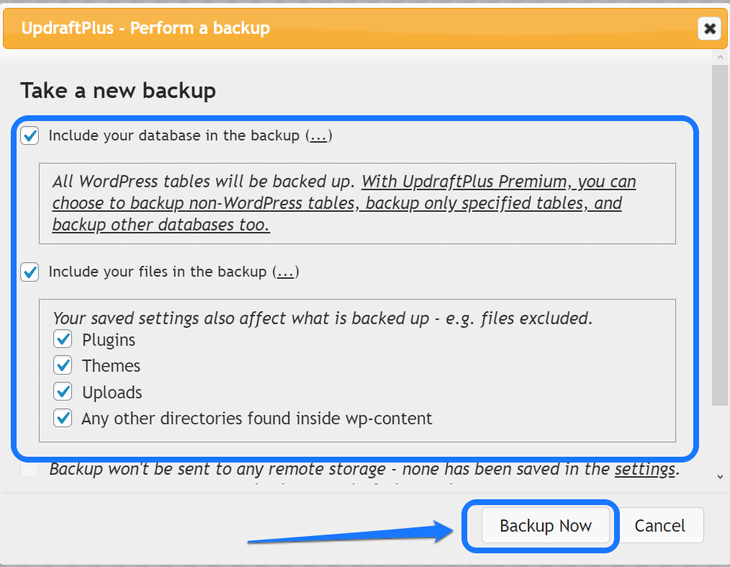
You enter the dashboard of this backup plugin. Here you can see a message box with the next backup schedule. Please click on the Backup Now button. It brings up a pop-up window to manage your settings.

You get to adjust a few settings regarding your first backup set up. It lets you choose the components that you want to include in your backup file. For instance, you can select themes, plugins, uploads, etc. Click on Backup Now after making changes.
Now you need to wait a few minutes until UpdraftPlus creates a file backup zip file. After that, you can see the details of your new backup. It saves your database, uploads, and other files and lets you restore or delete the files.

When you finish changing the WordPress theme, you need to visit its dashboard and click on the Restore button. This action puts back any files that can get lost in the process.
2. Create a Clone of Your Site (Staging)
Staging your website is a process of creating a duplicate of your site components. It helps you move your site to a different server, back up your files, and more. In our context, we will be using this process to check compatibility with a new theme.
If you install them on your original site, it increases the risk of ruining your website. We recommend you test such changes on your site’s clone at first. Once they give a positive result, you can update it on the live version.
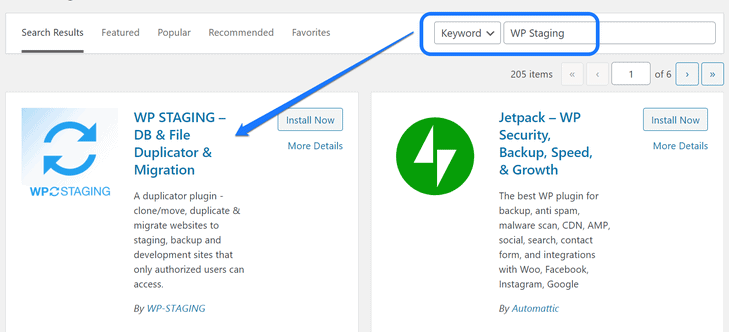
For this process, you need to install the WP Staging plugin. In addition to cloning your site, it also helps you copy the replica site changes to the live one.
Please visit the Add New Plugins on WordPress and enter its keyword in the search bar.
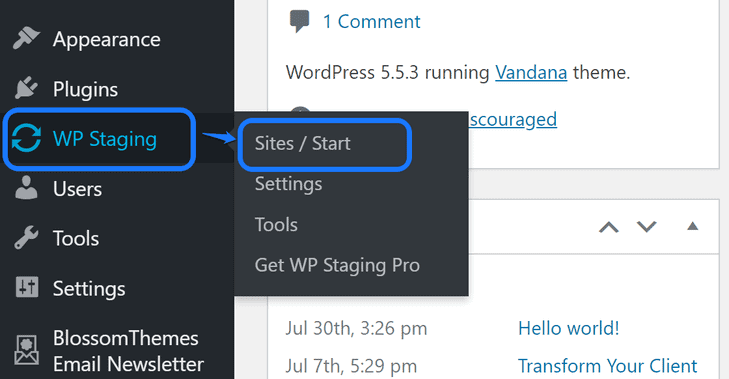
After installing the first plugin from the search results, go to the WordPress dashboard. Search for the option WP Staging in the sidebar. Please hover your mouse cursor on top of it and click the Sites/Start button from the drop-down menu.
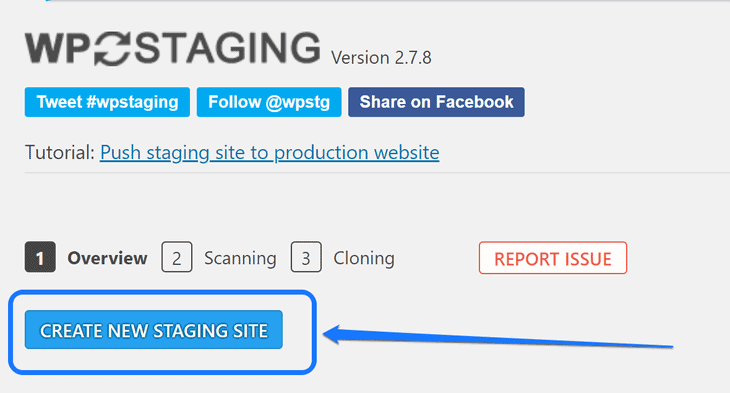
You reach the editing interface of this staging plugin. It divides the process into three steps: overview, scanning, and cloning. We suggest you click on the Create New Staging Site button to begin.
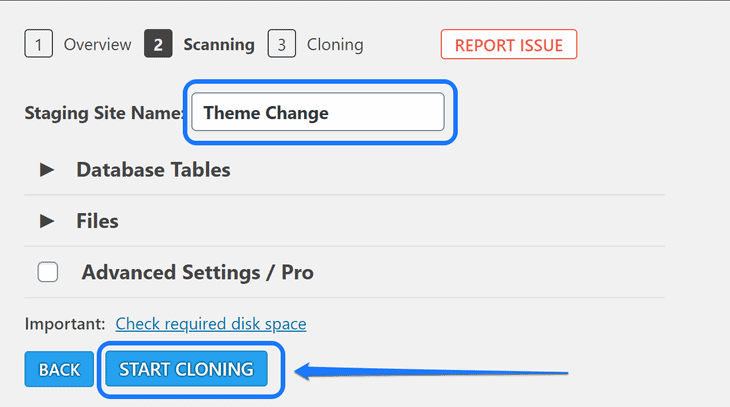
It takes you to the second step: scanning. You need to write the name of your staging site in the text box shown below. Besides, it lets you make a few adjustments to the database tables, files, and more.
Please click on the Start Cloning button after customizing the settings.
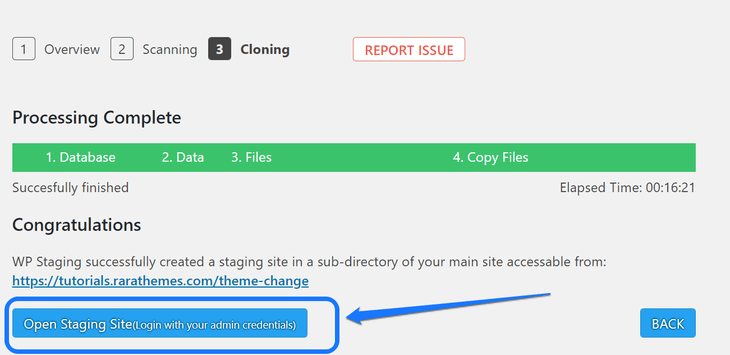
This action takes you to the third and final step. The WP Staging plugin starts cloning your site. After completion, you get a permalink to access your clone site. Please click on the Open Staging Site to continue.
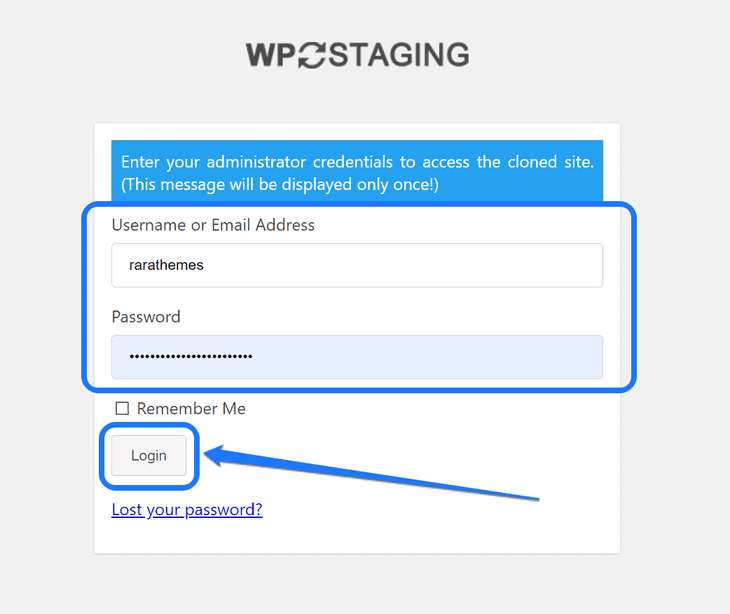
You reach the login page of the cloned site. Enter the username or email address and password in the text boxes. Interestingly, the credentials are the same as that of the main website. Click on the Login button to enter the replica site.
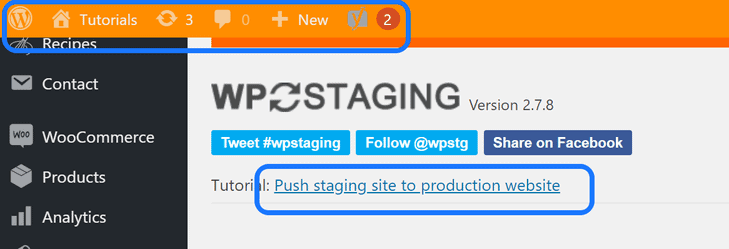
Once you enter the cloned website, observe the header bar in the WordPress dashboard. If it displays in orange, you are currently in the clone version. Now you can make any kind of changes to your site without the fear of breaking it.
Moreover, if you have purchased the premium version of this plugin, you can push theme changing updates to the live website. If not, you have to make the same changes you made in the clone site to the actual site.
3. Enable the Maintenance Mode
While you are making changes to your website, you need to keep your site in maintenance mode. If your audience visits the website during the process, they might get a terrible user experience.
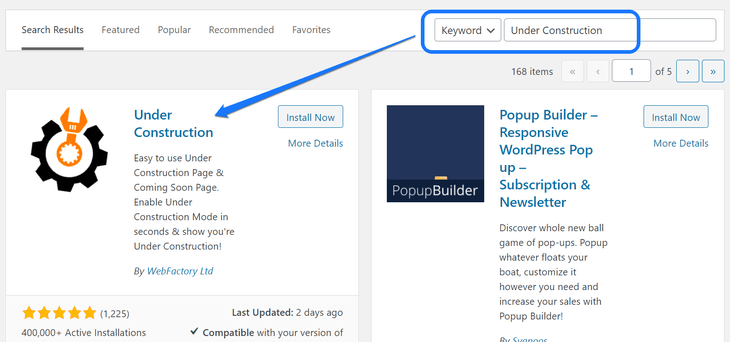
It’s a simple process, and you can turn it on with a few easy steps. You need to install a WordPress plugin, though. We will use the Under Construction extension for this demonstration.
Install and activate this plugin from the Add New Plugin page.
Please visit the WordPress dashboard and go inside the drop-down menu of the Settings option in the sidebar. You need to click on the UnderConstruction button from this menu.
With this action, you reach the dashboard of this plugin. Look at the first adjustment option inside the Main section. We suggest you enable the Under Construction Mode.
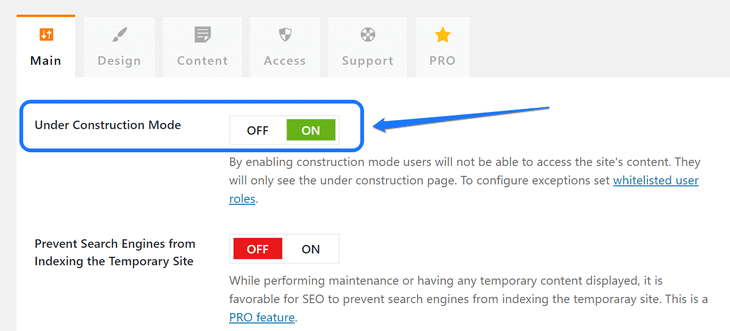
After that, scroll beneath these settings till you reach the bottom of the page. Now, click on the Save Changes button.
How to Change a WordPress Theme Safely without Losing Content?
You made all the preparations stated in the above section, right?
Now it’s time to learn the best techniques to change a WordPress theme. Please make sure to make all these changes on your replica site before making them go live.
We are going to look at two different approaches to change a theme in WordPress.
1. Changing a Theme Using WordPress Dashboard
Using the WordPress dashboard is the simplest way to change the active theme. Besides, you can choose three methods of accomplishing it. Let us learn more about each of them in this section:
A. Using Built-In Search Functionality
First of all, you need to log in to your account. Inside the dashboard, you can see a sidebar with an Appearance option.

You need to hover the mouse pointer on that option. When you see a drop-down menu, click on the Themes button.
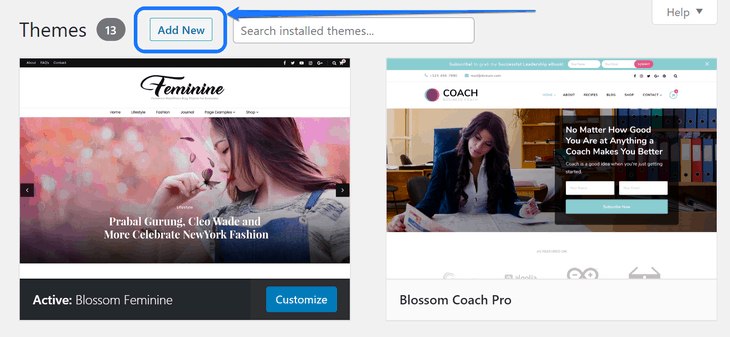
Here you can see a list of installed and active theme on your WordPress account. It has an Add New button at the top of the page. Click on that to proceed.
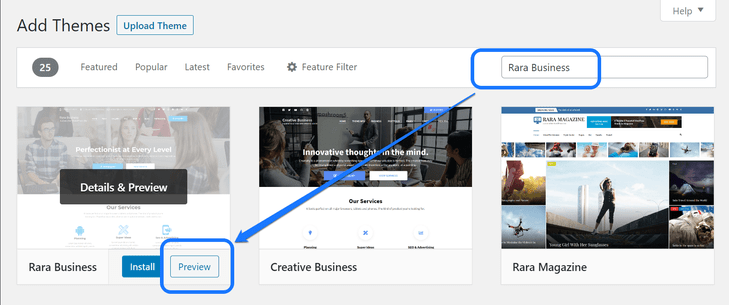
Now you reach the Add Themes page that lets you enter a search term in a text box. Please enter the name of your desired WordPress theme in this box. After you find a perfect item, hover your mouse cursor on top of it and click Preview.
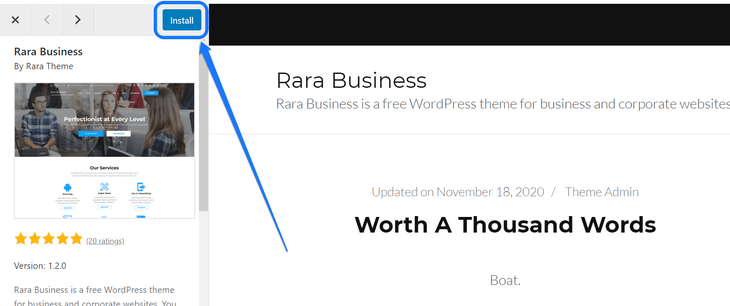
Now WordPress displays you a demo of what your site will look like after installing that theme. You can scroll down to take a thorough look at this preview site. Once you are satisfied with it, click on the Install button situated at the top of the page.
You will see an Activate button after installing that theme. Click on it as well. It redirects you to the Installed theme page. Now you can see the Customize button below your currently activated template.

Finally, you can click on this button to start editing the theme.
B. Using Upload Theme Option
Another approach to adding a theme to your WordPress site is by using the uploading option. To use this feature, you have to download a web template from a reliable theme manufacturing brand.
We suggest you visit the official download page of a particular theme. For instance, you can see the Restaurant and Cafe theme’s sales page in the screenshot below.

Download the theme using the Call-to-Action button. In the above example, the sales page has a button that reads “Download Now.” Click on it and get this theme’s .zip file to your hard drive.
Save the .zip file in a safe folder on your computer.
Now it’s time to upload the downloaded file to your WordPress site. Please enter your admin panel and visit the Add New Theme page.
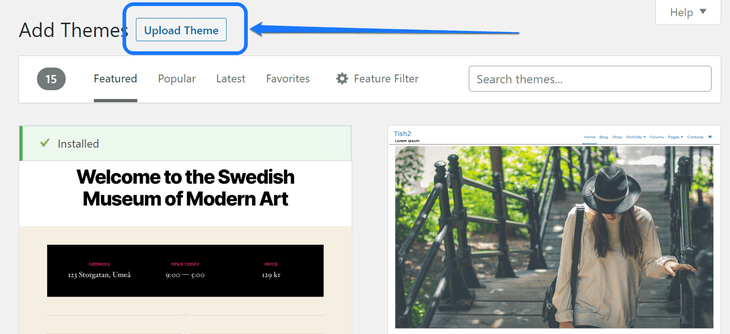
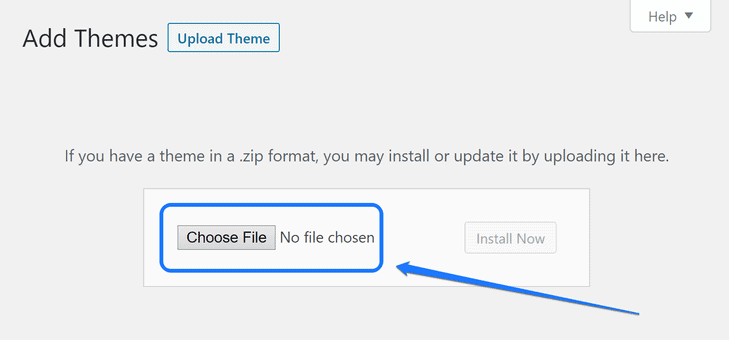
Here, you need to click on the Upload Theme button situated at the top.
After this action, you get an option to select a WordPress theme from your computer’s hard drive. Please click on the Choose File button to choose that .zip file that you recently downloaded.
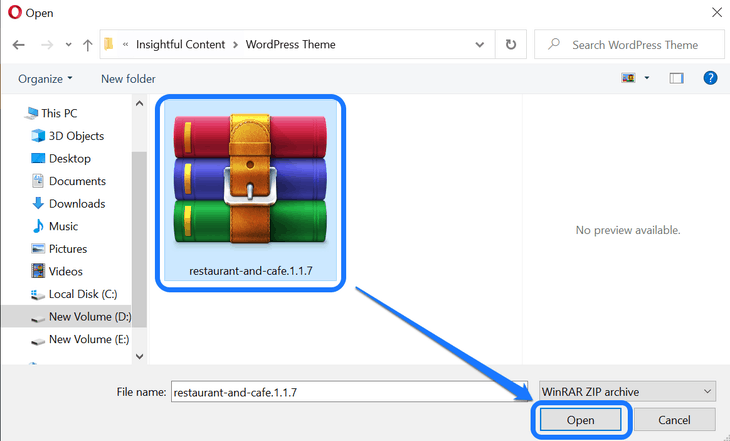
Then you see a window that allows you to select a theme file from your computer. Navigate yourself to the folder where you kept the file, then select it. Click on the Open button after that.
Then, the Add New Theme page displays the name of your selected theme. If you want to re-upload another web template, then click on the Choose File once again.
Besides, you get an Install Now button at the side of the .zip file’s name. We suggest you click on it after you’re satisfied with your choice.

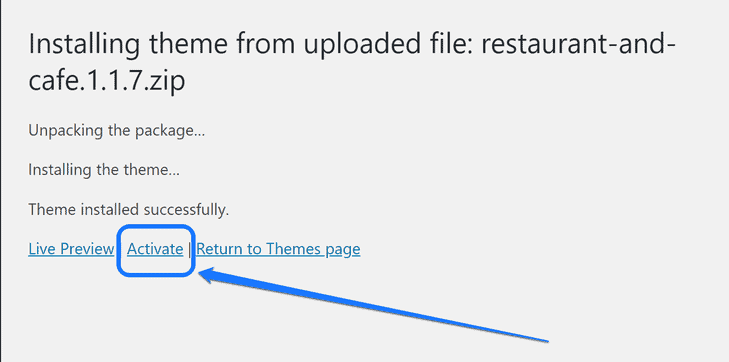
WordPress starts unpacking the .zip file that you uploaded. After that, it installs the theme from that package. Once you see the message displayed below, click on the Activate button.
Similar to the previous step, you get to the Installed Themes page after this. Now you can make adjustments to your website by clicking on the Customize button.
C. Using the Theme Switcha Plugin
Next, we have the option to install a plugin to change the theme in a WordPress site. You can use the Theme Switcha extension for this purpose. It provides a live private preview of the web templates you install on your website.
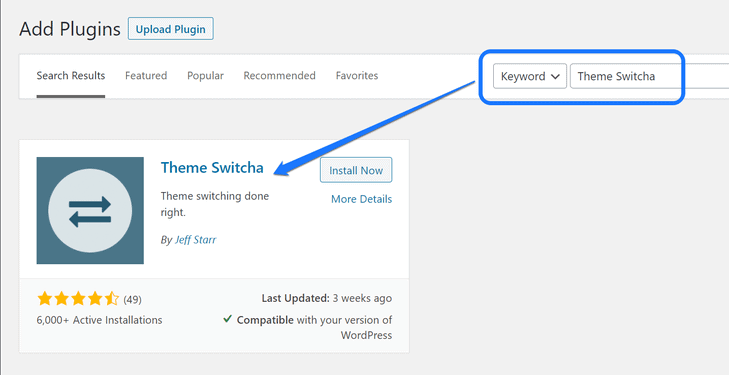
Like every other plugin, you can install this one from the Add Plugins page. Enter the term “Theme Switcha” in the search bar at the top of the page. Install and activate the only option you see in the result.
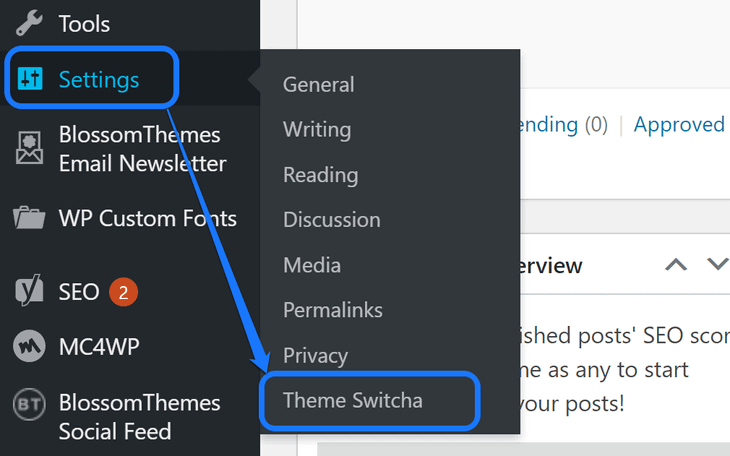
Then, you need to enter its Settings page to enable the option. Please visit the admin panel and hover your mouse over the Settings button. Here you can see a drop-down menu where you need to click on Theme Switcha.
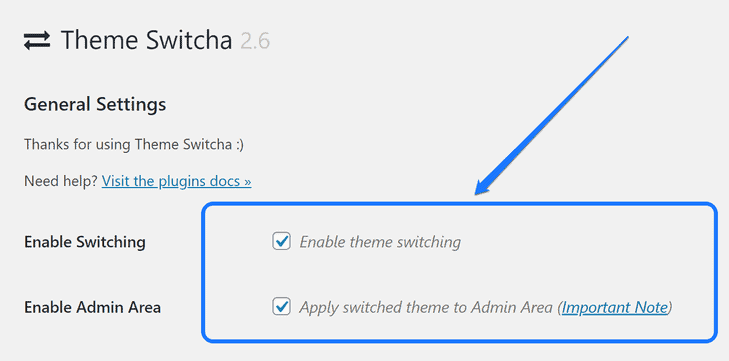
You enter the General Settings page of this plugin. The most crucial action in this step is to check the Enable theme switching option. Additionally, you can also enable the Apply switch theme to the Admin area option.
Please scroll down and click on Save Changes situated at the bottom of the page.
We suggest you scroll down on the same page after enabling the theme switching option. You can see the thumbnails of all the themes installed on your account. Click on any one of them to view its preview.
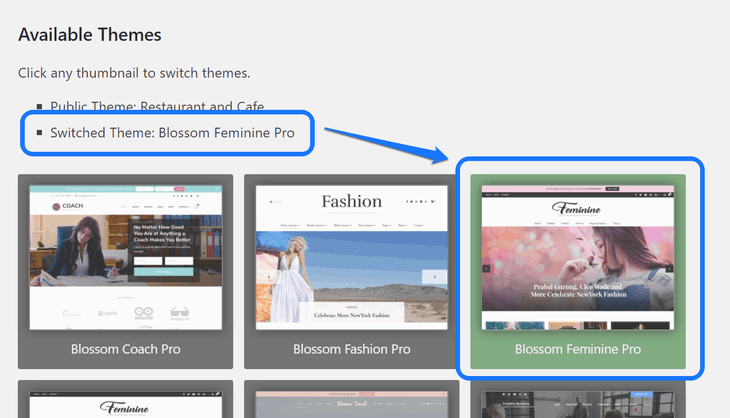
You can see the preview of each of these themes on a new browser tab. We suggest you check all of them before finalizing one. After that, scroll beneath these thumbnails till you reach the bottom of this page. Please click on the Save Changes button.
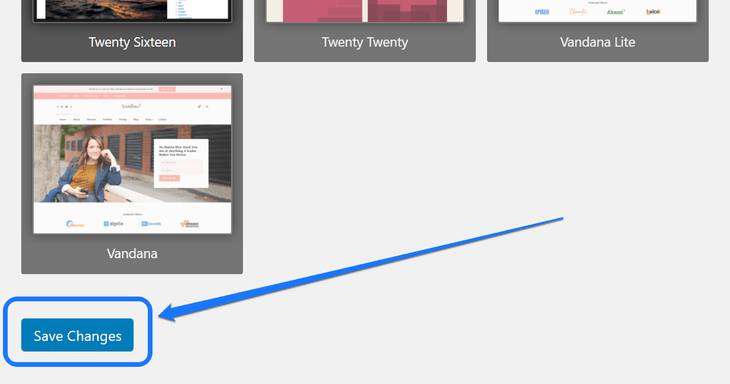
When you save your updates, it automatically changes the previous theme to your newly selected one. Like the earlier methods, you now need to click on the Customize option to edit your website.
2. Changing a WordPress Theme Using cPanel (Manual Approach)
Another useful method of changing a website template is by using an FTP Client and cPanel. You don’t need to log in to your WordPress account for it. This process might be confusing if you’re new to the cPanel dashboard.
First of all, enter the FTP (File Transfer Protocol) client connected to your website. Please enter the “themes” subfolder inside the “wp-content” folder.
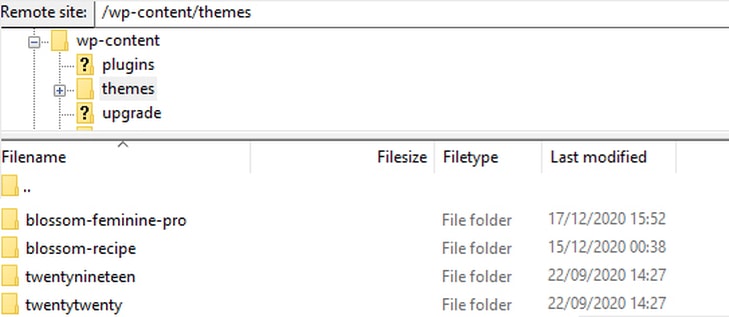
Here, you can see the name of all the themes installed on your website. We suggest you copy the name of the web template that you want to activate. Paste that file on a notepad for now.
In case you don’t see your desired name for the theme, please watch the video given below. It describes how to install a WordPress theme using FTP Client.
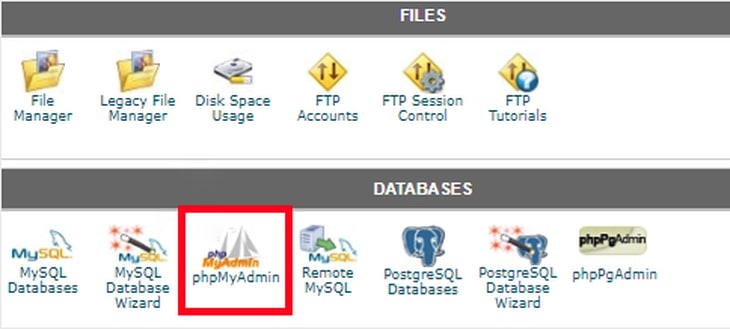
Now you need to log in to the cPanel of your website hosting account. Once you enter, scroll down till you see the Databases section. Please click on the phpMyAdmin icon to continue.
Now you are inside the phpMyAdmin dashboard. When you look at the left sidebar, you see a list of all the databases. You need to click on the particular database that you use for your WordPress site.
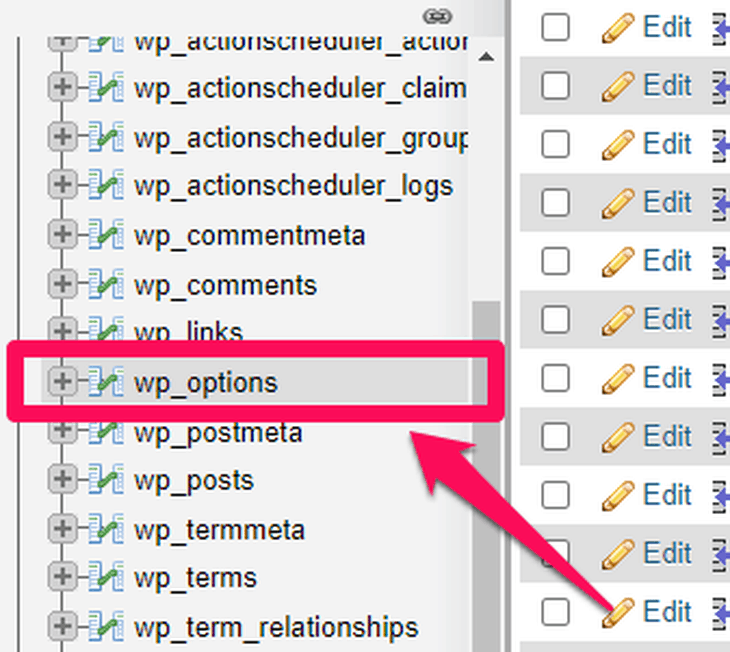
This action expands the number of tables inside that database. Search for the table with the title “wp_options.” We suggest you click on that table to enter inside it.
Next, you will see different rows of “option_names.” Search for the options template and stylesheet in the list.
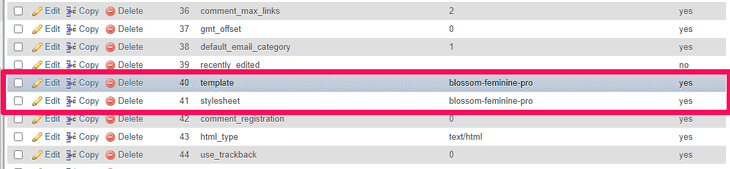
In the next step, you have to click on the Edit button of the template option. This action opens up an editor with several text boxes. Please locate the right space from the option_value row.
Here, you need to paste the name of the theme you copied earlier from the FTP Client. After that, click on the Go button situated at the bottom of this section.
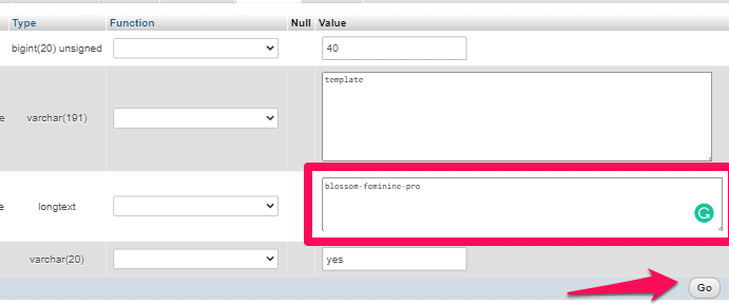
The final step is to repeat the same process for the stylesheet option as well. Click on the Edit button and paste the name of the theme in the option_value row. Similar to the template option, click the Go button after making changes.
If you followed these steps correctly, you would see the new theme activated on your website.
Also, what should you do to your previous theme once you change it? We recommend you to remove it from your website. Check out the blog on deleting a WordPress theme in this blog.
Which Method Should You Use to Change the WordPress Theme?
Among the methods that we mentioned above, which one do you think is the best option? Before we answer that question, it’s essential to know that it depends on everyone’s preference.
If you want a quick approach, you need to go with the built-in search functionality from your WordPress dashboard. It allows you to get a new theme running in just a couple of steps.
In contrast, do you want to get a full preview of your new theme before activating it?
In that case, we recommend you to select the Theme Switcha plugin option. It displays your entire website content on a new template before making any changes.
Finally, the option to change a WordPress theme via cPanel is an alternative option for non-WordPress users. Its downside is that you won’t get any preview before changing the theme.
Therefore, if you want our verdict, you should select the built-in search functionality. You can quickly navigate the WordPress dashboard for this option and don’t have to install an additional plugin.
FAQs About Changing a WordPress Theme?
Q. Which Content Will Remain Safe Even After Changing a WordPress Theme?
A. Your website posts, pages, and core WordPress settings will remain safe after changing a theme. The crucial site information and your plugins will also not be affected.
Q. Why is Changing My WordPress Theme a Delicate Process?
A. Switching a WordPress theme is a delicate process because it might mess up some of the content during the process. For instance, it may delete your shortcodes, tracking codes, etc.
Q. How Can I Safely Change a WordPress Theme?
A. The most important way of keeping your website safe while changing a theme is to keep a backup. Additionally, you need to test all the changes on a clone site. A staging/clone site will help you test the changes before making them live.
Q. How Do I Test While Changing a WordPress Theme?
A. You can simply click on the Preview button on any theme before installing it. It displays how the website will look once you activate that web template. Another method is to use the Theme Switcha plugin that provides a more accurate preview.
Wrapping Up!
Lastly, we would like to hear your suggestions. Which approach of changing a WordPress theme do you think is the most reliable? If you know other methods than those discussed in this blog, please share them in the comment section.
We also want to know whether our content is providing any value to our readers. So if you think that we need to add more information, then share your feedback.
Also, check out our articles on How to Edit a WordPress Theme.