Moving to HTTPS helps any website build a secure environment and ensure better data protection. Nowadays, most visitors surf a site only after confirming that it is HTTPS encrypted. So, if you run an HTTP site, it is about time you learn how to move WordPress from HTTP to HTTPS.
Here, we will talk about what an HTTPS is, its benefits, and how to easily move your WordPress from HTTP to HTTPS.
Without any further ado, let’s begin:
What is HTTPS?
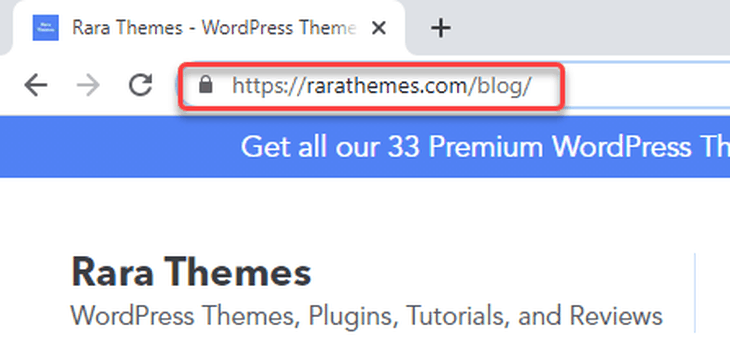
You will notice most of the websites nowadays start with “https://” on their URL. On that note, you can even see the URL of this site starts with https://. You will also notice a padlock icon in front of the https.
So what does it mean?
The ‘https://’ and the padlock icon are how modern browsers let the visitors know the site uses SSL encryption. It is a sign that the website takes the visitor’s privacy seriously.
That brings us to the topic, what is HTTPS?
HTTPS stands for HyperText Transfer Protocol Secure. It is an encryption method to secure the connection between the browser and the server. Such a measure makes it difficult for malware and hackers to break into the connection and steal information.
People share lots of information online, such as personal biodata, bank details, and others. Thus, it becomes essential to set up a secure connection to protect those data. That is where HTTPS and SSL come to play.
HTTPS uses an SSL certificate (Secure Socket Layer) to establish a connection between the visitor’s browser and your server. It encrypts any information shared in this connection. In other words, HTTPS and SSL encrypt replaces information such as username, passwords, and others with random letters and numbers. It is then no longer readable to humans and difficult to decipher.
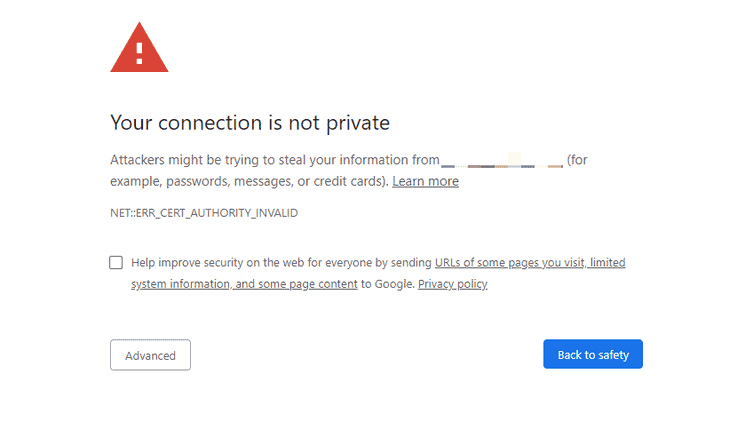
Also, know that each site gets a unique SSL certificate to maintain individual identification. If a server has an HTTPS on its URL, but its SSL certificate does not match the database, the browsers warn the users not to connect to that site.
Why Should You Move WordPress From HTTP to HTTPS?
Now that you know what an HTTPS is, you might as well know why you need it.
Almost everyone is talking about security, data protection, and encryption nowadays. Here are some data that will get you thinking:
- 85% of online shoppers skip/avoid/exit unsecured websites.
- Symantec’s Internet Security Threat Report warns that one out of 10 URLs is malicious.
- Since 2014, Google has regarded HTTPS as a ranking signal.
These reasons should be good enough to consider moving your WordPress to HTTPS. Here are some additional reasons:
1. Secure Environment
If you own an e-shop or a website that handles credit card information and other sensitive information, security should be your prior concern. Your visitors and clients entrust your site with their information, and you must not disappoint them. It becomes your responsibility to maintain a secure environment for them.
Without HTTPS encryption, hackers can get into your server and get your client’s information, including their payment details. It is also possible that hackers alter the data on your website. Your visitors could get the wrong information on your site. Also, hackers can add malware, unnecessary ads, and other bugs to your site. So, you need to know How to secure website.
We recommend moving to HTTPS to assure your visitors that their information is well-protected.
2. Building Trust and Authenticity
As already mentioned above, 85% of visitors avoid an unprotected site. Data encryption is becoming an increasing expectation by visitors. Almost 77% of the users are worried that their data will be misused.
Moving to an HTTPS is a way of ensuring your visitors that your site is authentic and safe. The little padlock icon on your URL helps build your visitors’ trust in your site.
3. SEO Boost
Not only your visitors but even the search engines expect your site to be HTTPS and SSL-certified. Back in 2014, Google announced being SSL-certified is now a ranking factor. The importance of HTTPS will increase over time.
Besides, if you run an HTTP and get referrals from websites running on HTTPS, you receive incorrect data on your web analytics. You could lose your marketing channels.
4. Faster Loading Speed
Studies have shown that any site that takes seven seconds of loading time results in a 53% bounce rate of visitors. You can estimate the need for your site to perform faster. So, you might be interested to know How to increase Speed of website.
On that note, an HTTPS site performs much faster than an HTTP site. When we tested the speed, HTTPS was astoundingly 76% faster than HTTP.
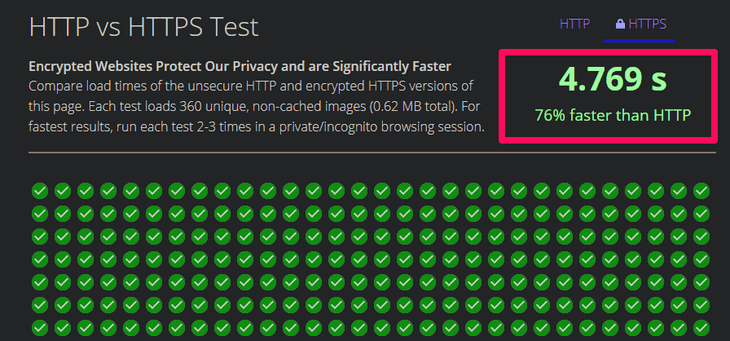
You can run the test and check for yourself.
5. Referral Data
If you’re a marketer, you are probably familiar with the concept of referral data and using Google Analytics. What many people don’t realize is Google Analytics blocks referral data from HTTPS to HTTP. As a result, most of those data pile up together with the “direct traffic” section.
However, it still passes referral data from HTTP to HTTPS. Thus, it becomes a necessity to move to HTTPS if you want to enjoy more referral traffic along with the direct traffic.
6. Chrome Warnings
Thus, it is very important to stay under Chrome’s “good” radar. However, as of July 24th, 2018, Chrome 68 and higher versions have marked all the non-HTTPS websites as “Not Secure.” This action is regardless of whether or not they collect data.
So, if you receive huge traffic from Chrome, it is crucial that you move from HTTP to HTTPS. Note that Chrome holds about 77% of browser market share. Thus, no matter where you receive huge traffic from, it is always best to stay under Chrome’s “good” radar.
Requirements to Move Your WordPress to HTTPS/SSL
You don’t need much to move your WordPress from HTTP to HTTPS. You only need to buy an SSL certificate. You might even already have it. Some hosting companies offer SSL certificates for free in their hosting packages. Some of the popular hosting companies with such a feature are:
- Bluehost
- SiteGround
- WPEngine
- DreamHost
If your hosting provider does not offer a free SSL certificate, you can buy it from domain.com. They offer some of the best deals for regular as well as wildcard SSL certificates. Here are three types of SSL certificates:
- Domain Validation: You can validate a single domain or subdomain including email or DNS. The validation takes along a few minutes. You can buy it for as low as $9 per year.
- Business/Organization Validation: If you need a higher level of security for your single domain or subdomain, you can apply for this option. It takes 1-3 days to get business/organization validation.
- Extended Validation: Extended validation requires business verification in the beginning. Such validation enables a full green bar on the URL as you see on banking websites. It takes 2-7 days to issue this validation.
After buying an SSL certificate, you need to ask your hosting provider to install it.
Setting Up Your WordPress to Use HTTPS and SSL
After enabling the SSL certificate on your domain, you need to set up your WordPress to use it on your website.
Below are the two methods you could do. You can choose the method that fits you the best:
Method 1: Setting Up HTTPS/SSL Using a Plugin
This method is straightforward. Thus, any beginner can comfortably get along with the steps below:
- Log in to your WordPress admin dashboard.
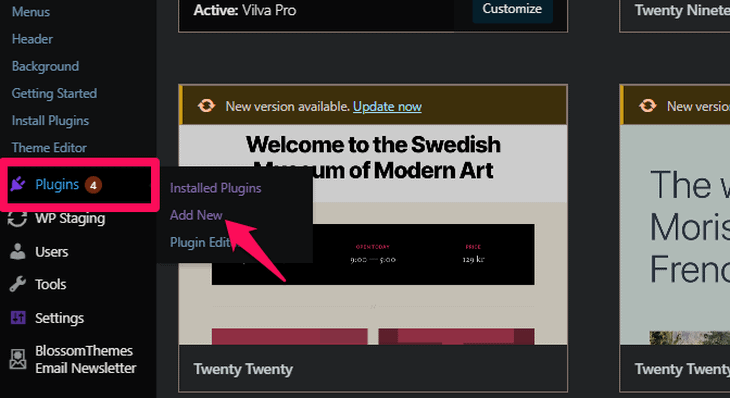
- Scroll down to the ‘Plugins’ on the left side panel.
- Click on the ‘Add New’ option from the list.
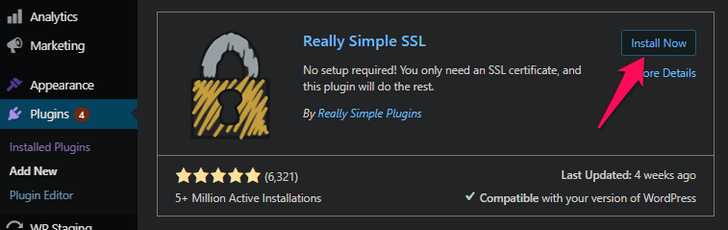
- Search for ‘Really Simple SSL’ plugin.
- Install and activate the plugin.
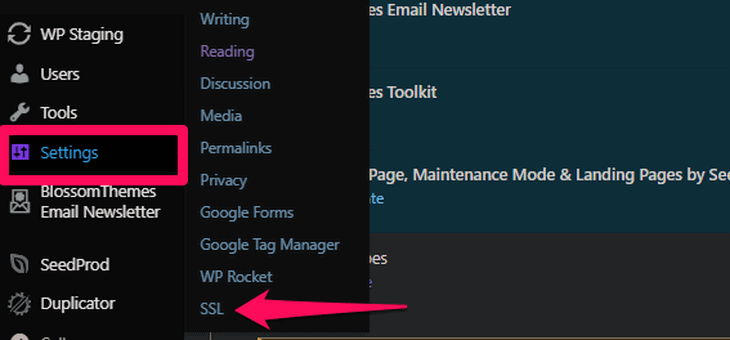
- Head to the ‘Settings’ on your dashboard and click on the ‘SSL’ option.
The plugin now automatically sets your site to use HTTPS.
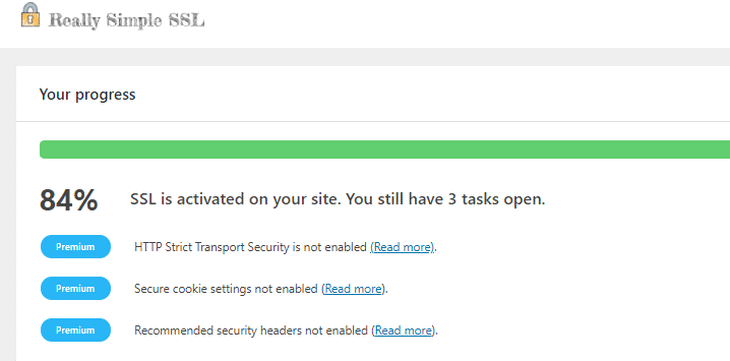
Here is what the plugin does:
- Check the SSL certificate.
- Set your WordPress to use HTTPS in its URL.
- Set up all redirects from HTTP to HTTPS
- Scan for content on your URL still loading on HTTP sources and fixes them.
Note: The Really Simple SSL plugin attempts to fix the mixed content errors on your site. It does so by using the output buffering technique. As it makes this attempt, it could have some performance impact on your site. However, the impact is only seen on your first-page load. The impact should be minimal if you use any caching plugin.
Method 2: Setting Up HTTPS/SSL Manually
This method requires you to edit the WordPress files. It is a more performance-optimized option, but you need to add some codes to the root files. If you are not sure about this method, you can hire a developer or go with the first method.
If you want to go with this second method, the first thing to do is making a backup of your WordPress. As we said, this method involves adding a few lines of code to the root files. If something goes wrong, it might mess up your entire site and even take it down. Making a backup of WordPress is always a healthy and smart practice.
After backing up your files, here are the steps to set up HTTPS/SSL manually:
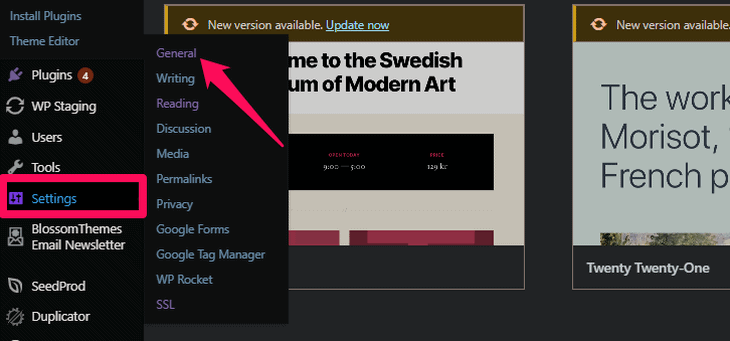
- Log in to your WordPress admin dashboard.
- Navigate to the ‘Settings’ option on the left side panel.
- Click on the ‘General’ option.
- Replace the “http://” in the WordPress address and site address URLs with “https://.”
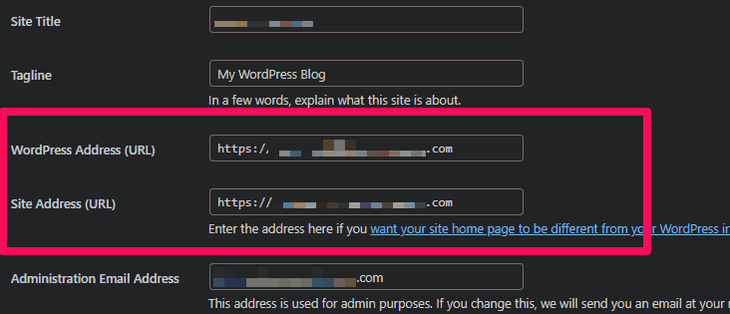
- Click on the ‘Save Changes’ button at the end of the page.
- After saving the changes, WordPress logs out and asks you to re-login.
Redirecting traffic from HTTP to HTTPS
After saving the changes, you need to set up your WordPress redirects from HTTP to HTTPS. For that, you can do that by adding the following lines of codes to your .htaccess file.
<IfModule mod_rewrite.c>
RewriteEngine On
RewriteCond %{HTTPS} off
RewriteRule ^(.*)$ https://%{HTTP_HOST}%{REQUEST_URI} [L,R=301]
</IfModule>
For nginx servers, you need to add following lines of codes on your configuration file:
server {
listen 80;
server_name example.com www.example.com;
return 301 https://example.com$request_uri;
}
Here, replace the “example.com” with your domain name.
After following these steps, WordPress now loads your entire site on HTTPS.
Forcing HTTPS and SSL in WordPress admin/login area
For this, you need to configure the SSL in your wp-config.php file.
- Connect to your site using FTP or cPanel.
Here is an example of accessing the site using FileZilla.
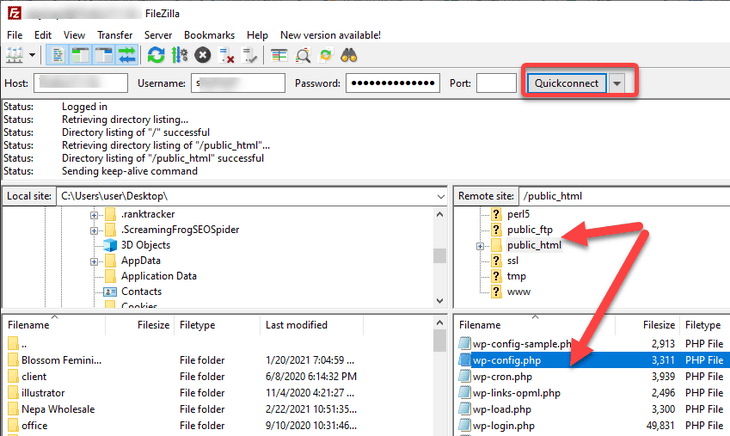
The right quadrants show the list of folders that contain your website’s file.
- Navigate down to your website’s root folder. Mostly, the root folder is named after your domain name or public_html. Double click to open it.
- Right-click the wp-config.php file and click on the ‘Edit’ option.
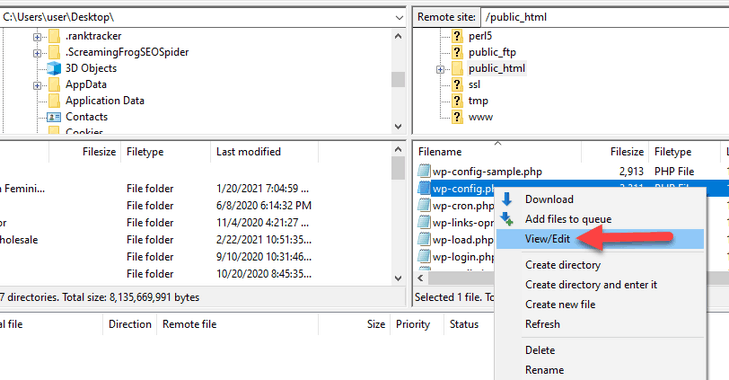
Don’t touch any other file or line of code except the ones we are about to discuss below. Backing up your files is a good idea. You can restore the changes if you delete or make any mistake in the files.
- Look for a line that reads, “That’s all, stop editing! Happy blogging.”
- Now, copy and paste the following line just before that quote.
define('FORCE_SSL_ADMIN', true);- Save the changes and exit the editor.
It will now force SSL and HTTPS in the admin area. The above steps also work on the WordPress multisite network.
Your website is fully set up to use SSL and HTTPS. However, you might still encounter a mixed content error.
Solving Mixed Content Errors in WordPress
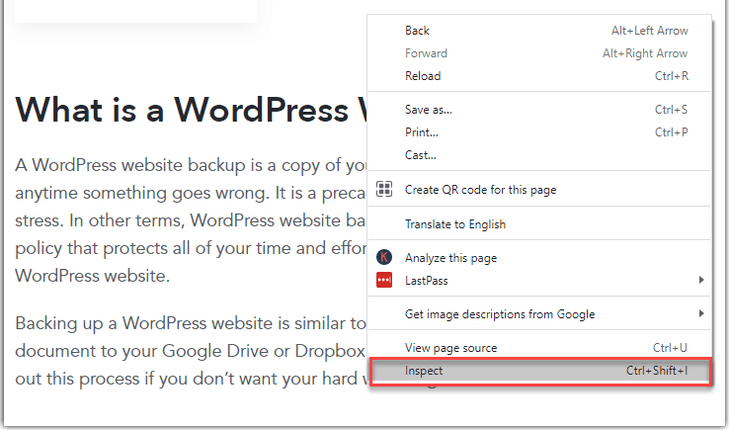
Receiving mixed content issues after setting up HTTPS is common. The error occurs mainly because of images, scripts, or stylesheets that still load using the HTTP in the URLs. Thus, even though you have set up the HTTPS, you won’t see the padlock icon on your URL. In some cases, your browser displays a message saying the connection is not fully secure.
Solving this error is very easy. Follow the steps below:
- Find out which content is using the insecure HTTP by using the inspect tool. Visit your webpage and click anywhere on the page. Then select the ‘Inspect’ option. You can also hit the “Ctrl + Shift + I” to enter the inspect mode.
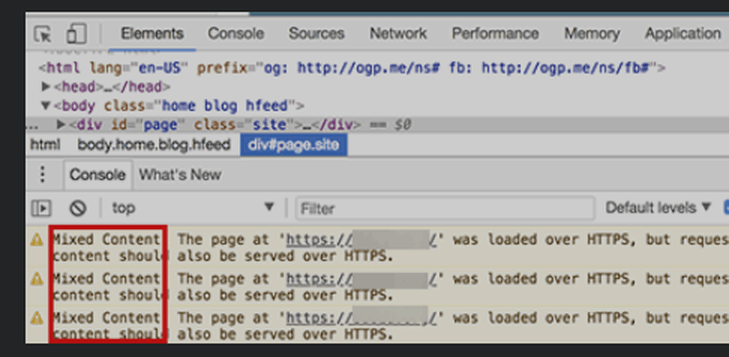
- Your screen now splits into two.
- The console on the right side displays the mixed content error with details for each content item.
Now let’s learn how to solve the mixed content error.
- You need to find the content that starts with HTTP and replace it with HTTPS.
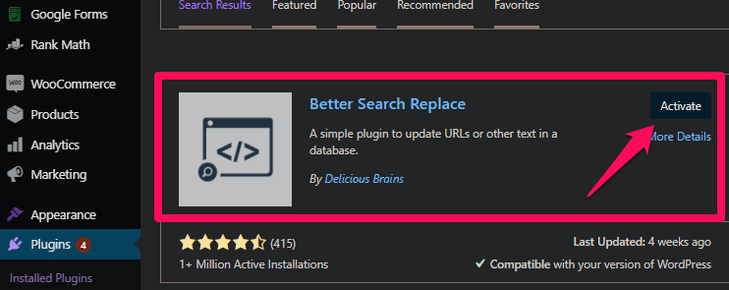
- We recommend using the Better Search Replace plugin.
- Log in to your WordPress admin dashboard.
- Navigate to the ‘Plugins’ option on the left sidebar.
- Click on the ‘Add New’ option.
- Search, install and activate the Better Search Replace.
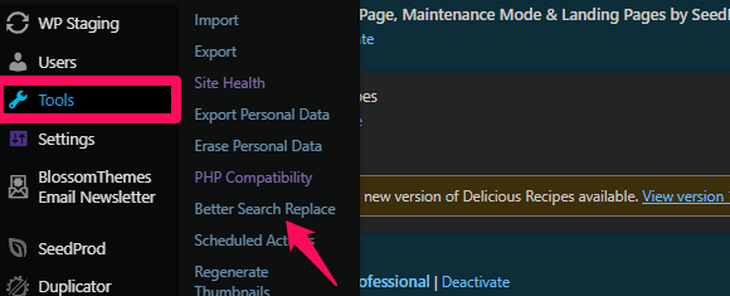
- Go to the ‘Tools’ option on your dashboard.
- Click on the ‘Better Search Replace’ option.
- Add your website’s HTTP URL on the “Search for” field. Likewise, add your website’s HTTPS URL on the “Replace with” field.
- Select all the database options from the “Select tables” option below.
- Click on the “Run Search/Replace” button at the bottom.
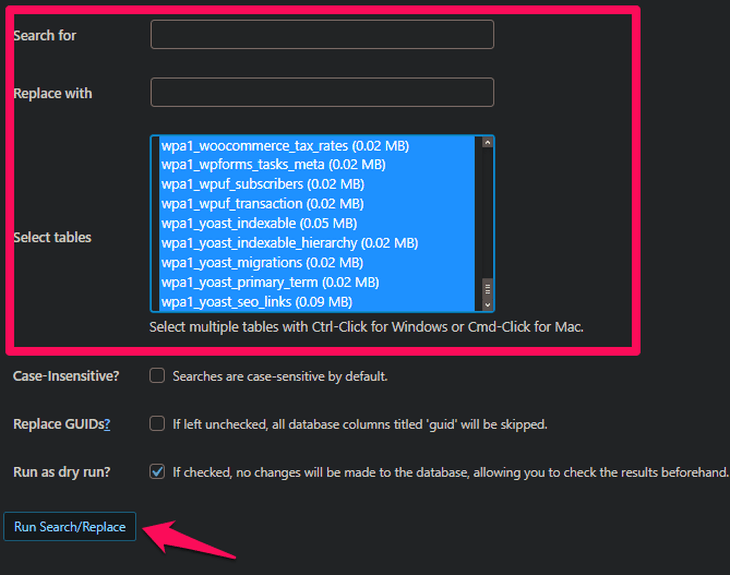
The plugin searches and replaces all the content. The time it takes depends on the database size.
Updating Your Google Analytics Property
After moving from HTTP to HTTPS, you need to let Google know of the changes so that it does not affect the SEO. The easy way to do that is updating your Google Analytics property. Follow the steps to do so:
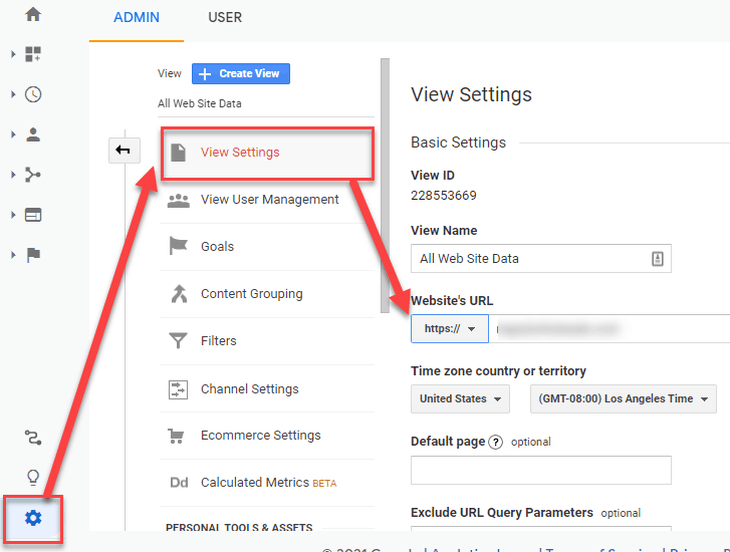
- Click into your domain property settings.
- Under the default URL, select the HTTPS:// option.
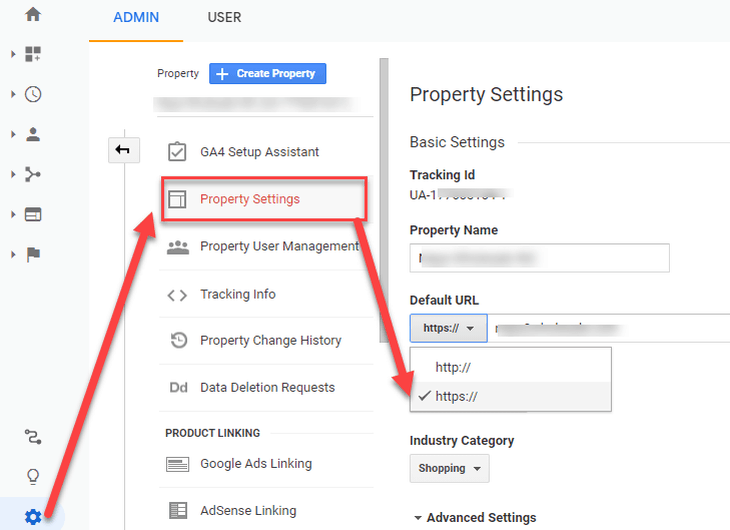
- Now, click on the Domain View Settings.
- Under the Website’s URL, select HTTPS:// option.
Now you need to link your new Google Search Console profile with your Google Analytics account.
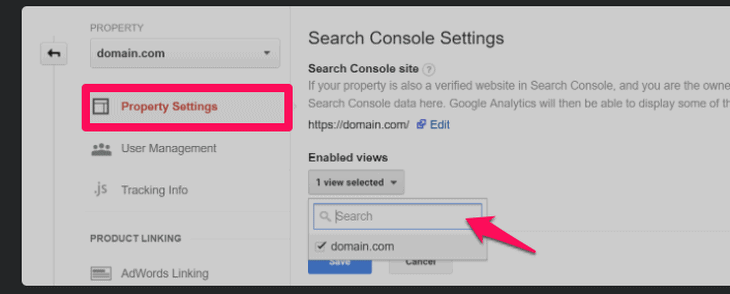
- Click on your domain property settings.
- Scroll down to the “Search Console Settings” section.
- You can now link your newly created HTTPS GSC profile.
Google automatically sends the search ranking on your site’s HTTPS version.
Conclusion
Keeping your site and its data secure is an important subject for any website owner. Moving from HTTP to HTTPS is one of the efficient ways to do that. It builds a secure connection between your server and browser. Besides, the padlock sign and the “https://” on any website’s URL is now the basic expectations of most of the visitors. So why not build trust and also secure the data by moving to the HTTPS.
FAQs (Frequently Asked Questions)
Q. How to move WordPress from HTTP to HTTPS?
Here are two ways you could do that. You could use a plugin or set up the HTTPS manually. We have explained both these methods in the above sections. Check it out.
But you do need to purchase and install the SSL certificate. You can contact your hosting provider for it.
Q. Why Should I use HTTPS instead of HTTP?
The main purpose of HTTPS is to secure the data on your website. Your site may contain crucial information about your visitors, such as their login credentials, credit card details, and more. Thus, switching to HTTPS establishes a secure network between your server and the browser. This ensures better protection of those data.