Hey there!
Are you here to start your own WordPress blog and make money?
Yes? Welcome to the step-by-step guide on how to start a blog!
No? Why not!
Getting started with your own blog is one of the most rewarding, yet easiest, things you could do in your life. Even an individual with little to no tech experience can start a WordPress blog!
Plus, there are so many benefits of starting your own blog, whether you want to earn money from home or you just like writing. That’s why I recommend everyone to start their WordPress blog.
Okay. If you are still in two minds, here are a few reasons why you should start a blog today (in less than an hour with WordPress and this step-by-step guide)!
NOTE: If you already know the power of a blog, you can jump ahead to our guide.
5 Reasons You Should Create a WordPress Blog
1. You can make Money From Home
There are many bloggers who make money full-time with blogging. Some bloggers even make 6 figures monthly! Don’t believe me? Look at this report.
With a little dedication, even you can start earning money with your blog.
If you are bored, and/or frustrated, with your current 8 hours desk job, you might want to switch to blogging. Or, you could even use blogging as your passive income(a part-time thingy).
Give it a shot. Worst case scenario, you lose 100 bucks.
2. You get Exposure
Do you own a business? Blogging is a great marketing platform. A blog can be an easy and cheap way of reaching out to your potential customers.
Even if you are not a business, you can use a blog to get more exposure.
Whether you have an idea that you want to share to people or you are a local model/politician, a blog will help you increase your audience.
3. You can inspire/help people
Many people have stories (I know you do too). A blog can be a great place to start sharing your experiences.
You could write about your daily life– the struggles you face and how you cope with them. There may be people who are going through the same problems like yours, you could inspire them.
Or, if you have a specific skill set, for example, you are a doctor or a self-taught lifehacker, you could help people all around the world with your counseling and ideas.
Many people out there are looking for guidance. Therefore, let me help you create a blog so that you can help and inspire people.
4. You can publish a book easily
Blogging can be a back door for you if you want to be a writer.
If you have an online presence, it will be easier for you to find a publisher. Why? It is easier for the publisher to sell your book to people who already know you.
Or, you could even self-publish an ebook and sell it online to your blog’s audience.
5. You can keep your communities together
You could start a blog about your community and post local news. This kind of blog will keep your locals informed about what’s happening around them. You could even use the blog to create and organize events in your community.
Or, if you are an activist, you can use a blog to gather people with common interests and call for action!
Well, are you ready to start a blog (to make money or otherwise) now?
Grab a cup of tea or coffee or a glass of juice, if you want to, because I am going to walk you through a 20-minute guide on how to start a blog in 2024.
6 Basic steps to start a blog and optimize it.
- Find your topic of interest
- Get a home for your blog
- Install blogging platform (WordPress)
- Make your blog gorgeous
- Add necessary tools
- Optimize your blog for search engines (SEO)
The good news is you don’t need to do any coding in any of these steps. So, let’s get started!
Note: Some of the links in this guide are affiliate links. We earn a certain amount of commission if you buy services/products through the links, without any extra cost to you. That being said, we don’t recommend products that are not worth.
STEP 1: Find Your Topic of Interest
Think of an idea that you want to write about.
The idea doesn’t have to be truly unique, in fact, no idea is truly unique. Ideas differ only in the way they are expressed. So, think of an idea, but your idea should be on a specific topic.
If you are a business or company, you already know what you want to blog about. And, if you’re an individual, you should ask yourself these 3 questions before deciding the topic.
Do you love the topic?
You should enjoy learning and writing about the topic. If you don’t love the topic, you will soon run out of ideas to post about, and will eventually get bored and quit your blog.
Also, your distaste for the topic will also be seen in the writing. And, no one reads a blog that’s not interesting.
Thus, choose a topic you are passionate about. If you are not sure, think about what you like doing in your free time. Celebrity gossip? Sports? Travel? Or something tech related? I will leave it to you.
Are you ready to be the expert on the topic?
If you have (or haven’t) found what you want to write about on your blog, the next important thing to consider is, are you willing to learn in-depth about the topic?
To be successful in the blogosphere, you have to be the authority on your topic/niche. Your aim as a blogger should be to create a blog that is the authority of your topic– people should come to your blog when they want to learn about the topic.
Are there other people interested in your topic?
Finally, the topic you love should also be loved by other people. That means people must be interested in reading about your topic.
Well, how the heck do you find out that?
Just Google.
For example, let’s say you want to start a blog about health, to be specific, health for busy people. You go to google and search “Health for busy people”

Go ahead and search your topic in Google. If there are enough search results, the topic’s HOT!
Pro Tip: If there are sponsored ads in the Google search results for your topic, people are making money with that topic. And, that’s a good sign.
However, while selecting the topic, you don’t want the topic to be too vague. Be specific. In the example that I used (health for busy people), the word “busy” narrows down the broad topic of Health.
Besides simple Google Search, you can also use Keywords tools to see the estimated number of people searching for your topic.
I will now guide you on how to set up and use Google Adwords for free to find a topic.
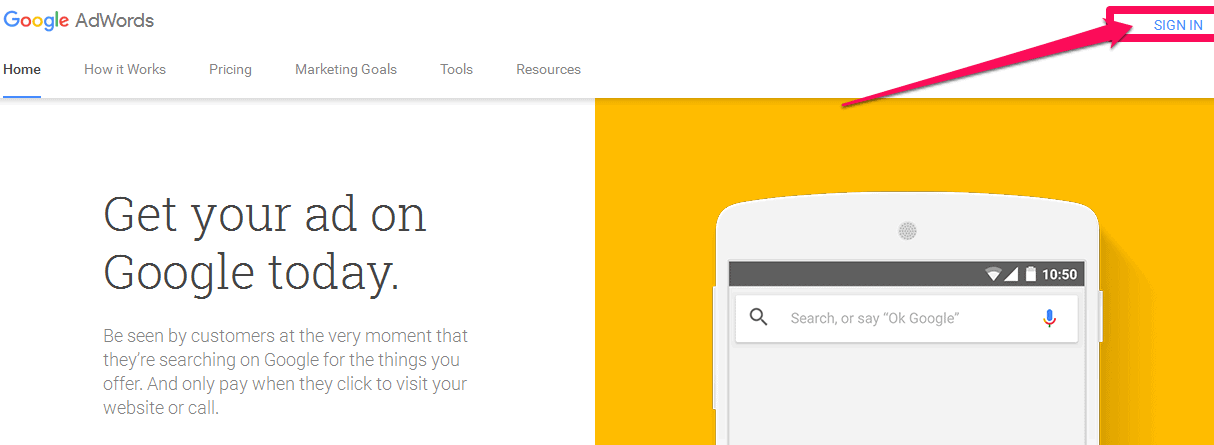
First, go to https://adwords.google.com/home/
Then, sign in using your Google account (Gmail). If you don’t have one, go create a Gmail, it’s free!
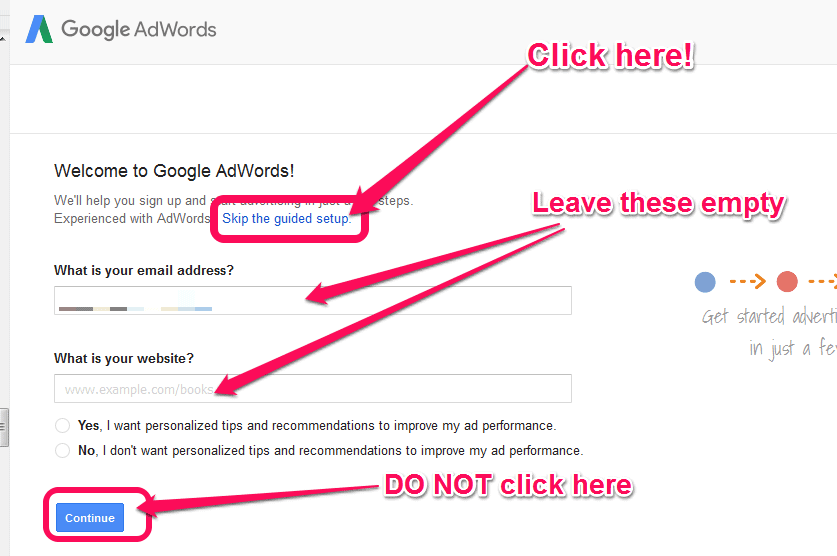
Once you are logged into Google Adwords, remember to click “Skip the guided setup”.
Pro Tip: If you click “Continue”, you will have to create a Campaign. And, you don’t want to go there, it costs money. If you already clicked “Continue”, then log in with another Google account.
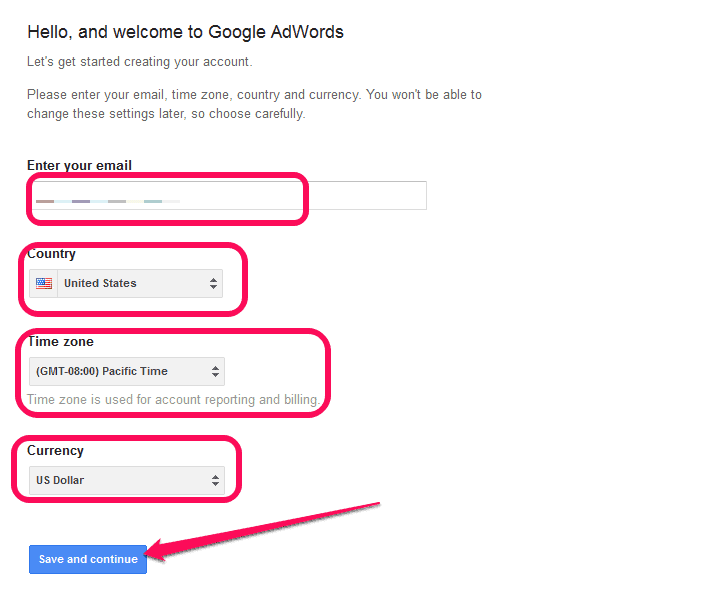
Now, enter some details and click “Save and Continue”.
After that, go to Tools and select Keyword Planner.

Now, in the “Get search for new keywords using a phrase, website or category” section, enter your Topic ideas.
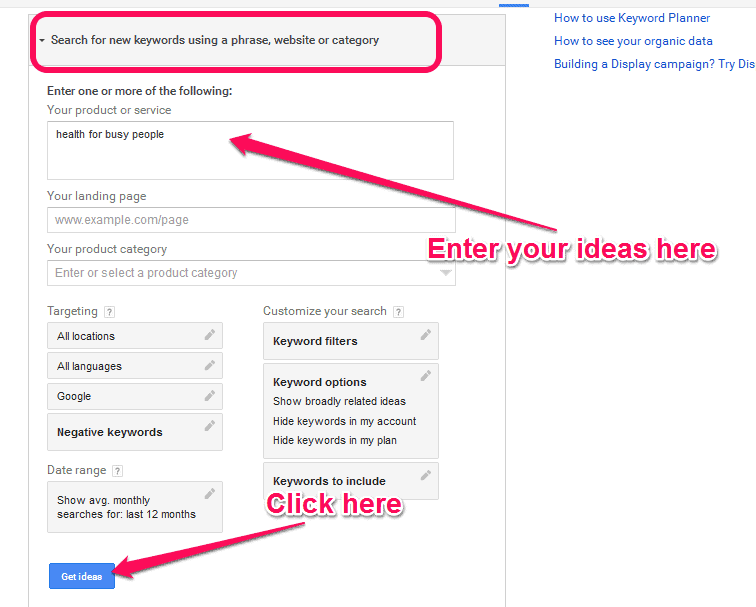
You will see a list of google searches for your ideas and its variants.
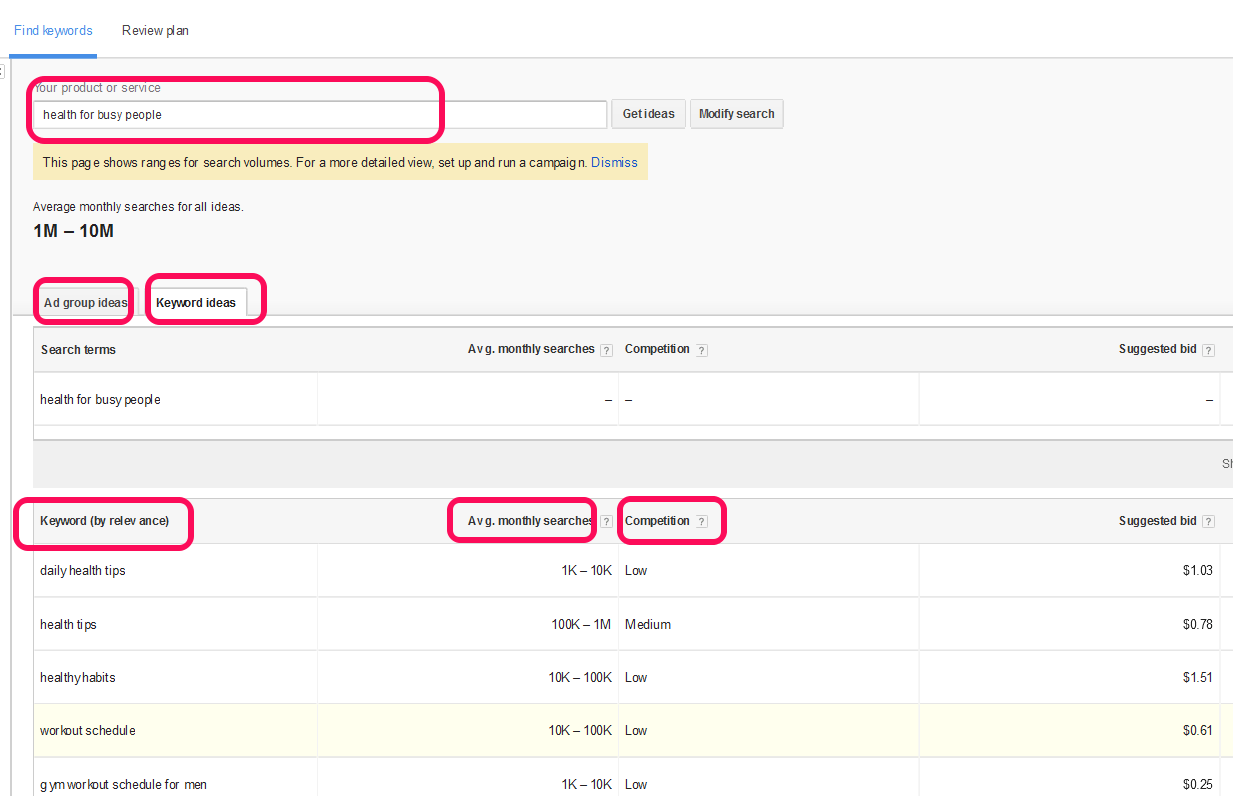
See how I got more keywords ideas when I searched for “health for busy people”?
Well, go ahead, and starting searching for ideas. Good Luck!
STEP 2: Get a Home For Your Blog
Now that you know what to blog about, let’s create a home for your blog.
In the Internet universe, every website needs a home and an address.
Home, called web server or web host, is where all the content of a website sits. And, address, called domain name, is a web address for your website.
You should be careful while choosing the domain name for your blog because it will be your brand. But, don’t waste too much time thinking about it. You can always change your domain name later. The most important thing for now is, your blog should be up and running.
Tips for choosing a good domain name:
- Choose a name that describes your topic.
- Use something that is easy to spell and memorize. Avoid hyphens and numbers.
- Try to keep your domain short. Three words max.
- Choose a .com suffix. They are more popular.
- Use your name if you want to create a personal brand.
Now, jot down your topic and start brainstorming the name for your blog. Grab a thesaurus if needed.
To be on the safe side, note down a few possible names because the name you want may be already taken.
After you have a list of potential domain names, go to Namecheap.com and check for the availability.
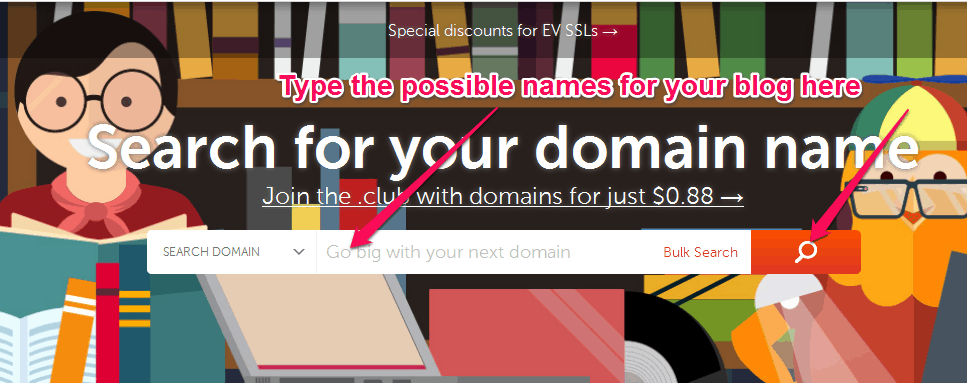
When you find a domain name, just note it down. Don’t register it at Namecheap because we will register it later for free.
Now that you have decided an address for your blog, let’s talk about the house, web host, for your blog.
A web host is a space you rent out to keep all the stuff of your blog, from codes required to make the blog to your articles and images.
Depending on the type of services, storage, and bandwidth, a web host can cost you around 3$ a month to $1000 a month. Therefore, for a beginner, I recommend shared hosting plans. They are cheap and will be enough for starters.
However, there are many web hosting companies out there. And, deciding which hosting company to choose from can be a tedious task. You have to consider things like speed, space, uptime and customer support.
If you start doing research on it, it will take more than a week. By then, who knows, you might as well lose interest on the blog at all.
Therefore, don’t go that route and go for SiteGround hosting instead.
We have been using SiteGround as our hosting provider, and we never had an issue with it. I have tried other servers as well, some were very bad. Thus, I highly recommend SiteGround. Also, they have plans for everyone. You can get hosting for as low as $3.95/month (that’s cheap for the standard of the service they provide). If you don’t trust me, you are free to check out the reviews.
Why choose SiteGround hosting:
- They give you a free domain when you buy a hosting plan.
- WordPress officially recommends SiteGround. We will use WordPress to create the blog later.
- SiteGround offers excellent 24/7 customer support.
- It is one of the fastest web hosting services. They use SSDs.
- They have an uptime of 99.99%.
- You can install Let’s Encrypt SSL certificate easily. Let’s Encrypt is a free SSL certificate to add extra security to your blog.
So, let’s register a free domain name and web host at SiteGround now.
Steps to get the domain and web host for your blog at SiteGround
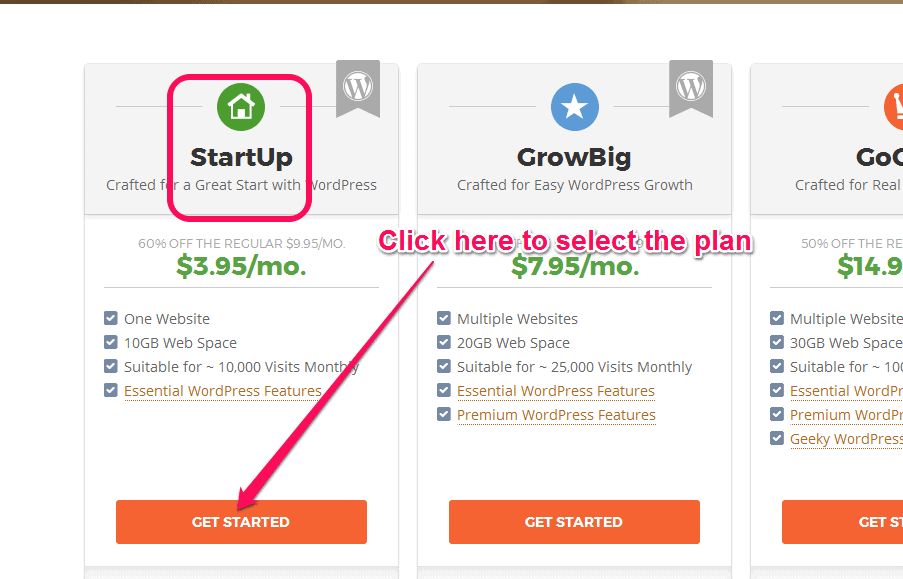
- Go to SiteGround.com
- Choose “StartUp”. For now, this is the best plan for you.
- Now register the domain you searched at Namecheap.com
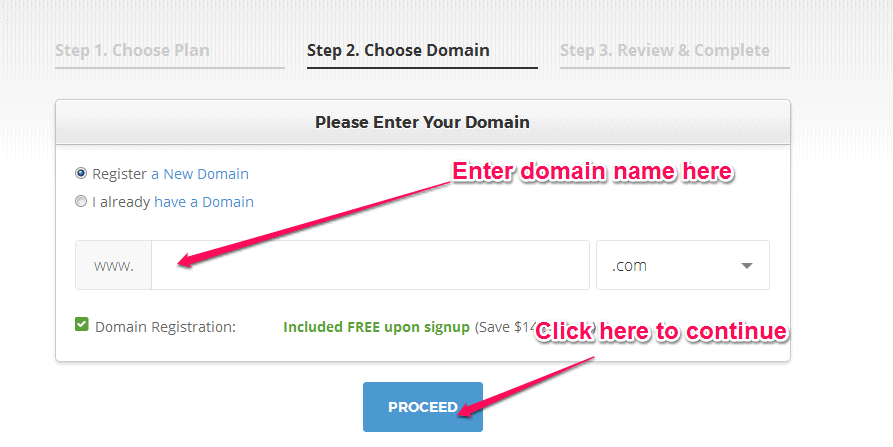
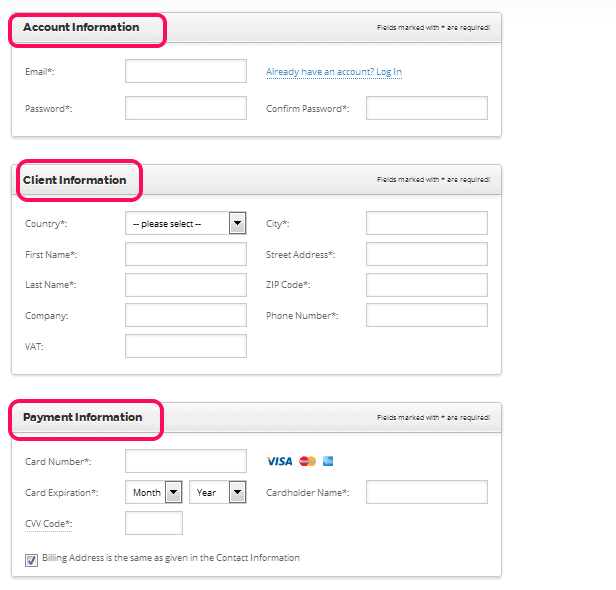
- Fill the form with your contact details and Payment information
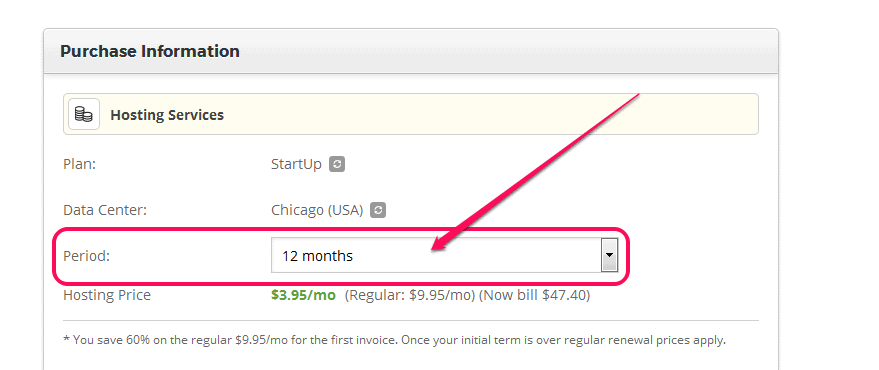
- Select for how long you want the hosting plan. You can choose 12 months if you just want to try out. I recommend 24 months.
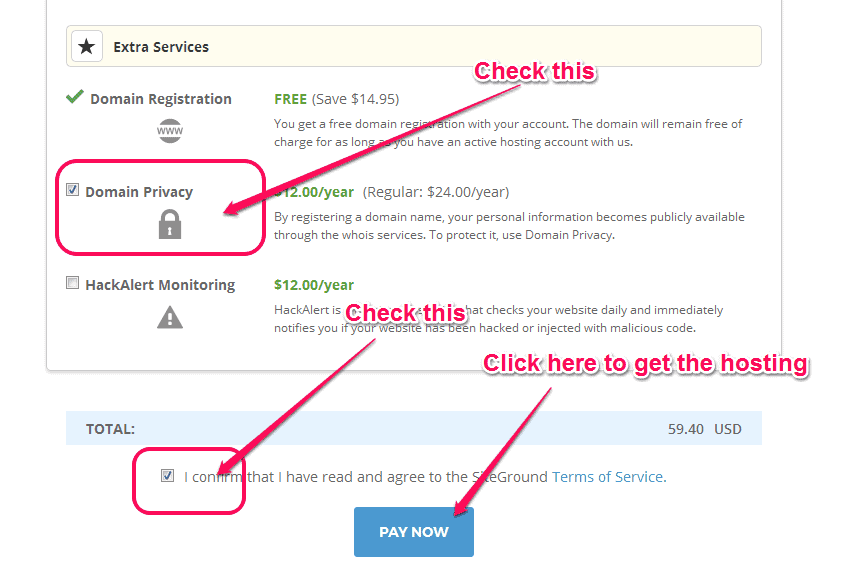
- Select Domain Privacy to protect your private information. And, click Pay Now.
Congrats! You have a home and an address for your blog now!
STEP 3: Install Blogging Platform (WordPress)
In this step, we will create a website.
Don’t be intimidated. It’s very easy with WordPress. You don’t even need to write a single line of code.
First of all, there are two ways to create a blog/website.
You could write the codes yourself or hire someone to make a website for you. This method can be time-consuming and/or expensive.
The other way is to install a website creating a platform (Content Management System) for your blog. This is an easy way. Some of the platforms cost you money, some don’t.
We will use the WordPress platform to create a blog in this guide.
Why WordPress?
Well, firstly, it is the most popular blogging platform out there. Around 40% of the web is powered by WordPress. Secondly, WordPress is free, easy, user-friendly, flexible and powerful. You can even add plugins (apps) inside WordPress to make it even more powerful (I will teach you how to add plugins later).
But, be careful. There are two options with WordPress.
- WordPress.com: This is Hosted blog service by WordPress. WordPress will manage your hosting. This can be expensive if you want to use your own domain name.
- WordPress.org: This is self-hosted WordPress. You need to manage your own hosting. This is the recommended way because it’s cheap and more flexible.
Note: WordPress is a free platform. The only difference between WordPress.com and WordPress.org is where you host your blog (the home of your blog). This guide is for self-hosted WordPress (WordPress.org).
How to Install WordPress on SiteGround
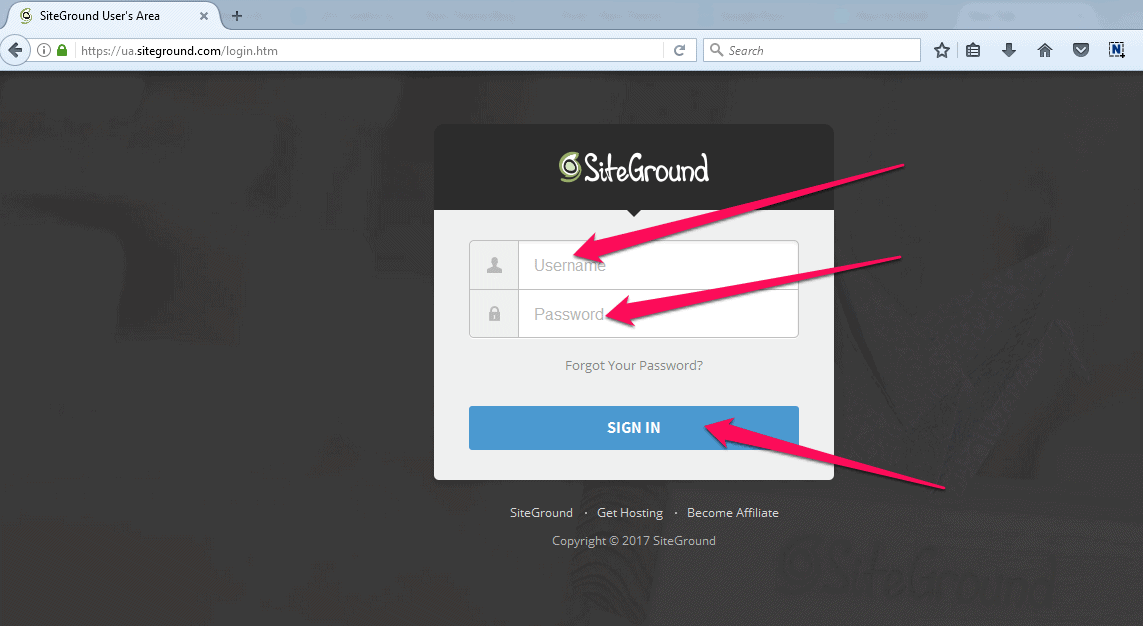
First, go here and log in to your SiteGround account. Check your Email for your login information.
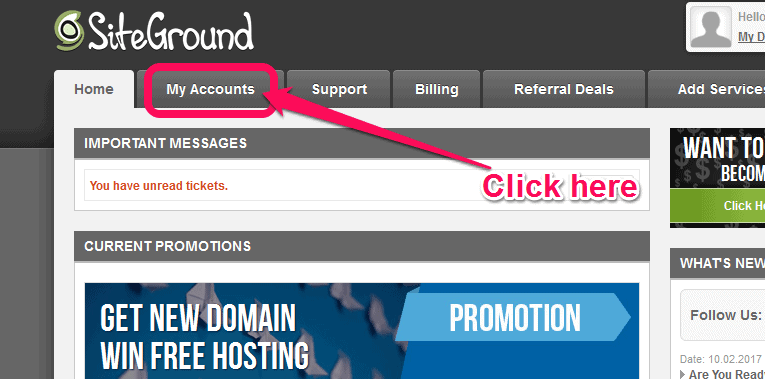
After you are logged in to your SiteGround, go to “My Accounts”
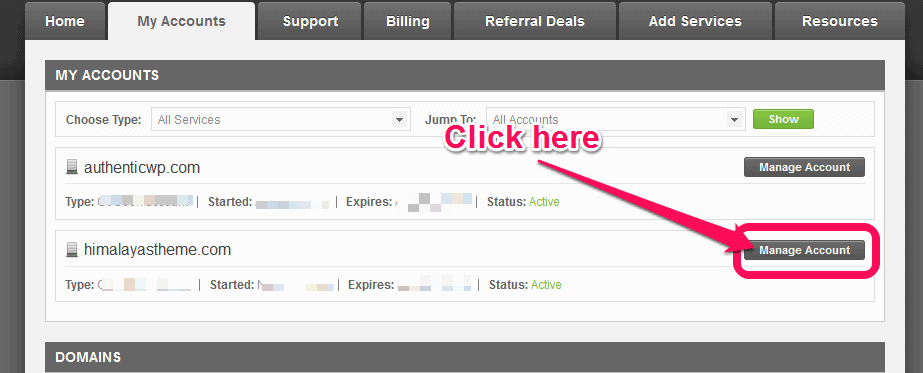
Now, click on Manage Account. You probably have one domain so one account to manage.
Then, click on “Go to cPanel”.
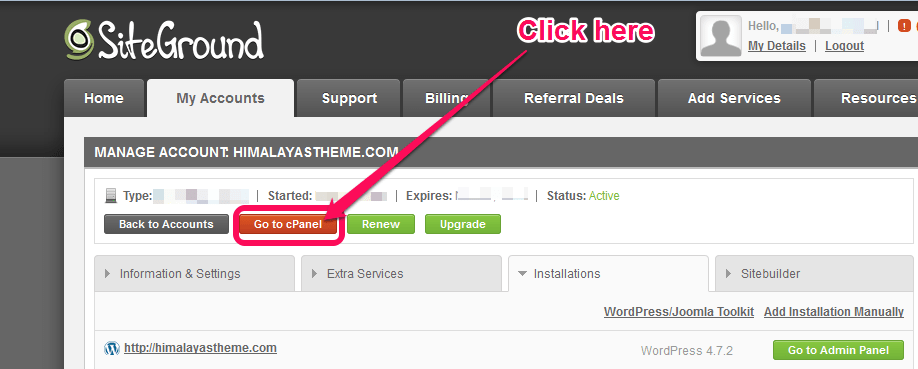
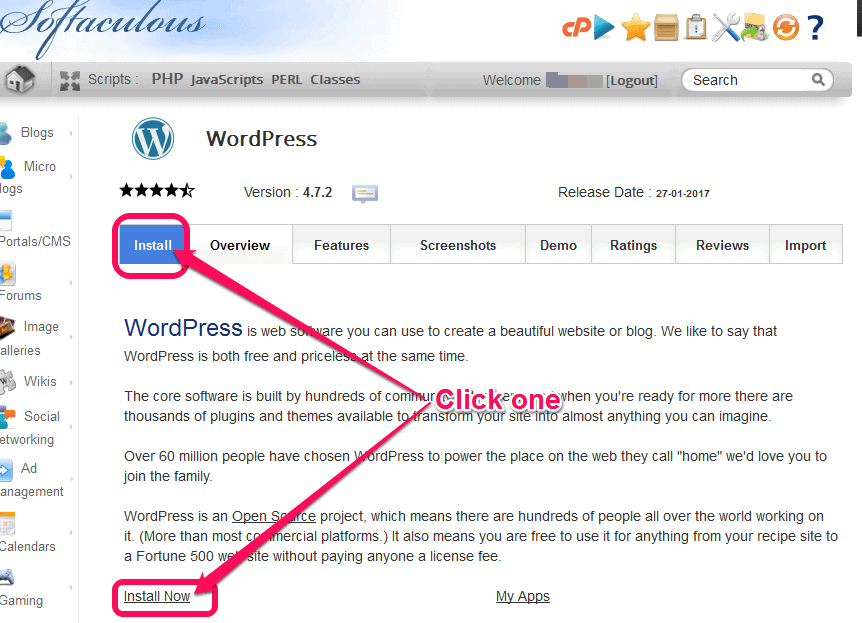
Don’t get scared with all the stuff you will see on cPanel. You probably don’t need to see them after you install Wordpress. For now, just go to “AUTOINSTALLERS” section and click on WordPress.

Now, click Install.
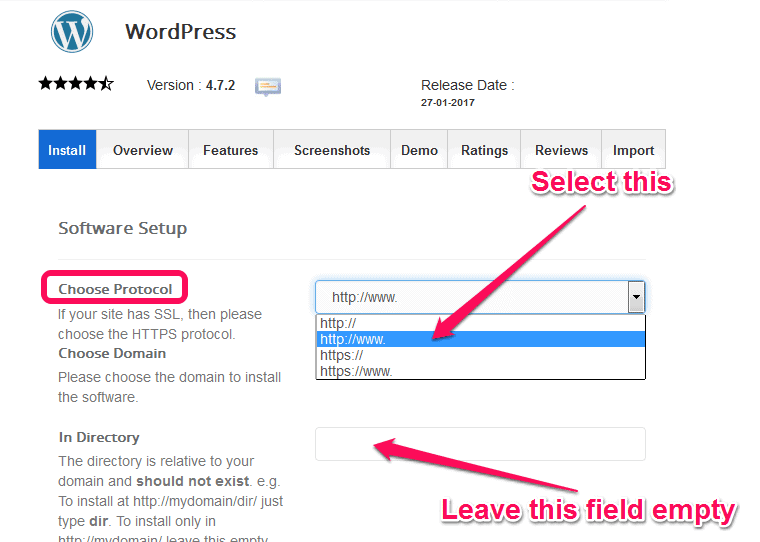
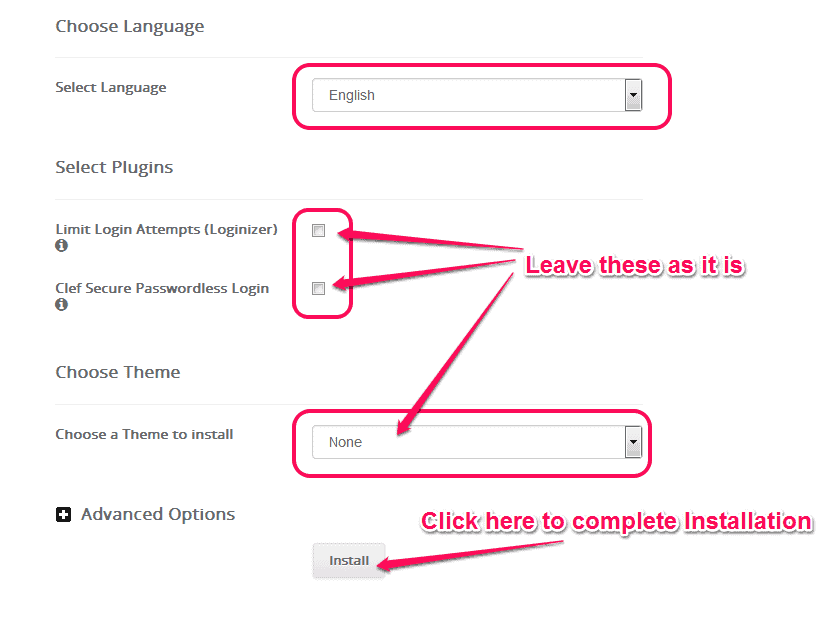
In the Software Setup, choose “http://www.”
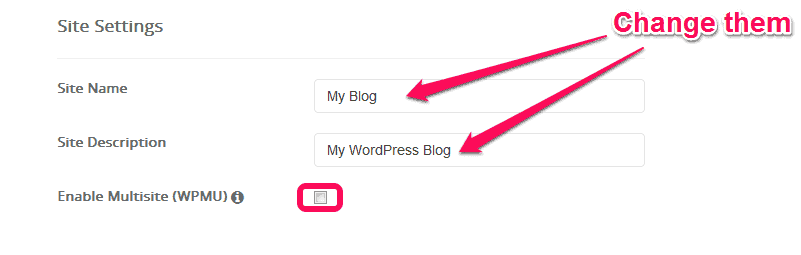
Now, in the Site Settings, name your Blog and write a Site Description (the tagline for your blog). Select WPMU is you are planning to use multiple blogs in the same WordPress installation. If you don’t know what Multisite is, deselect it.
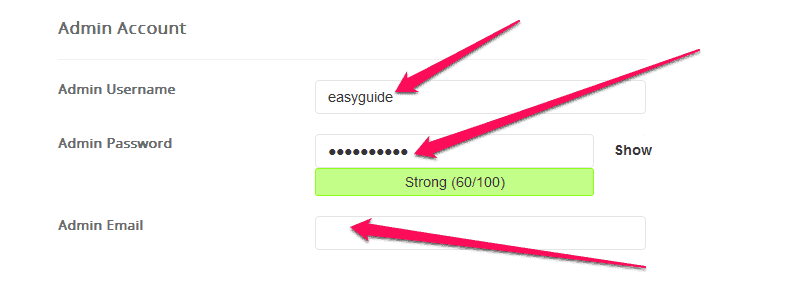
After that, enter username and password for your WordPress. NOTE THEM DOWN SOMEWHERE. You will need it later to customize your blog. And, make sure you enter the email you currently use as an Admin Email.
Now, choose language and click “Install”.
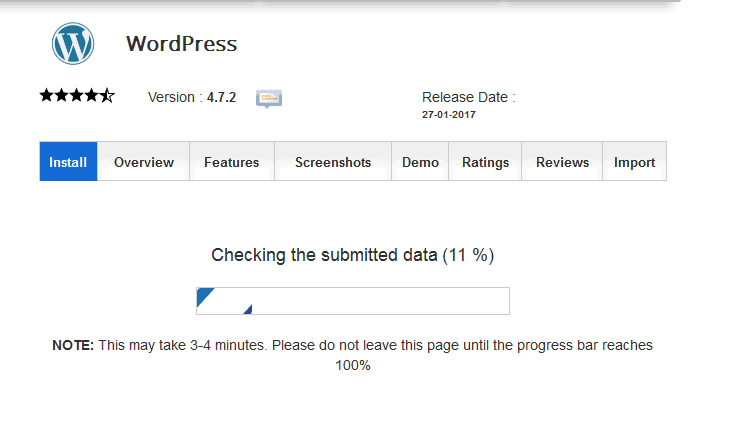
After the installation is complete, you will see a success page with URL to your WordPress admin panel. You will receive the links in your email too.
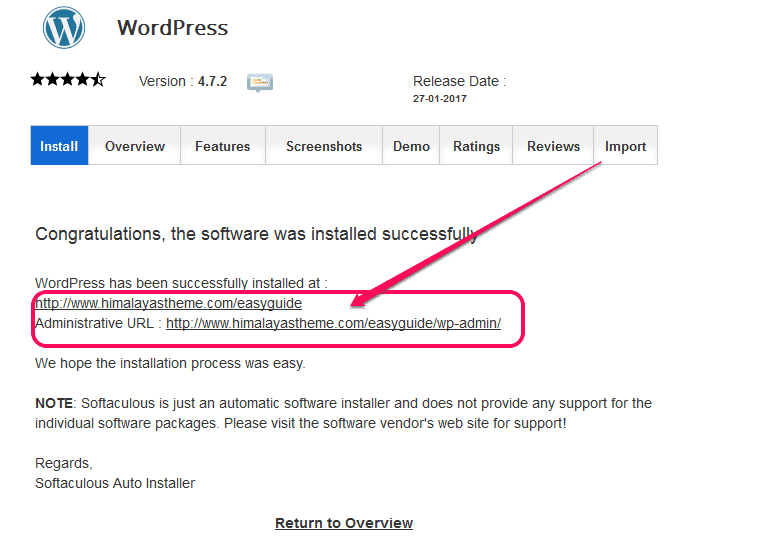
You now have a fully functional WordPress blog. Congrats!
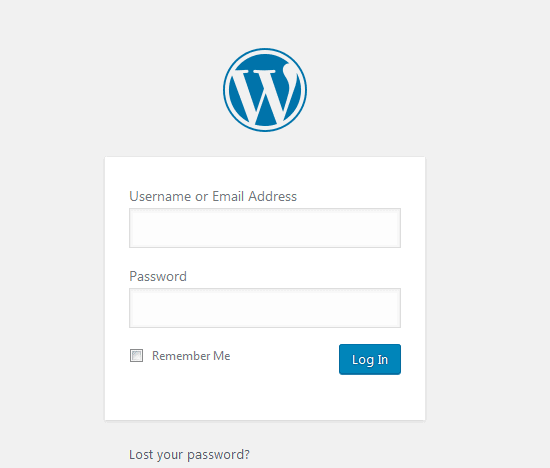
You can now log in to your WordPress and customize it. You can access the WordPress admin panel through http://www.yourblogname.com/wp-admin
Your WordPress login screen will look like this:
STEP 4: Make Your Blog Gorgeous with WordPress Themes
By default, your WordPress blog would look like this:
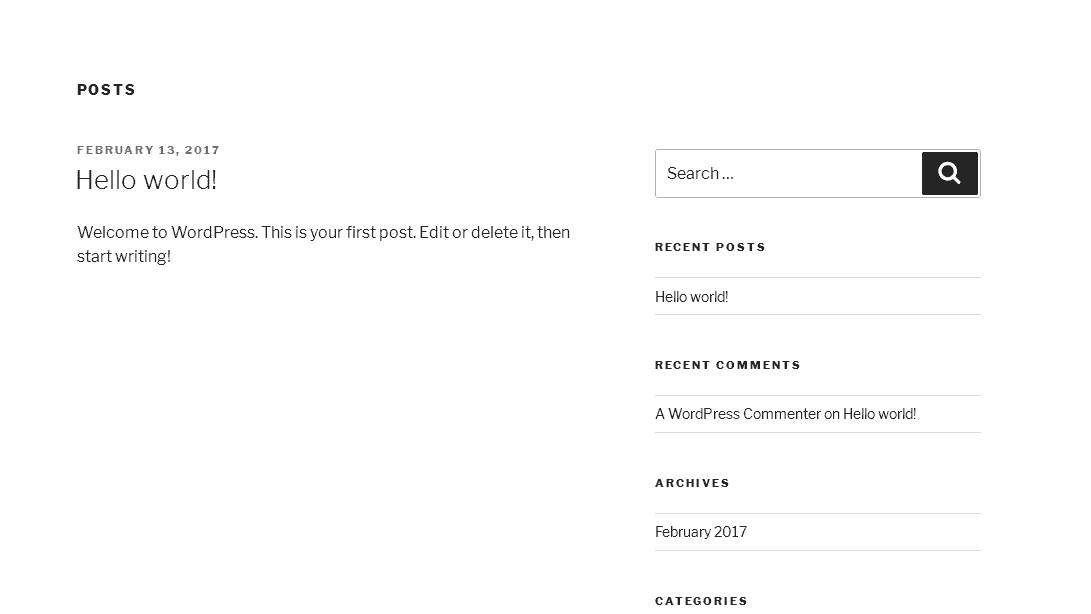
Doesn’t that look awesome?
In WordPress, designs are called themes. You can find many themes, free and premium, on the Internet. And changing the WordPress theme is very easy.
How to change themes on your WordPress Blog.
First, log in to your WordPress (http://www.yourblogname.com/wp-admin).
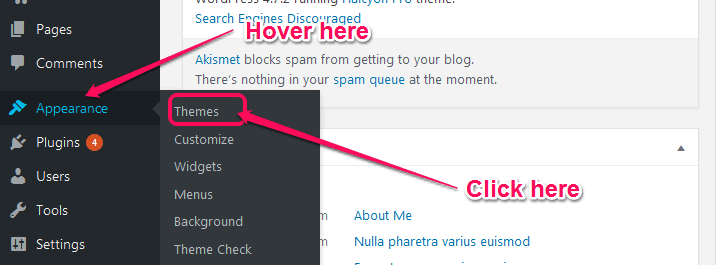
You will see the WordPress Dashboard with lots of menus in the sidebar. Hover over the “Appearance” menu and click “Themes”. The WordPress Dashboard might look unnerving at first, but you will feel right at home with a little practice.
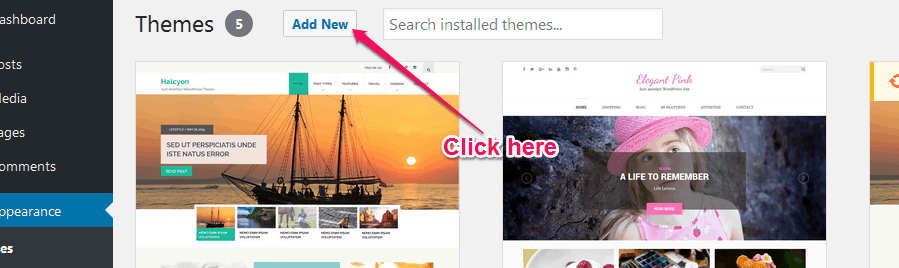
You will see few default WordPress themes. To add a theme, click “Add New” button.
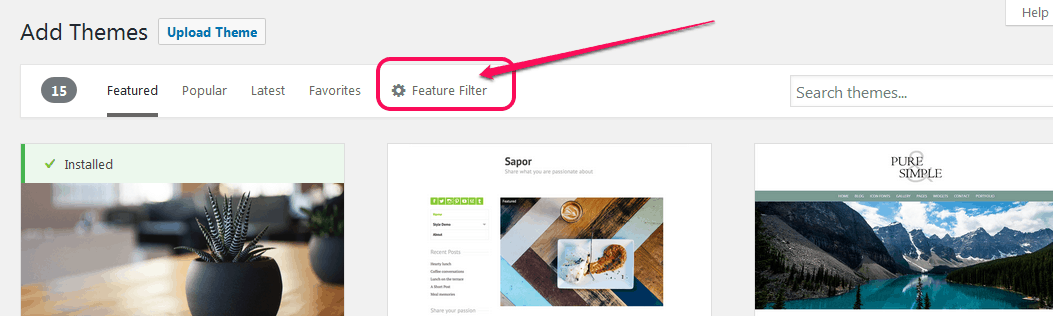
WordPress will show you a list of some great themes. But, if you have special preferences, you can shortlist the themes using “Feature Filter”.
You can select from 3 categories of filters. Select the filters that suit your blog the best, and click on Apply Filters.
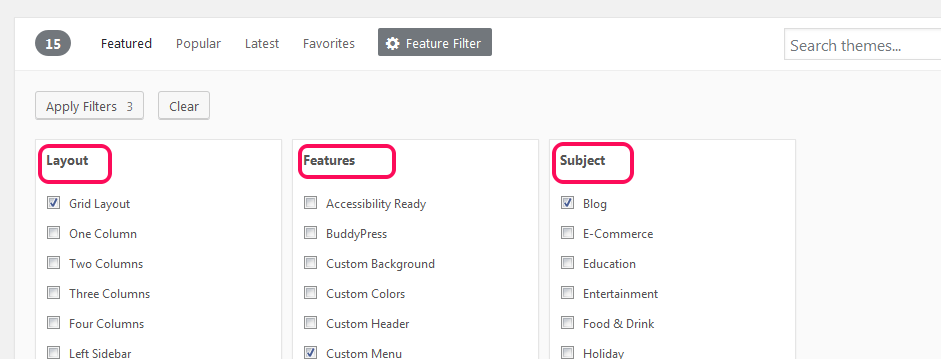
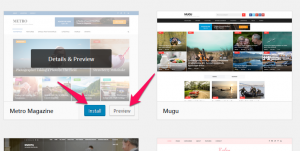
Click on Preview to see the layout of the themes. If you like the preview, click Install to install the theme. You can Install many themes on your WordPress.
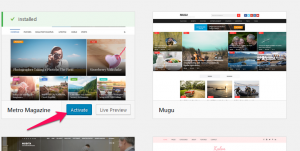
But, to make the theme appear on your blog, you will have to activate it.
All the themes that are listed on Wordpress are free of cost. Go ahead and try them out. But, don’t get carried away. Choose one for now and get started with your blog. You can always change the theme later.
I hope you find an attractive free WordPress theme for your blog.
In case, you didn’t like any of the free themes on WordPress, you can always choose from Premium themes.
Premium themes will cost you money, but if you can spare about $60 for a theme, I would recommend you to get a Premium theme. With a Premium theme, you get responsive customer support. Here are 7 reasons you should buy a premium WordPress theme.
We, Rara Themes, also have some free and premium themes, you can check them out here. The benefit of choosing our theme is that, once you buy a theme, you can use it for free on any number of blogs for a lifetime. You can install and try the free versions of our premium theme before buying.
The best theme, I recommend, for any blog type is Kalon Pro. Kalon Pro is highly customizable and has a beautiful design. Even this blog uses Kalon Pro. Also, here’s a collection of the best blogging WordPress themes for you.
If you do not like our themes, you are free to search for other Premium themes. But, remember, consider the following things before choosing a theme for your blog.
- DESIGN: The color and the design of the theme should be neat, attractive and should match your topic.
- DESIGNER: The theme should be designed by experienced designers, who know what they are doing. There should be a few technical errors. Poorly coded themes will give you headaches later and will also lower your blog’s rank in search engines.
- RESPONSIVENESS: About 56% of Internet users use mobile phones to access the Internet (source). Thus, your theme should be optimized for every type of electronic device – Computer, Mobile, Tablet. You don’t want to miss an audience on any platforms. Search for a Responsive theme.
- SEO Ready: In order to become a successful blogger, your blog should rank higher in search engines like Google for your niche. And, a Search Engine Optimization (SEO) ready theme will help you rank higher in Google Search results. Therefore, you should get SEO ready theme for your blog. To check if a theme is SEO ready, go here and paste the URL of the theme. The theme with few errors is better for SEO.
- SUPPORT FROM DEVELOPER: This applies only to the Premium themes. When you buy a Premium theme, see how responsive the support team is.
Good Luck!
STEP 5: Add Necessary Tools (Recommended WordPress Plugins)
One of the reasons we chose WordPress, in the first place, was because of the ability to easily add Plugins.
WordPress Plugins are tools that make WordPress more functional. They help you manage your posts and blog. Think of them as apps you have on your smartphone.
There are tons of plugins available (free and paid). But, as a beginner, you must add the following Plugins to your blog immediately.
WordPress Plugins every starter should have on their Blog.
1. Akismet
Akismet plugin will help you filter spam comments. Every blogger receives spam comments, well, tons of them. Thus, you need to install Akismet to moderate the comments on your blog post.
2. Yoast SEO
Yoast SEO is a plugin for making your blog rank higher in Google, Bing, Ask and other search engines. This plugin gives your real-time instructions on SEO and writing style so that every article you post is search engine friendly. I will teach you how to use this Plugin later.
Google XML Sitemaps plugin provides the complete XML sitemap of your blog to search engines. Basically, if you install this plugin, search engines can easily navigate on your blog. And, that’s good for your blog.
4. Jetpack
Jetpack plugin is made by WordPress themselves. This plugin will help you manage your blog. And, it will also protect your blog from Brute Force attacks and unauthorized logins.
BackUpWordPress plugin helps you backup your blog. You should always keep a backup of your blog. This plugin allows you to choose a date and schedule the backup.
W3 Total Cache plugin increases the performance of a blog via caching. This plugin caches all the repetitive files. Thus, speeding up the loading time of your blog and saving you hosting bandwidth as well.
7. Social Media and Share Icons (Ultimate Social Media)
Social Media and Share Icons plugin helps you manage social media icons for your blog. They have a great collection of social media icons. As a blogger, you should use social media to promote your blog because social media brings in about 43% of traffic to websites.
Now, go and install these 7 Plugins on your blog right away!
Umm, but how?
First, log in to your WordPress admin panel.
Then, click on “Plugins” menu on the sidebar of your Admin Dashboard.
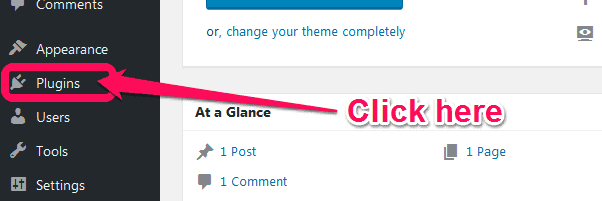
Now, click “Add New” button at the top.

Next, search for the Plugins I listed above in the search bar.
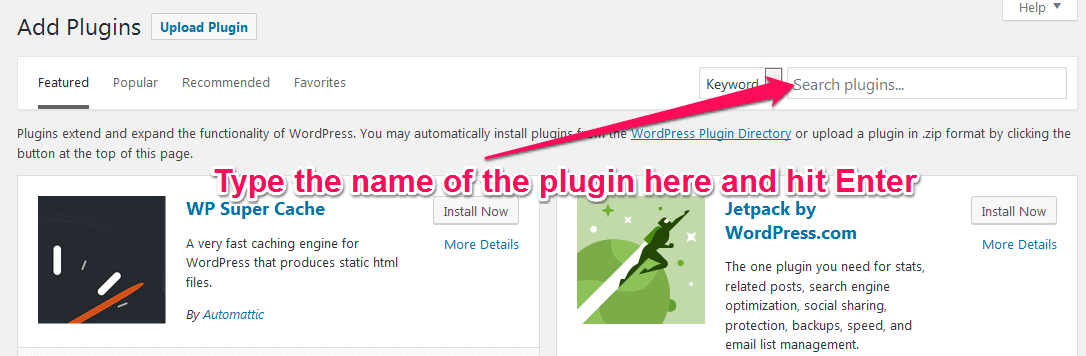
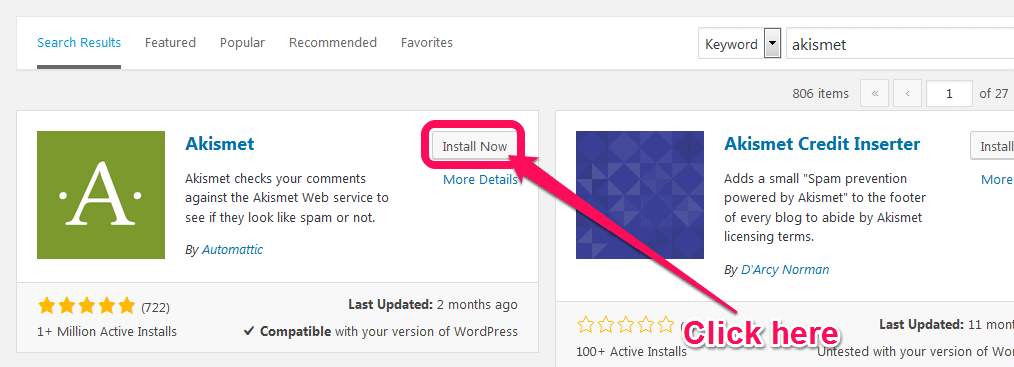
Click on “Install Now” button to install the plugin. I searched for the Akismet plugin and will install it in this guide.
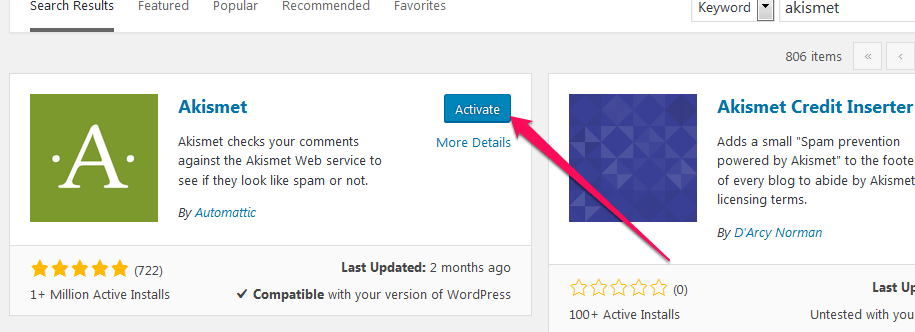
Now, click on “Activate”
Wasn’t that easy?
STEP 6: Optimize your blog for Search Engines (SEO)
I recommended you to get an SEO ready theme earlier. That was just one step towards SEOing your blog.
Search Engine Optimization (SEO) is a complex but extremely important technique to make your blog famous. It is a process of making your blog posts appear higher in search results for specific keywords.
Mastering the SEO takes time and a lot of effort. But, as a starter, you can learn few tricks. Our article about 7 OnPage SEO techniques will give some idea.
Similarly, Moz.com has great SEO guide for beginners. Go through it when you have time.
But, since you have already installed Yoast SEO plugin and an SEO ready theme on your blog, you can read about the SEO tricks later.
For now, let’s optimize your blog with Yoast SEO.
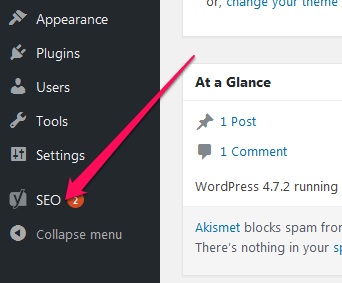
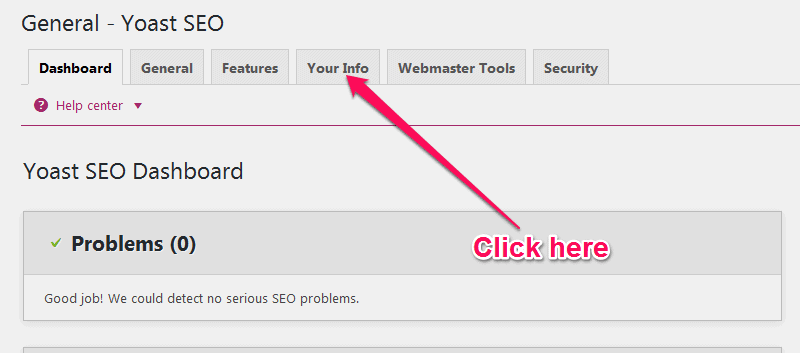
After you install Yoast SEO plugin, you will see a new menu “SEO” in the sidebar of your WordPress Dashboard. Click it.
Now, go to “Your Info” tab.
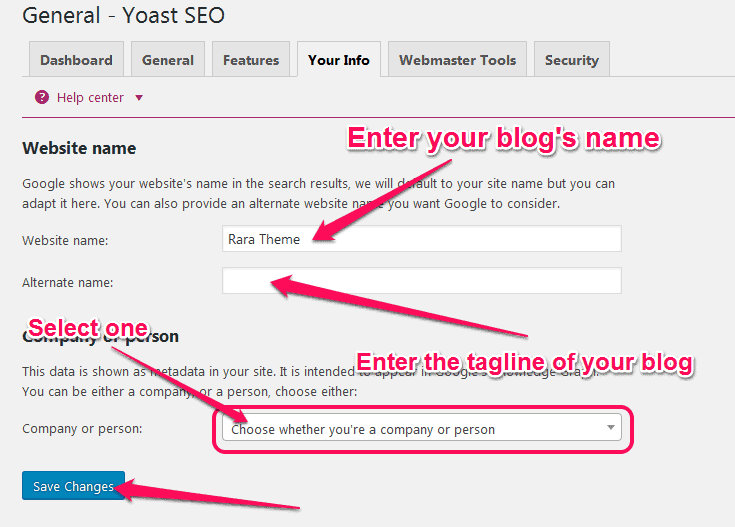
Enter your Blog’s name and the tagline of your blog. Then, select if you are a company or a person. Click “Save Changes” when you are done.
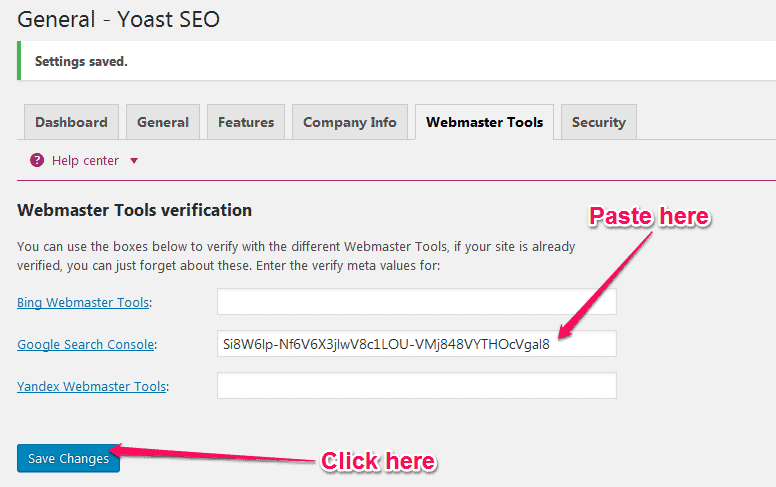
Now, go to “Webmaster Tools” tab. We will enter meta value for Google Search Console.
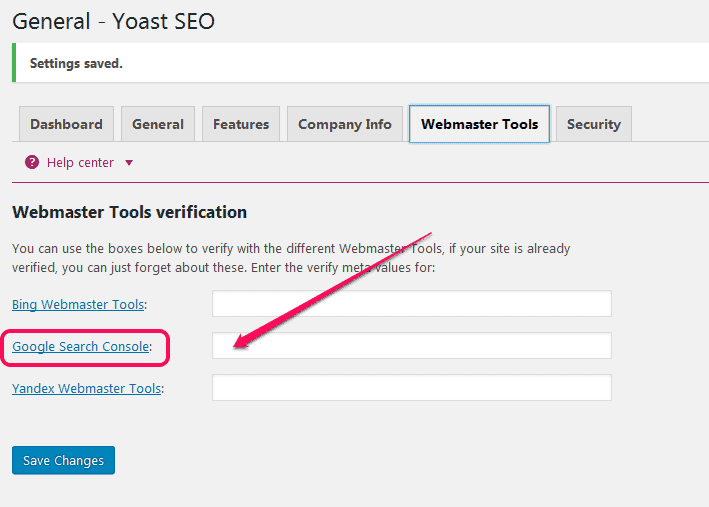
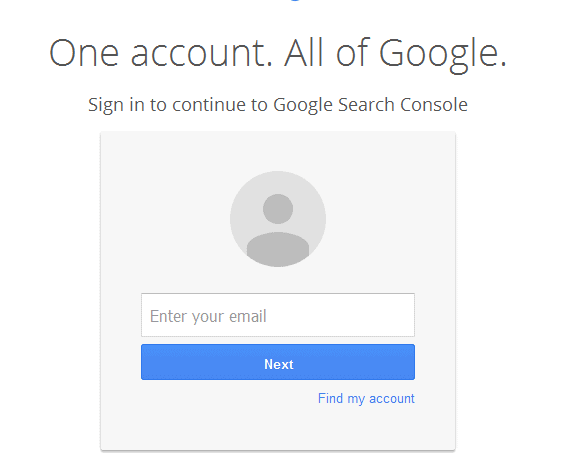
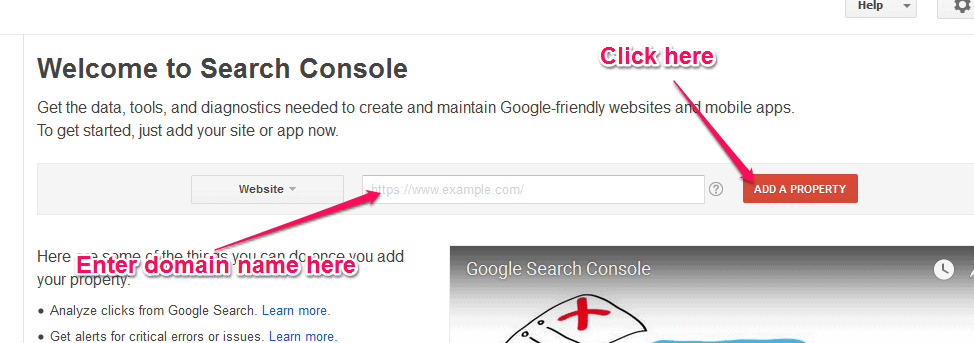
To get the meta value for Google Search Console, go here. Sign in with your Google Account (Gmail). If you are already logged in to your Google account on your browser, you will directly go to Google Search Console’s welcome page.
In the welcome page, type in the domain name of your blog and click “ADD A PROPERTY”.
Now, go to Alternative methods tab and select “HTML tag”.
. 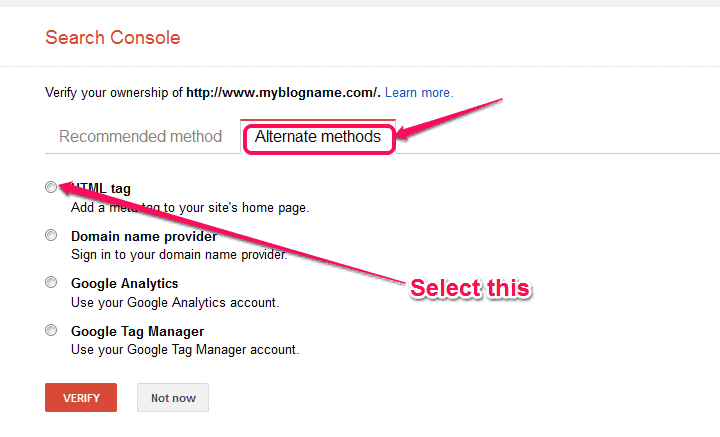
As soon as you select “HTML tag”, you will see your meta tag. Copy the string inside “content=”. Don’t copy the quotation marks.

Now, go back to Yoast SEO and paste the code in Google Search Console. Then, click “Save Changes”.
After you saved the changes in Yoast SEO, go back to Google and click “Verify”.
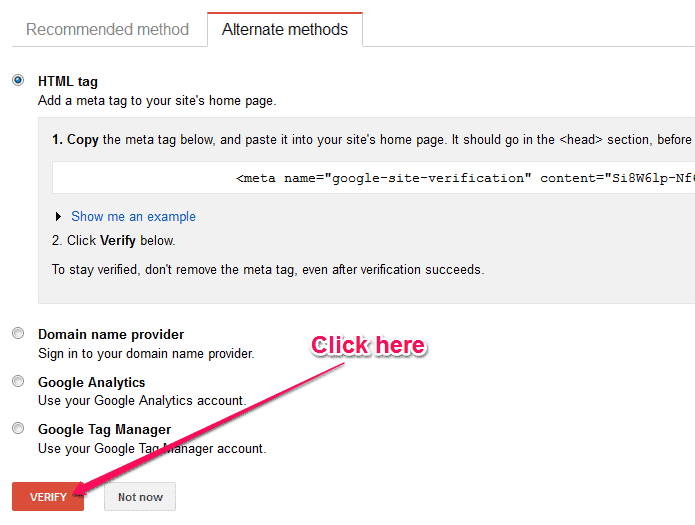
Congrats, you have successfully added Google WebMaster Tools on your blog. With Google WebMaster Tools, you can see the insights of your blog. After we are done with this guide, you can have a look at it. So, note it down somewhere for now.
Let’s continue with our journey of setting up Yoast SEO.
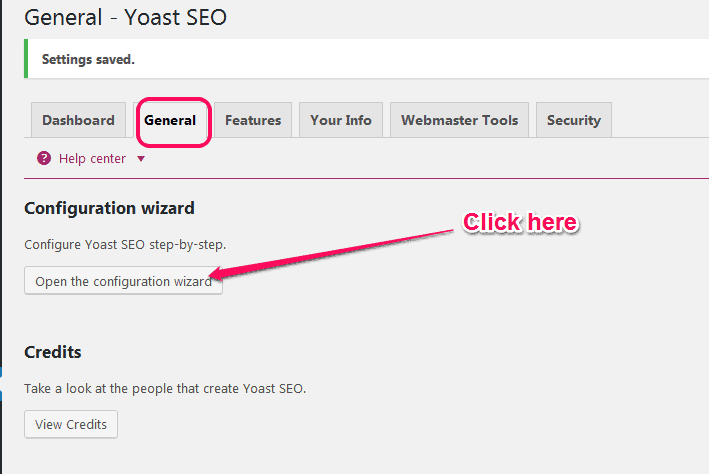
Now, in the Yoast SEO, go to “General” tab and click “Open the configuration wizard”
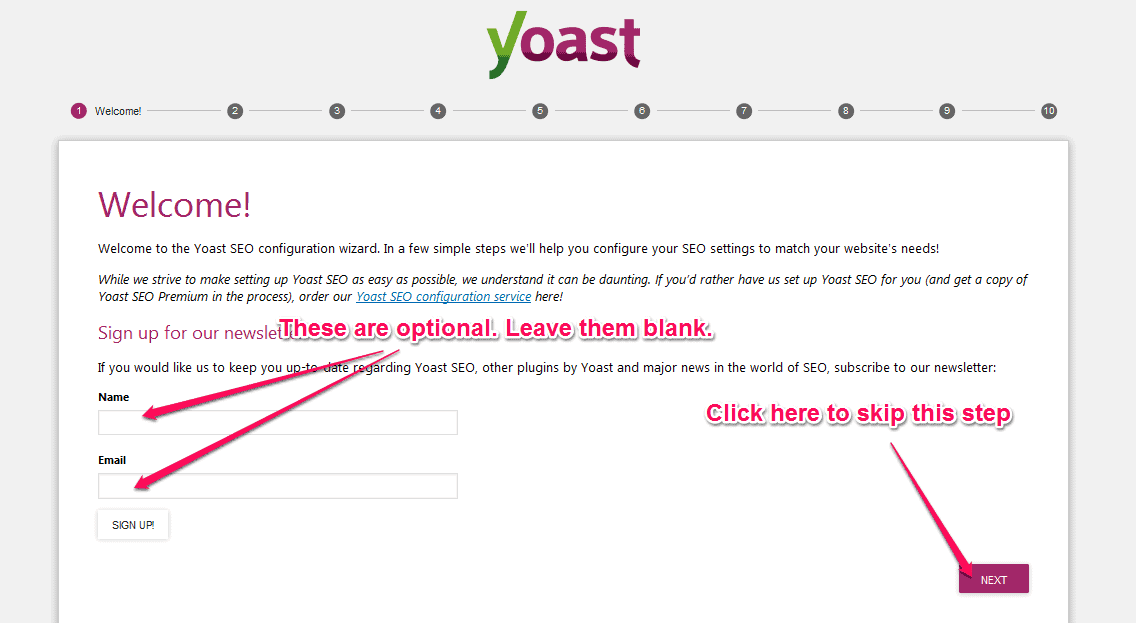
Yoast will take you to a setup wizard. Skip the Welcome step.
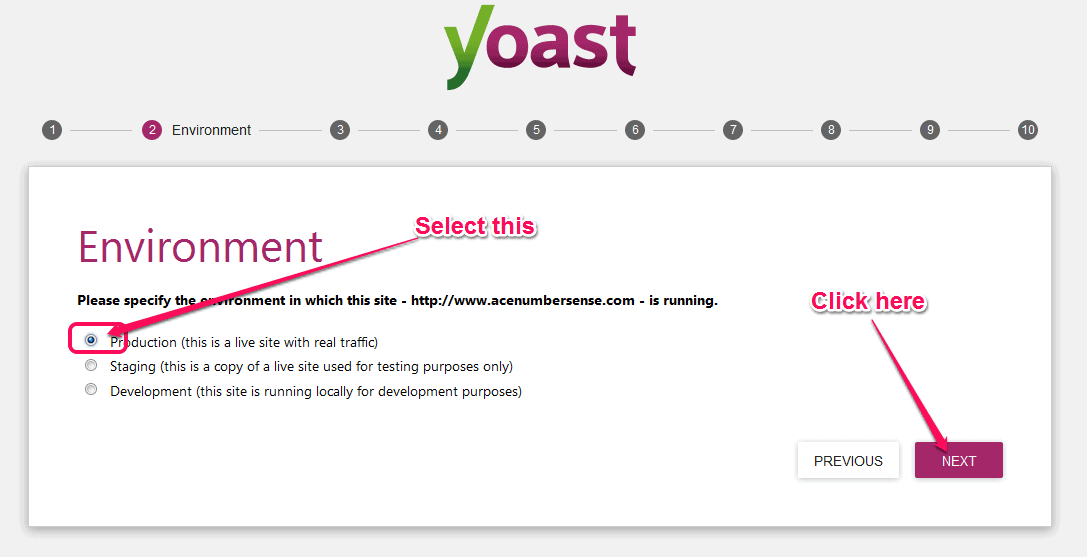
In the next step, select “Production” Environment and click Next.
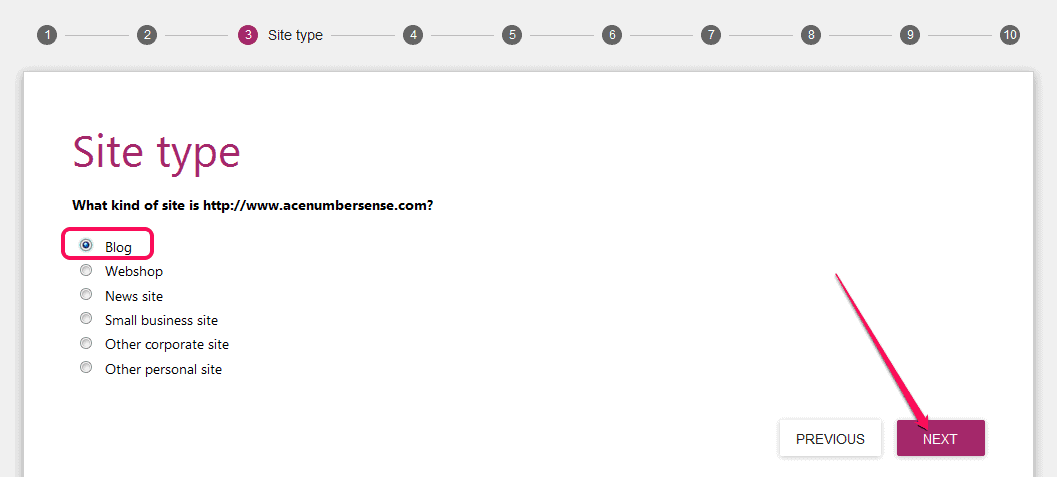
Now, choose Blog and click Next.
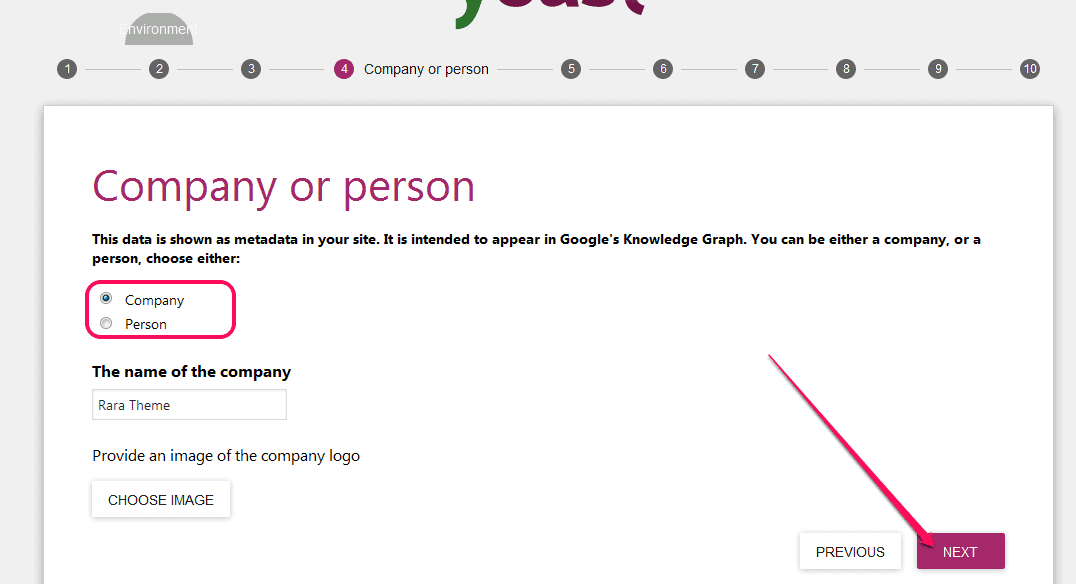
In step 4, if you are a company select “Company”, otherwise select “Person”. Then, click Next.
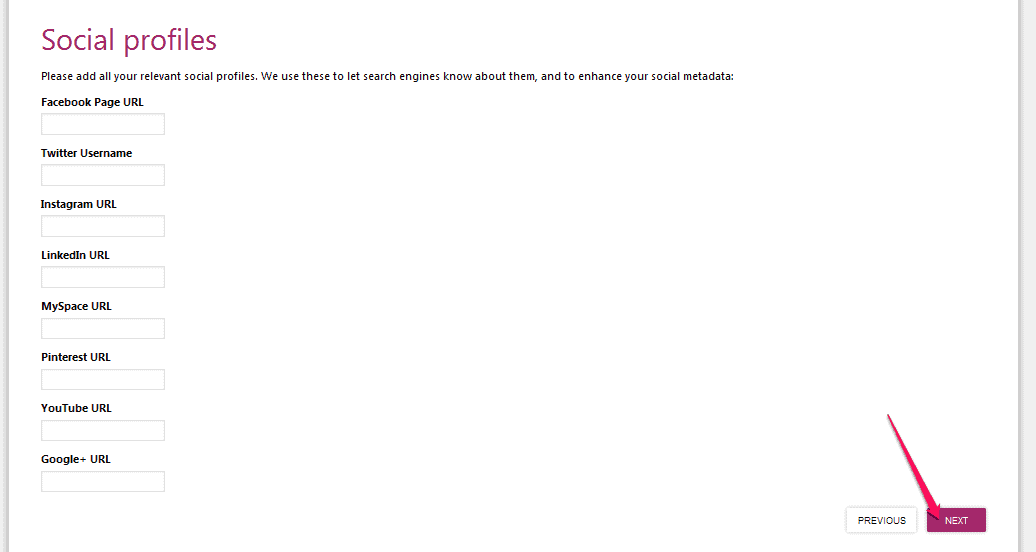
Add social profiles if you have already created social media pages for your blog. If you haven’t, just click Next to skip this step.
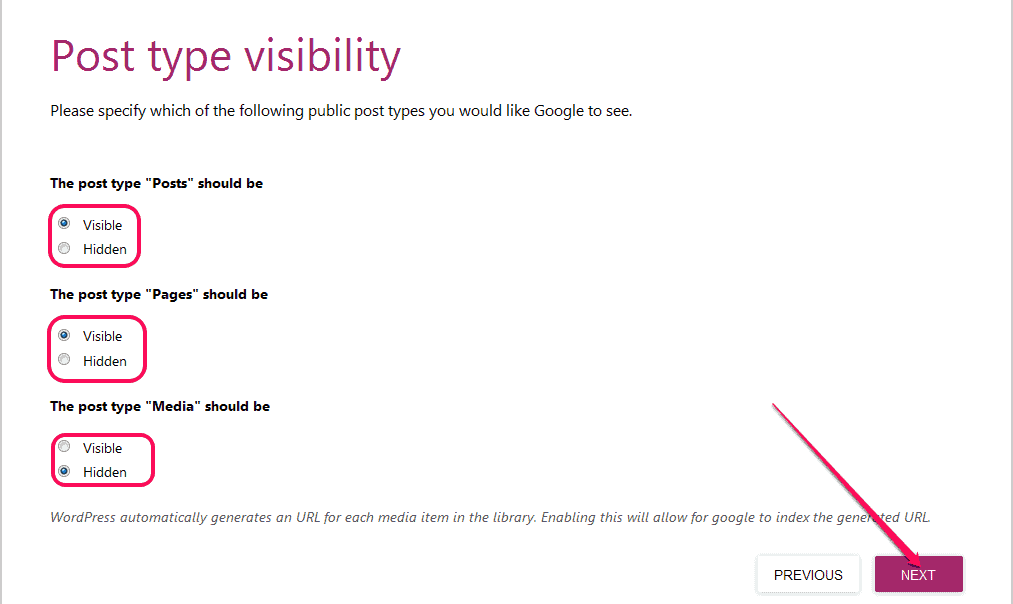
The default setting in step 6 is just fine so click Next.
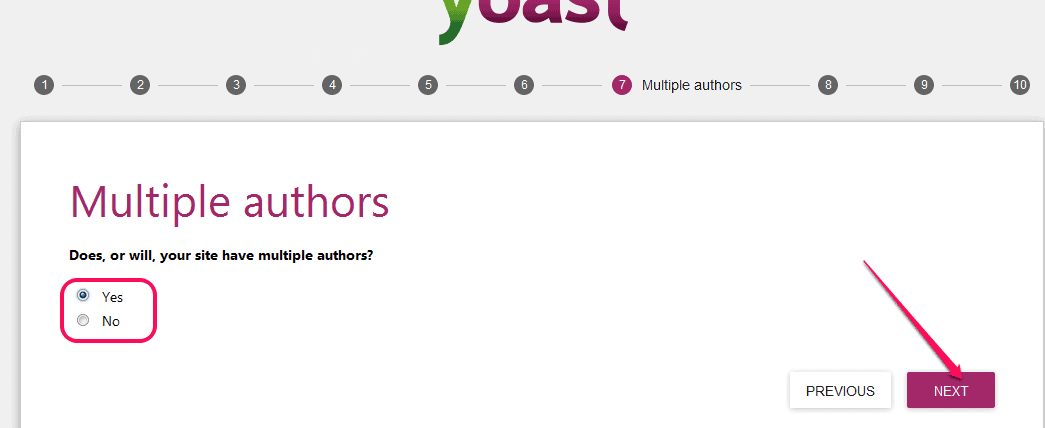
Now, decide if you are a solo blogger or you will have multiple authors on your blog. Don’t worry, you can change the settings later. Click Next to proceed.
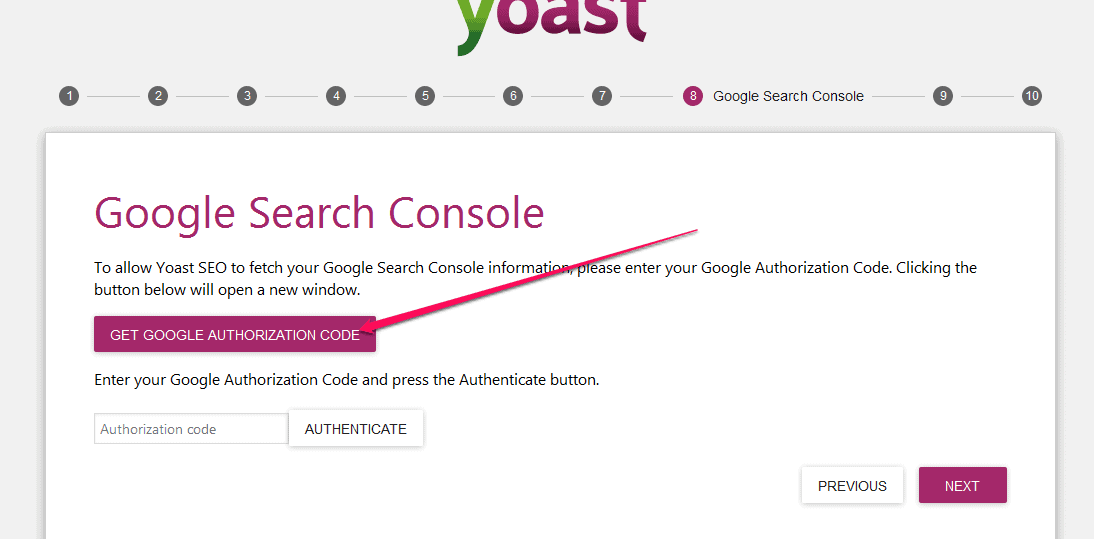
If you want Yoast SEO to bring in data from Google WebMaster Tools (Google Search Console), click on the “Get GOOGLE Authorization Code”. Otherwise, click Next.
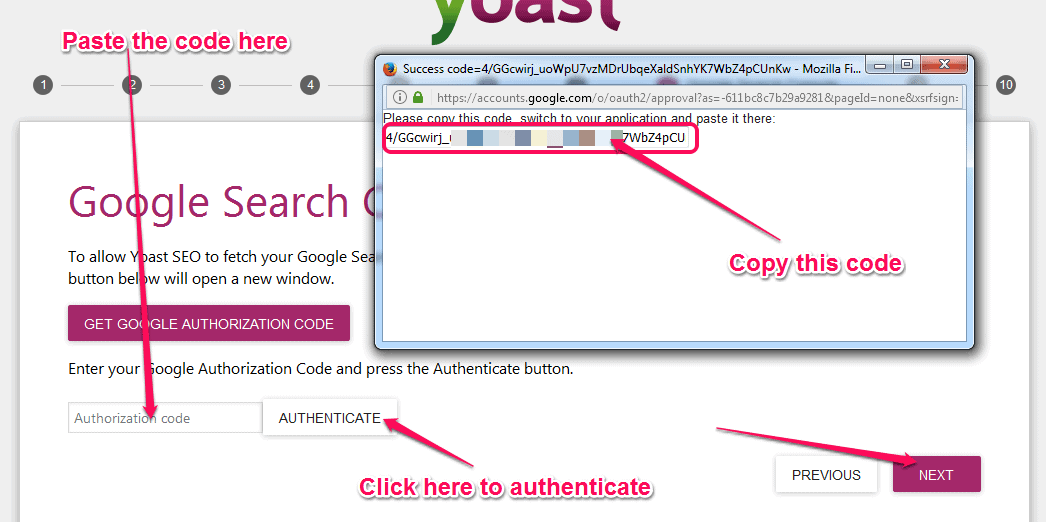
If you decided to import Search Console data to Yoast SEO, you will see a pop-up window asking for your permission. Click Allow.

Now, copy the code from the pop-up window and paste it in Yoast SEO wizard. Click “AUTHENTICATE”. Select your domain name and click next.
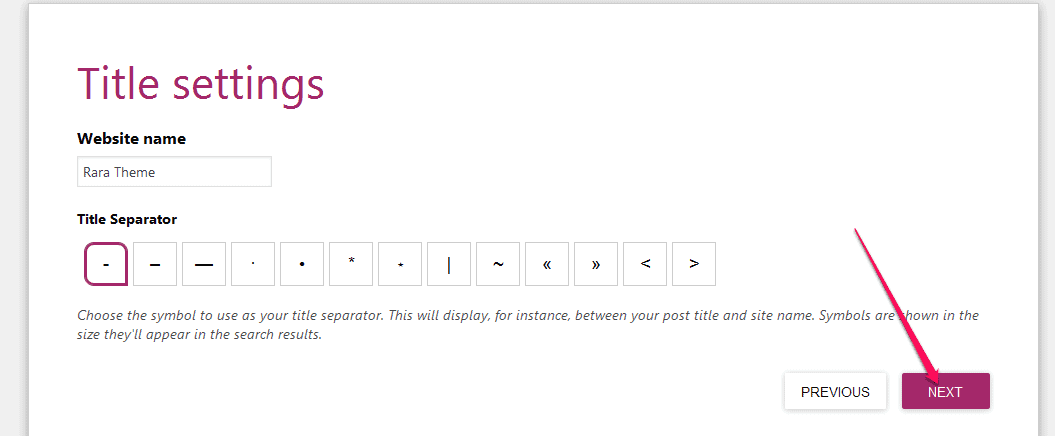
In step 9, select a Title Separator. It is not important. Click Next.
Yoast SEO will show you a Success message in step 10. Click Close.
Congrats! Yoast SEO is now successfully configured on your blog.
Now, there’s one more thing to change before you can post your first article!
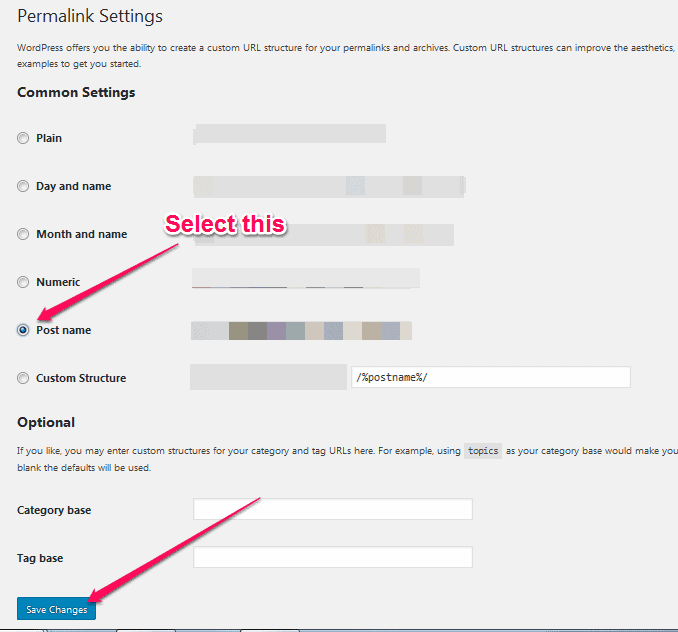
Hover your cursor over “Settings” menu on your WordPress admin panel, and click on “Permalinks”.

Now, in the Common Settings, select Post Name and click “Save Changes”.
(applaud…)
Congratulations! You now have your own fully optimized blog.
What’s next?
Start brainstorming ideas for your articles. Create an Editorial Calendar. Post regularly.
I wish you success!
Happy Blogging.

Have you ever thought about creating an e-book or guest authoring on other websites? I have a blog based on the same topics you discuss and would love to have you share some stories/information. I know my audience would appreciate your work. If you’re even remotely interested, feel free to shoot me an email.|
Thanks for sharing the nice content.